There’s something undeniably comforting about a cheeseburger—but what if I told you there’s a way to enjoy all that juicy, cheesy, beefy goodness without firing up the grill or ending up with a pile of dishes? Enter: Air Fryer Cheeseburger Wraps. These little guys are my newest obsession. They’ve got all the flavor of a classic cheeseburger, but they’re tucked into a tortilla, crisped up in the air fryer, and ready in under 30 minutes. It’s like your favorite drive-thru order met meal prep heaven—and decided to stay for dinner.
I first started making these when my kids were asking for cheeseburgers on a weeknight, and I just wasn’t in the mood to babysit patties over a skillet. I figured I’d try a shortcut with tortillas and the air fryer, and boom—total hit. Now they’re a go-to in our weekly rotation, especially when we need something fast, filling, and fun.
So whether you’re looking for an easy weeknight dinner, something a little different for game day, or a way to get the flavor of a cheeseburger without all the mess, this recipe delivers. Let’s get started with the basics and dive into the first part of the recipe.

Ingredients You’ll Need
Main Components
450 g ground beef (80/20 blend is best for flavor)
Salt, freshly ground black pepper, and garlic powder—to taste
4 large flour tortillas (25 cm)
Fillings & Condiments
4 tablespoons mayonnaise
4 tablespoons ketchup
16 dill pickle slices
4 slices American cheese
Finishing Touch
2 tablespoons unsalted butter, melted
This recipe makes 4 generous wraps—perfect for feeding the whole family or saving one or two for lunch the next day.
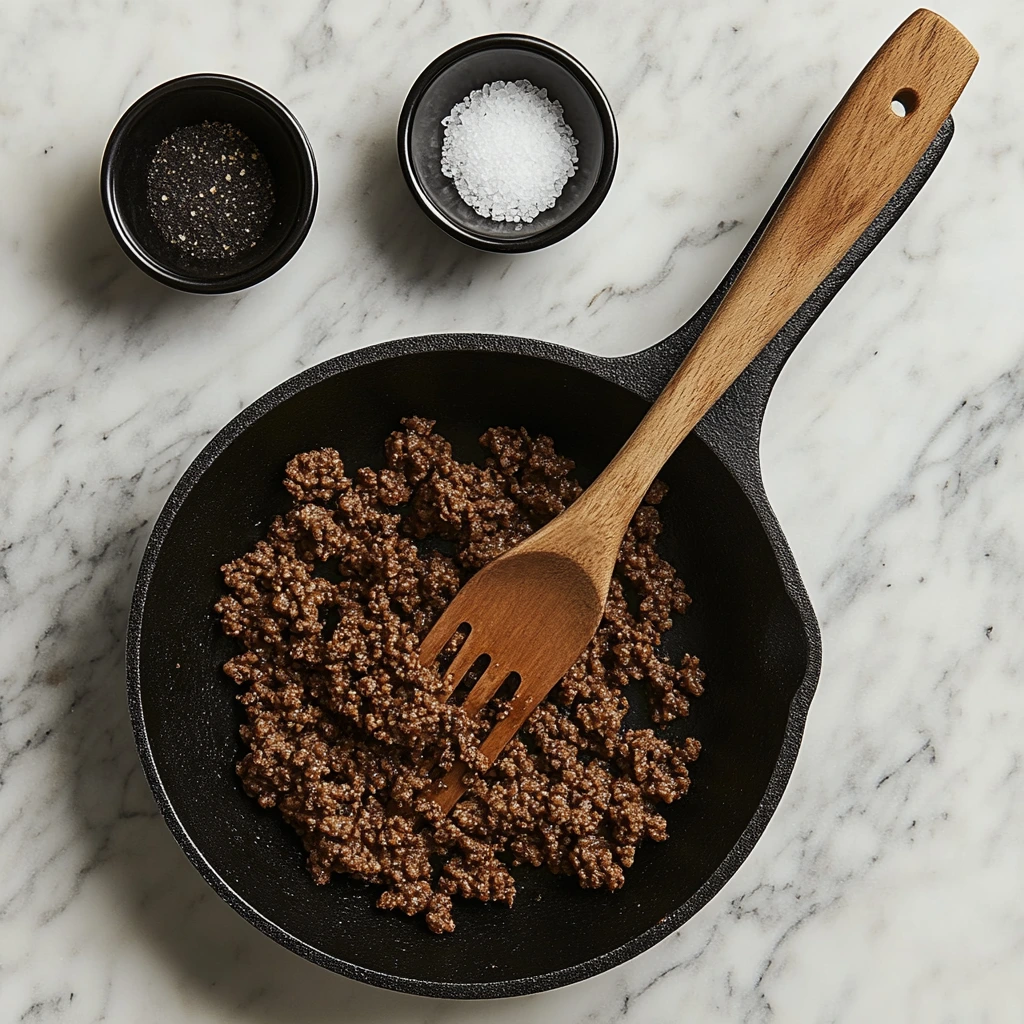
STEP 1: Cook the Ground Beef
Start by heating a large skillet over medium heat. Add your ground beef and begin breaking it apart with a spatula or wooden spoon. As it cooks, season it with salt, freshly ground black pepper, and a little garlic powder (I usually eyeball it, but about ½ teaspoon of each is a good place to start).
Let the beef cook for about 8 to 10 minutes, stirring occasionally, until it’s nicely browned and cooked through. Once it’s done, drain off any excess fat to keep your wraps from getting soggy. Then set the beef aside and let it cool just a bit—you don’t want it piping hot when you roll up your tortillas.
STEP 2: Warm the Tortillas
This step is super important—cold or stiff tortillas are hard to roll and more likely to tear. Stack all four tortillas on a microwave-safe plate, cover them with a damp paper towel, and microwave them for 20 to 25 seconds. This makes them soft, pliable, and ready for all that tasty filling.
STEP 3: Assemble the Wraps
Now comes the fun part—layering up all those delicious burger flavors.
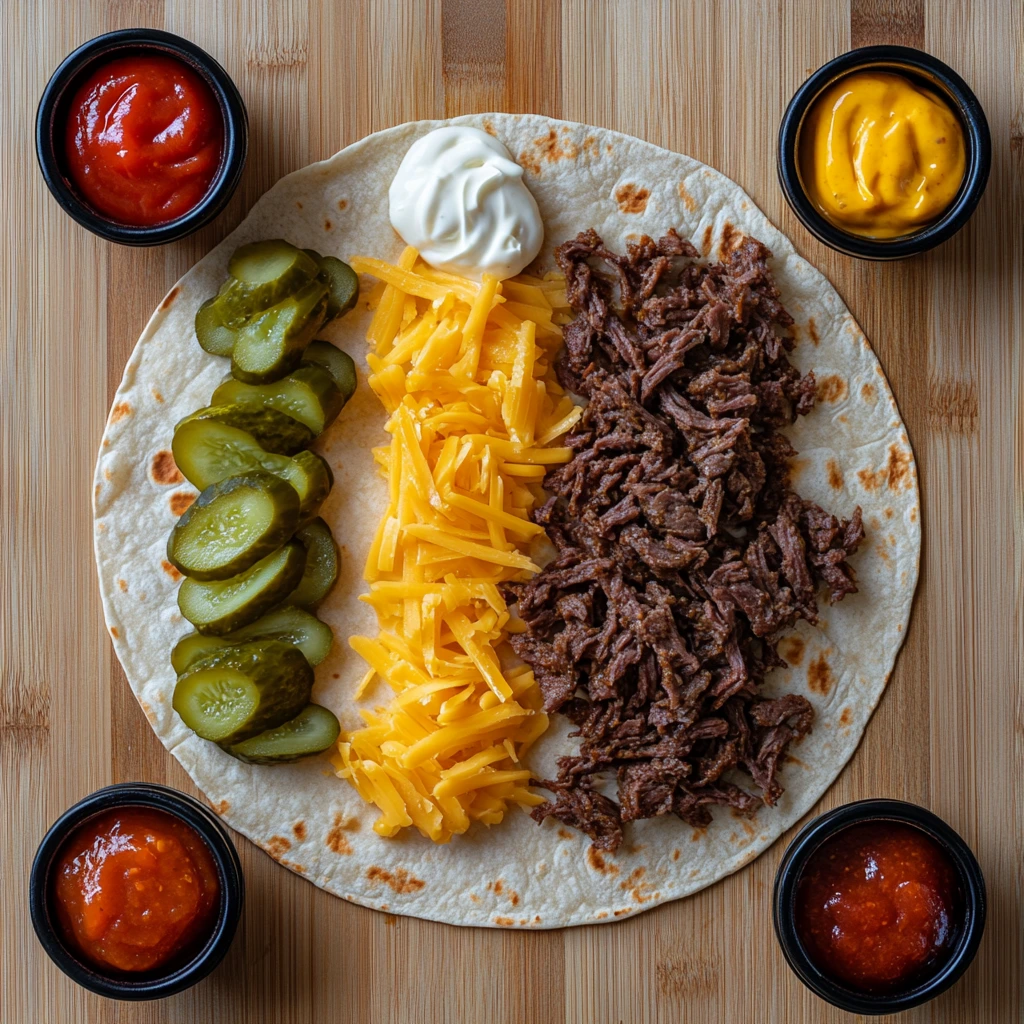
Lay one tortilla flat on a clean surface. Right in the center, spread 1 tablespoon of mayonnaise and 1 tablespoon of ketchup. Try to leave about a 5 cm border around the edges to make folding easier later.
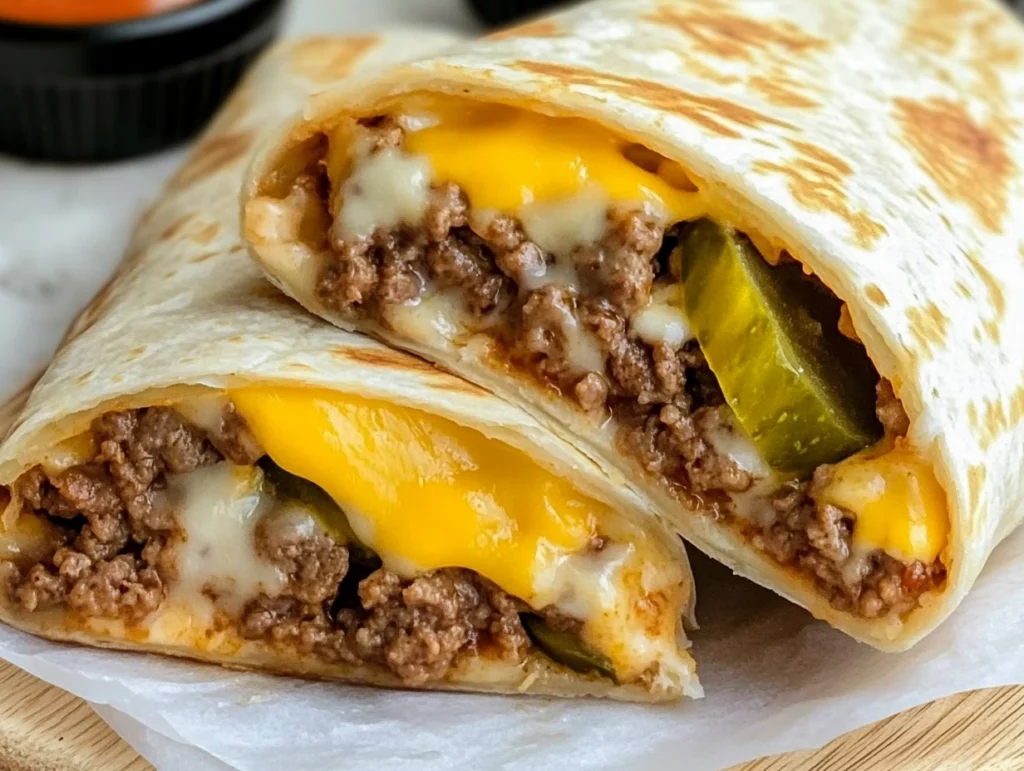
Next, line up 4 pickle slices over the sauces. Place a slice of American cheese on top (you can use cheddar or pepper jack if you want to mix it up), and then spoon about 120 g of the cooked ground beef over everything.
To fold: start by folding the sides inward over the filling. Then, from the bottom edge, roll tightly upward while tucking in the filling as you go. You want a nice, snug wrap here to keep everything together during cooking. Place the wrap seam-side down on a plate and repeat with the remaining tortillas.
Crispy Air Fryer Cheeseburger Wraps That Taste Like a Fast Food Dream
Alright, so your wraps are stuffed and rolled—now comes the magic: that perfect golden crisp that only the air fryer can give you. This step is what takes these from tasty to totally crave-worthy. If you’ve ever wished your cheeseburger had a little more crunch or that it could be eaten one-handed on the go, this is for you. Let’s pick up right where we left off!
STEP 4: Preheat the Air Fryer and Butter the Wraps
Before we get to cooking, go ahead and preheat your air fryer to 193°C (380°F). This will give the wraps a head start and help them crisp up evenly.
While that’s happening, brush the tops of each wrap with a little bit of melted butter. It doesn’t have to be a ton—just enough to give them that gorgeous golden finish and a touch of richness. If you skip the butter, they’ll still be good, but trust me, that buttery crunch is next-level.
STEP 5: Air Fry Until Golden and Crisp
Once your air fryer is preheated, place the wraps seam-side down in the basket. Give them a little space so they’re not crowded—you want the hot air to circulate and crisp them evenly. If your air fryer is on the smaller side, work in batches rather than trying to cram them all in at once.
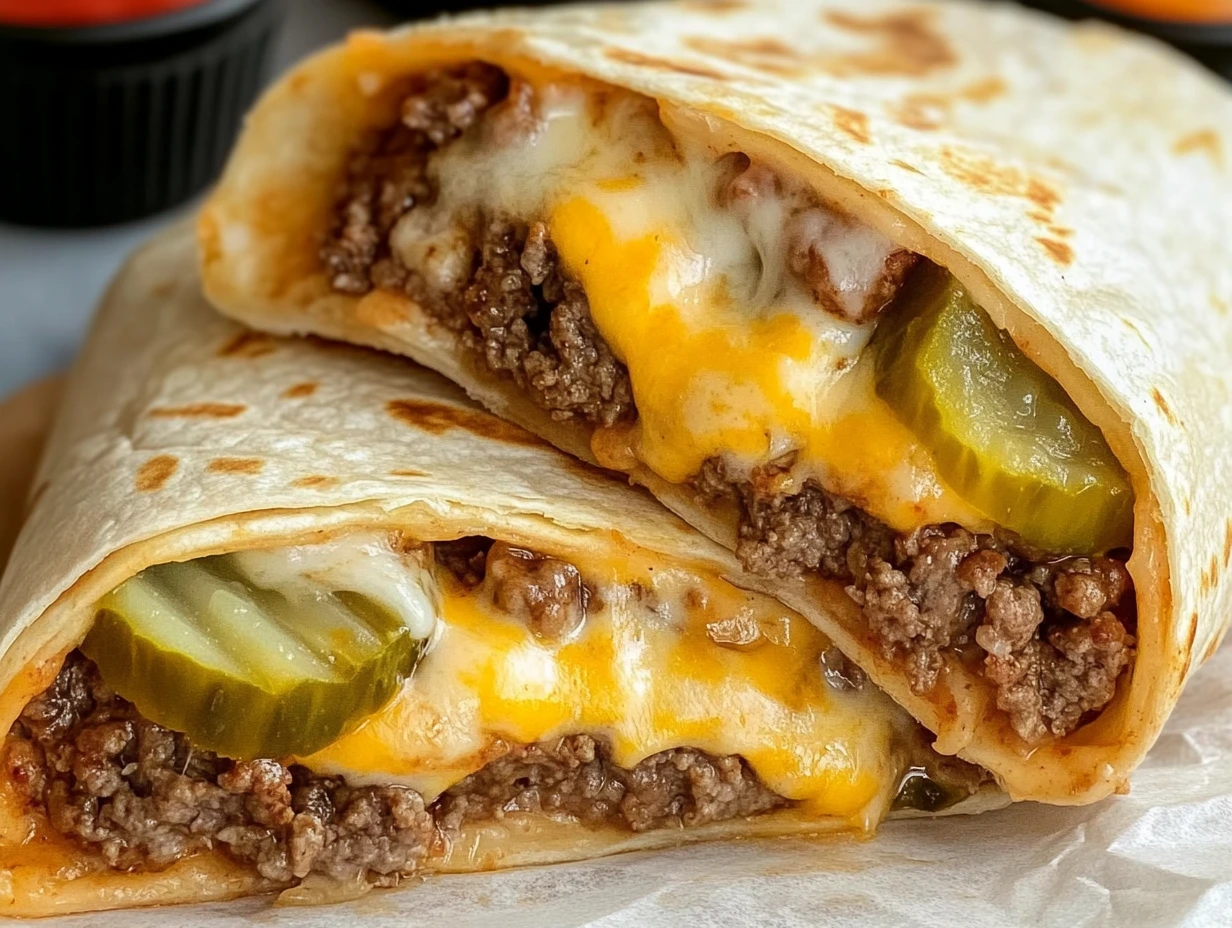
Air fry for about 5 minutes, or until the wraps are golden brown and crispy on the outside. If you want extra crispiness (and who doesn’t?), flip the wraps halfway through. This helps the bottom brown just as nicely as the top.
STEP 6: Finish with a Butter Brush and Let Cool Slightly
When they’re done, carefully remove the wraps from the air fryer—they’ll be hot! While they’re still warm, give them another quick brush of melted butter. It adds a beautiful finish and that fast-food flair we all secretly love.
Let them cool for about 2 minutes before serving. That little pause helps everything settle so they don’t fall apart when you bite in, and it also saves your mouth from molten cheese burns (speaking from experience here!).
Tips & Variations to Make Them Your Own
This recipe is pretty flexible, and I love how easy it is to customize depending on what you have on hand or what you’re in the mood for. Here are a few fun ways to switch things up:
Change the cheese: American cheese is classic, but cheddar, pepper jack, or even provolone will work beautifully. Just pick something that melts well.
Add extra fillings: Want more veggie action? Add a little shredded lettuce or sautéed onions before you roll. Just don’t overfill—if there’s too much inside, the tortilla won’t seal properly, and you’ll lose that tidy, crisp wrap.
Swap the sauces: If you’re not a ketchup-and-mayo fan, try a squirt of burger sauce, mustard, or even a smoky BBQ sauce for a little twist.
Make it spicy: Toss a few jalapeño slices inside or use spicy cheese if you like some heat.
Go low-carb: If you’re cutting back on carbs, you could use low-carb tortillas or even large lettuce leaves (though those won’t go in the air fryer—just eat them as wraps cold).
These are also great for meal prep. Just assemble the wraps and refrigerate them before cooking. When you’re ready to eat, pop one in the air fryer for a quick, crispy, delicious lunch or dinner that tastes freshly made.
Crispy Air Fryer Cheeseburger Wraps That Taste Like a Fast Food Dream
You’ve got the steps down, you’ve brushed those wraps with butter, and now you’re ready to dig in—but if you’re anything like me, a few questions always pop up when trying something new. Whether you’re wondering about storage, reheating, or how to make them ahead for a busy weeknight, I’ve got you covered. Let’s jump into some of the most common questions I’ve gotten about these Air Fryer Cheeseburger Wraps.
Frequently Asked Questions
Can I make these wraps ahead of time?
Absolutely. You can assemble the wraps up to a day in advance and store them in the fridge, tightly wrapped in foil or plastic wrap. When you’re ready to eat, just pop them into the air fryer and cook as directed—maybe add an extra minute or two if they’re coming straight from the fridge.
Can I freeze the wraps?
Yes! These wraps freeze really well. After assembling (but before air frying), wrap each one tightly in foil and place them in a freezer-safe bag. When ready to cook, air fry straight from frozen at 180°C (356°F) for about 10–12 minutes, flipping halfway. Keep an eye on them to avoid over-browning.
What’s the best cheese to use if I don’t have American cheese?
Cheddar is a great option because it melts beautifully and adds that sharp, classic flavor. Pepper jack gives it a spicy twist, and mozzarella adds a more mellow melt. Just make sure the cheese melts well—this isn’t the place for crumbly cheeses like feta.
Can I make these wraps vegetarian?
Definitely. Swap the ground beef for plant-based ground or cooked lentils. Season the same way, and proceed with the rest of the recipe. You can even add sautéed mushrooms or peppers for more flavor and texture.
Why are my wraps splitting open in the air fryer?
If your wraps are splitting, it’s likely because they were overfilled or the tortillas were too cold or dry. Make sure to warm the tortillas before filling, don’t skip the 5 cm border, and avoid adding too much of each ingredient. A tight roll is key.
Do I need to flip the wraps in the air fryer?
It’s optional, but flipping them halfway through helps ensure even crisping on both sides. If you love a super crispy finish, go ahead and flip!
Can I use corn tortillas instead of flour?
I don’t recommend it for this recipe. Corn tortillas tend to crack and break when rolled, especially once filled. Flour tortillas are much more pliable and hold up better during cooking.
Final Thoughts: A Cheeseburger Twist Worth Repeating
These Air Fryer Cheeseburger Wraps are everything I love in a recipe—quick, easy, customizable, and totally family-approved. They’re perfect for those nights when you want something comforting and satisfying without spending a ton of time in the kitchen or creating a big cleanup project afterward.
What I really love is how this recipe brings all the fun of a cheeseburger—melted cheese, pickles, juicy beef, and creamy sauces—into a hand-held wrap that’s crisp on the outside and warm and gooey on the inside. It’s seriously addictive, and once you try it, you’ll be making them again and again.
Print
Air Fryer Cheeseburger Wraps
- Author: Andrew Recipes
Description
These Air Fryer Cheeseburger Wraps are a modern twist on the classic cheeseburger—crispy on the outside and loaded with juicy beef, melted cheese, and tangy pickles on the inside. Wrapped in a tortilla and air-fried until golden, they’re perfect for a quick lunch, dinner, or even game day snack. The air fryer ensures a crispy exterior without deep frying, making them a little lighter but still full of flavor.
Ingredients
Main Components
450 g ground beef (80/20 blend)
Salt, freshly ground black pepper, and garlic powder, to taste
4 large (25 cm) flour tortillas
Fillings & Condiments
4 tablespoons mayonnaise
4 tablespoons ketchup
16 dill pickle slices
4 slices American cheese
Finishing Touch
2 tablespoons unsalted butter, melted
Instructions
1️⃣ Heat a large skillet over medium heat. Add the ground beef, breaking it apart with a spatula. Season with salt, black pepper, and garlic powder. Cook for 8–10 minutes, stirring occasionally, until browned and cooked through. Drain excess fat and set aside to cool slightly.
2️⃣ Stack the tortillas on a microwave-safe plate and cover with a damp paper towel. Microwave for 20–25 seconds until soft and pliable.
3️⃣ Lay one warmed tortilla flat on a clean surface. Spread 1 tablespoon of mayonnaise and 1 tablespoon of ketchup in the center, leaving about a 5 cm border around the edges. Lay 4 pickle slices in a line, add 1 slice of American cheese, and spoon about 120 g of the cooked beef over the top.
4️⃣ Fold the sides of the tortilla inward over the filling. Starting from the bottom, roll tightly while tucking in the filling. Place the wrap seam-side down on a plate. Repeat with remaining tortillas.
5️⃣ Preheat the air fryer to 193°C. Lightly brush the tops of the wraps with melted butter. Arrange them seam-side down in the air fryer basket with space between each. Air fry for 5 minutes, or until golden brown and crisp.
6️⃣ Remove the wraps from the air fryer and brush with additional melted butter while hot. Let them cool for 2 minutes before serving.
Notes
For extra crispiness, flip the wraps halfway through air frying. You can swap American cheese with cheddar or pepper jack for a different flavor profile. These wraps are also great with shredded lettuce or sautéed onions added before rolling, but avoid overfilling to ensure a tight wrap.

