
There’s just something magical about grilled cheese, right? It’s simple, nostalgic, and ridiculously comforting. But what if we took that melty, buttery goodness and gave it a little twist? Let me introduce you to Avocado Grilled Cheese—the creamy, crispy, flavor-packed sandwich you didn’t know you needed until now.
If you’re anything like me, you probably have at least one avocado sitting on the counter right now, just waiting to be used before it goes from perfect to past its prime. This recipe is exactly what that ripe avocado is destined for. The combo of buttery bread, gooey cheese, and smooth, seasoned avocado makes this sandwich feel elevated while still keeping the comfort-food charm of the classic grilled cheese.
I started making this version when I wanted something a little more satisfying than just cheese and bread. I tossed in an avocado that needed using, added a few spices, and boom—this sandwich quickly became one of my favorite easy lunches. Now I whip it up at least once a week (okay, maybe twice).
This sandwich is ideal for a quick lunch, a cozy solo dinner, or even a fun meal-for-one on a lazy weekend. It’s vegetarian, adaptable, and hits the spot every time. Plus, you can customize it with your favorite add-ins or keep it classic—it’s totally up to you.
Let’s get into the details!

Ingredients You’ll Need
2 slices of bread (sourdough, whole grain, or your favorite kind)
1 ripe avocado
½ teaspoon lemon juice
Salt and black pepper, to taste
½ teaspoon garlic powder
2–3 slices of cheese (cheddar, mozzarella, or Monterey Jack all work beautifully)
1 tablespoon softened butter
STEP 1: Mash the Avocado Mixture
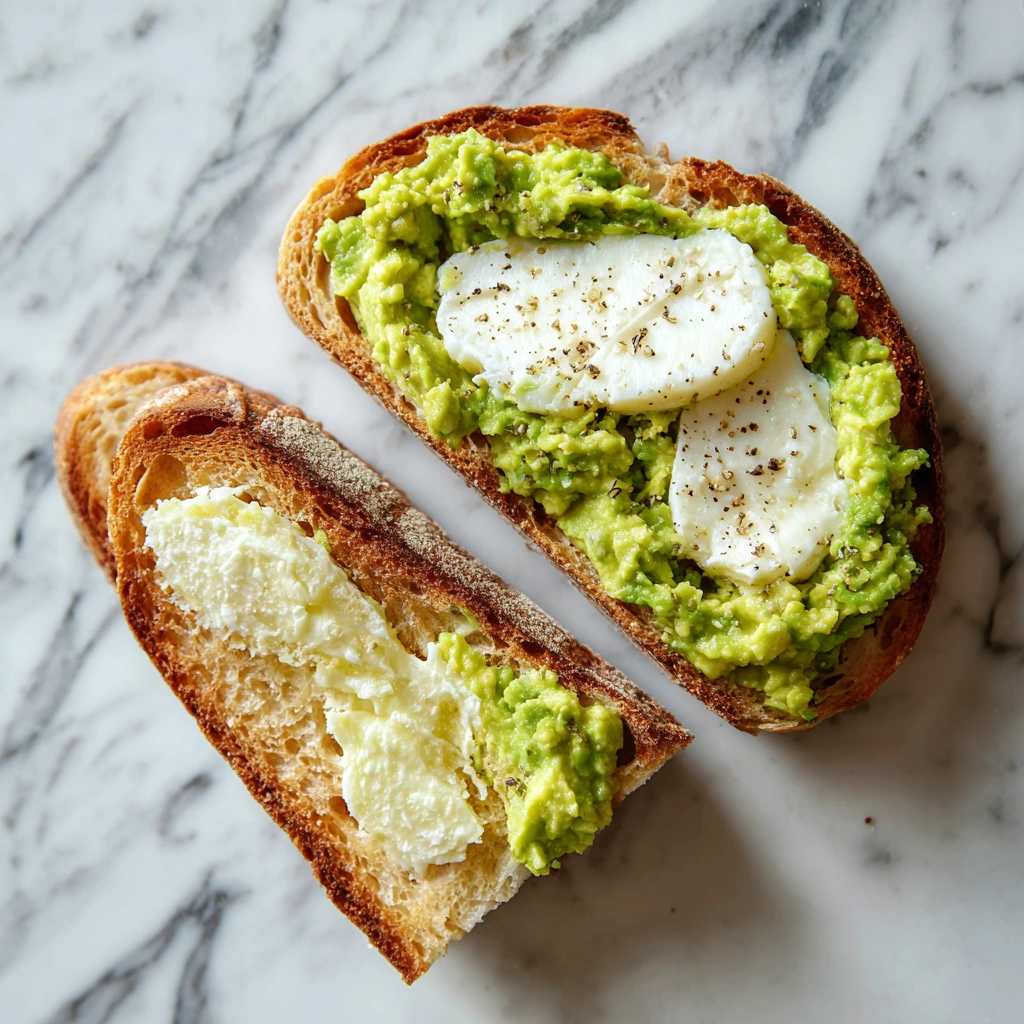
In a small bowl, mash up your ripe avocado. Add the lemon juice, garlic powder, and a little salt and pepper. Stir until it’s nice and smooth. The lemon juice doesn’t just add a bright pop of flavor—it also helps keep the avocado from turning brown. The garlic powder brings a savory touch that complements the cheese perfectly. Taste it and adjust the seasoning if needed.
Pro Tip: If your avocado isn’t quite soft enough to mash easily, try slicing it thin and layering it in the sandwich instead. Still delicious.
STEP 2: Prep the Bread and Build the Sandwich
Butter one side of each slice of bread. This is going to give us that irresistible golden crust once it hits the skillet.
Now flip the slices over so the buttered side is facing down. On one slice (the unbuttered side), spread a generous layer of your avocado mixture. Then pile on your cheese slices—go with cheddar for that classic sharp melt, mozzarella for stretch, or Monterey Jack for a creamy vibe. Top it with the second slice of bread, buttered side facing out.
If you’re feeling fancy, this is also the time to sneak in a few extras like tomato slices, cooked bacon, or even a handful of baby spinach. But it’s totally optional—the base version is already amazing.

STEP 3: Toast to Perfection
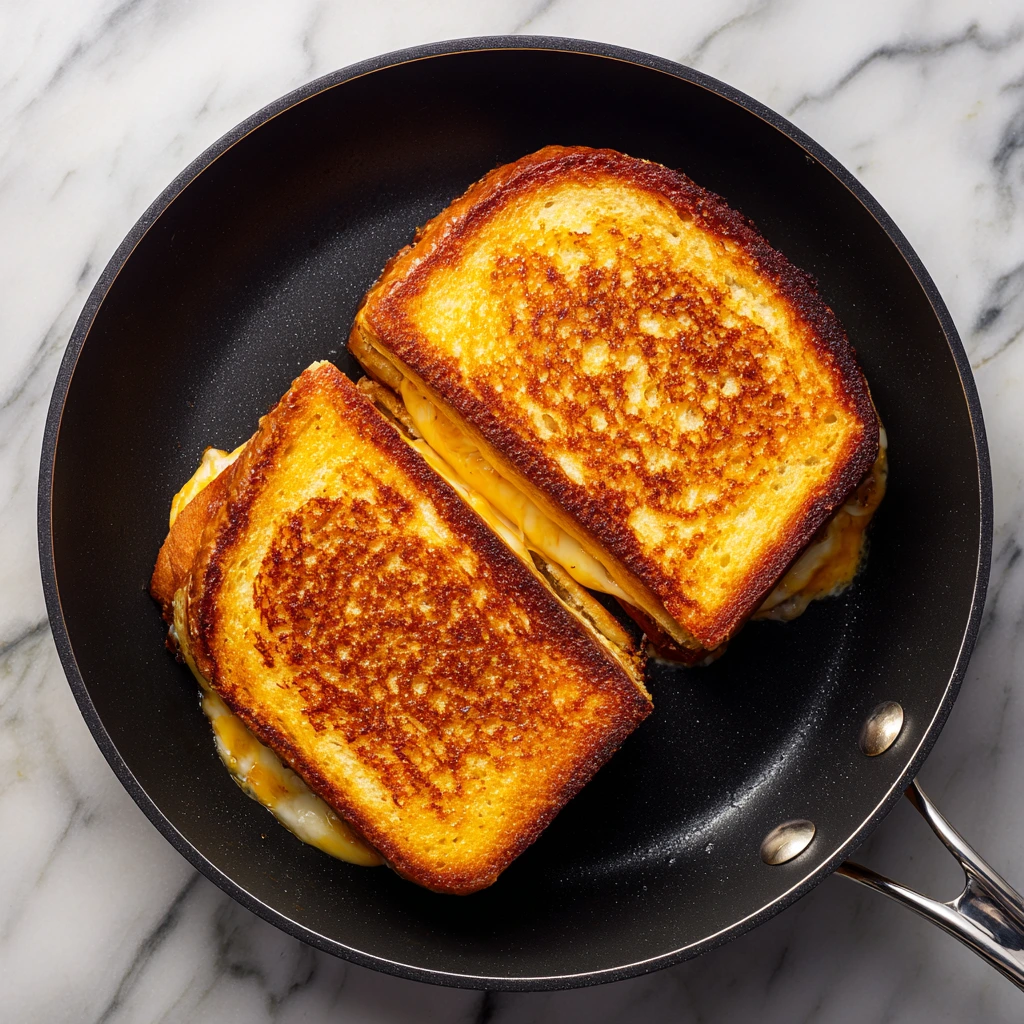
Grab your favorite skillet and heat it over medium heat. Once it’s hot, gently place your sandwich in the pan. Press it down slightly with a spatula to help everything melt together nicely.
Cook it for about 3 to 4 minutes on each side. You want that bread to be deeply golden brown and the cheese to be completely melted and gooey. Keep an eye on the heat—medium is key here. Too high and the bread will burn before the cheese gets a chance to melt.
Once both sides are beautifully crisped and the inside is all melty and creamy, remove it from the skillet.
Take Your Avocado Grilled Cheese to the Next Level
Alright, now that we’ve built the perfect base sandwich and toasted it to golden perfection, it’s time to talk about how to really make this Avocado Grilled Cheese your own. One of the things I love most about this recipe is how flexible it is. Whether you want something quick and comforting or a little more elevated, this sandwich is up for it.
In this part, I’ll walk you through a few extra steps and give you some simple add-ins and variations that make this sandwich feel brand new every time you make it. Plus, I’ll share one of my absolute favorite tricks for getting that irresistible crispy cheese crust on the outside of the bread. Trust me—it’s a game-changer.
STEP 4: Optional Add-Ins That Add Big Flavor
You’ve already got the creamy avocado, melty cheese, and buttery toast combo going on, but if you’re feeling like going the extra mile, here are a few of my go-to add-ins:
Tomato Slices: Thin, juicy tomato slices tucked in before grilling give the sandwich a fresh, tangy bite. If your tomatoes are extra juicy, blot them with a paper towel first to avoid a soggy sandwich.
Cooked Bacon: Crispy bacon adds smoky flavor and crunch. It’s especially good if you’re using mozzarella or Monterey Jack.
Sautéed Spinach or Kale: A handful of greens lightly sautéed with a little garlic makes this sandwich feel extra nourishing.
Red Onion or Pickled Onions: For a little zing and crunch.
Just be careful not to overload your sandwich—too many fillings can make it hard to get that perfect crispy crust and melty interior. Stick with one or two extras, max.
STEP 5: Try the Crispy Cheese Skillet Hack
Here’s a little secret I love to use when I want to make my grilled cheese extra special: sprinkle a small handful of shredded cheese directly onto the hot skillet before adding the sandwich. Then gently press the sandwich down into the melting cheese.
What happens next is magic—the cheese crisps up on the outside of the bread and forms this amazing golden crust that adds a whole new level of flavor and texture. It also gives your sandwich a little bit of that fried cheese edge that people can’t get enough of.
Let it sit for a minute or so until the cheese has browned and crisped up, then flip and toast the other side as usual.
STEP 6: Slice and Serve While It’s Hot
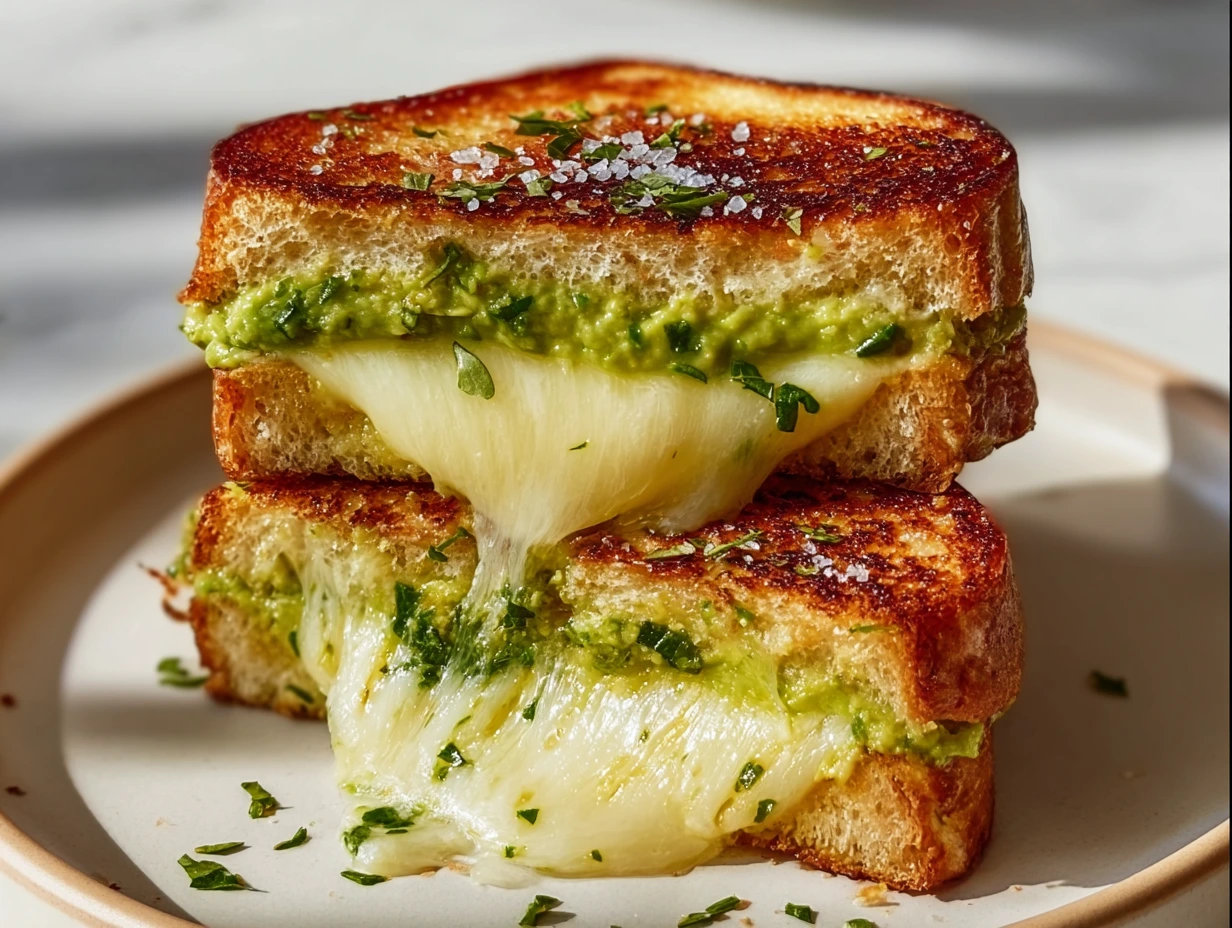
Once your sandwich is perfectly toasted and golden on both sides and the cheese is melted through, take it off the skillet and place it on a cutting board. Let it sit for about 30 seconds (just to avoid molten lava cheese burns), then slice it in half.
Serve it right away, while everything is warm, melty, and crisp.
You can absolutely enjoy it on its own, but here are a few pairing ideas that make it a full meal:
A bowl of classic tomato soup (this pairing never fails)
A side of crisp salad with lemon vinaigrette
Some fresh fruit or a handful of kettle chips for a fun lunch plate
Tips for the Best Avocado Grilled Cheese Every Time
Choose the right bread: Sourdough gives you that tang and holds up well to grilling. Whole grain is great if you’re looking for something heartier. Avoid super soft bread—it can get soggy fast.
Use ripe, but not overripe avocados: They should be slightly soft when you press them gently but not mushy or brown inside.
Don’t skip seasoning the avocado: That little bit of lemon juice, garlic powder, salt, and pepper makes a big difference. You want the avocado to bring more than just texture—it should add flavor too.
Medium heat is key: Cooking the sandwich too fast on high heat will brown the bread before the cheese has a chance to melt. Medium gives you that golden crust and warm center.
Be patient: Let the sandwich sit in the skillet long enough to get really golden. Don’t rush the flip!
Avocado Grilled Cheese FAQs & Final Thoughts
By now, you’re probably already craving this creamy, crispy, totally satisfying Avocado Grilled Cheese—and I don’t blame you. It’s one of those easy meals that checks every box: quick to make, full of flavor, and endlessly customizable. But before you grab your skillet and get cooking, let’s go over a few commonly asked questions that come up around this recipe. Whether you’re planning ahead, cooking for someone with dietary restrictions, or just want to make sure your sandwich turns out just right, these answers should help.
Frequently Asked Questions
1. Can I make this sandwich vegan?
Yes, absolutely! Just use your favorite plant-based cheese (there are some great meltable options out there) and vegan butter. Make sure your bread is dairy-free, too—most are, but it never hurts to double-check.
2. What’s the best bread to use for this recipe?
Sourdough is my personal favorite for its sturdiness and flavor, but whole grain, multigrain, or even a good rustic white bread all work well. Just avoid very soft sandwich breads, as they tend to get soggy with the avocado spread.
3. Can I make this ahead of time?
Grilled cheese is best enjoyed fresh off the skillet when the cheese is melty and the bread is crisp. That said, you can prep the avocado mixture ahead and store it in the fridge (add a little extra lemon juice to help keep it green). When you’re ready to eat, just build and toast your sandwich.
4. How do I store leftovers?
If you happen to have leftovers (rare, but it happens!), wrap the sandwich in foil and store it in the fridge for up to one day. Reheat it in a skillet over medium heat for a few minutes on each side to restore some of that crisp texture. Microwaving is not recommended—it tends to make the bread soggy.
5. Can I use shredded cheese instead of slices?
Definitely. Shredded cheese works just as well and melts quickly. You can even mix cheese types—like mozzarella and cheddar—for a great blend of flavor and texture.
6. What can I serve with this grilled cheese?
Tomato soup is the classic choice and for good reason—it’s the perfect match for a cheesy, crispy sandwich. But a fresh green salad, roasted veggies, or even a cup of fruit work really well too.
7. How do I know when the sandwich is done?
You’ll know it’s ready when both sides are golden brown and the cheese has melted all the way through. If you press gently with a spatula and see cheese oozing out the sides, you’re in business.
Final Thoughts: Why You’ll Keep Coming Back to This Recipe
Avocado Grilled Cheese might just become your new favorite comfort food. It’s warm, filling, and has that perfect balance of creamy and crispy. Plus, it’s simple enough to make on a busy weekday but special enough to serve when you’re having a cozy weekend lunch with someone you love.
I love how adaptable this recipe is—whether you’re adding tomatoes from your garden, sneaking in some greens, or sticking to the basics, it always delivers. And with just a handful of pantry and fridge staples, you can whip it up whenever that grilled cheese craving hits.
So the next time you find yourself with a ripe avocado and some cheese in the fridge, you know exactly what to do. Give it a try, and don’t be surprised if it becomes a regular in your meal rotation.
If you end up making this sandwich (or put your own twist on it!), I’d love to hear how it turned out. Leave a comment, share your favorite add-ins, or tell me what you paired it with. There’s always room for new ideas when it comes to grilled cheese!
Print
Avocado Grilled Cheese
- Author: Andrew Recipes
Description
Avocado Grilled Cheese is a creamy, crispy, and satisfying twist on the traditional grilled cheese sandwich. Ripe avocado adds richness and a subtle nutty flavor that pairs perfectly with melty cheese and buttery toasted bread. It’s quick to make, filling, and ideal for lunch or a light dinner.
Ingredients
2 slices of bread (sourdough, whole grain, or your favorite)
1 ripe avocado, mashed
1/2 tsp lemon juice
Salt and black pepper to taste
1/2 tsp garlic powder
2–3 slices of cheese (cheddar, mozzarella, or Monterey Jack)
1 tbsp butter, softened
Instructions
In a small bowl, mash the avocado with lemon juice, garlic powder, salt, and pepper until smooth and well seasoned.
Butter one side of each slice of bread.
Spread the mashed avocado onto the unbuttered side of one slice of bread. Layer with slices of cheese and top with the second slice, buttered side facing out.
Heat a skillet over medium heat. Place the sandwich in the skillet and cook for about 3–4 minutes per side, pressing down gently, until the bread is golden brown and the cheese is fully melted.
Remove from heat, slice, and serve immediately.
Notes
Add tomato slices, cooked bacon, or sautéed spinach for extra flavor and texture. For a crispy edge, sprinkle a little shredded cheese in the skillet before adding the sandwich. This grilled cheese pairs well with tomato soup or a fresh salad. Use gluten-free bread or dairy-free cheese to adapt it for dietary needs.

