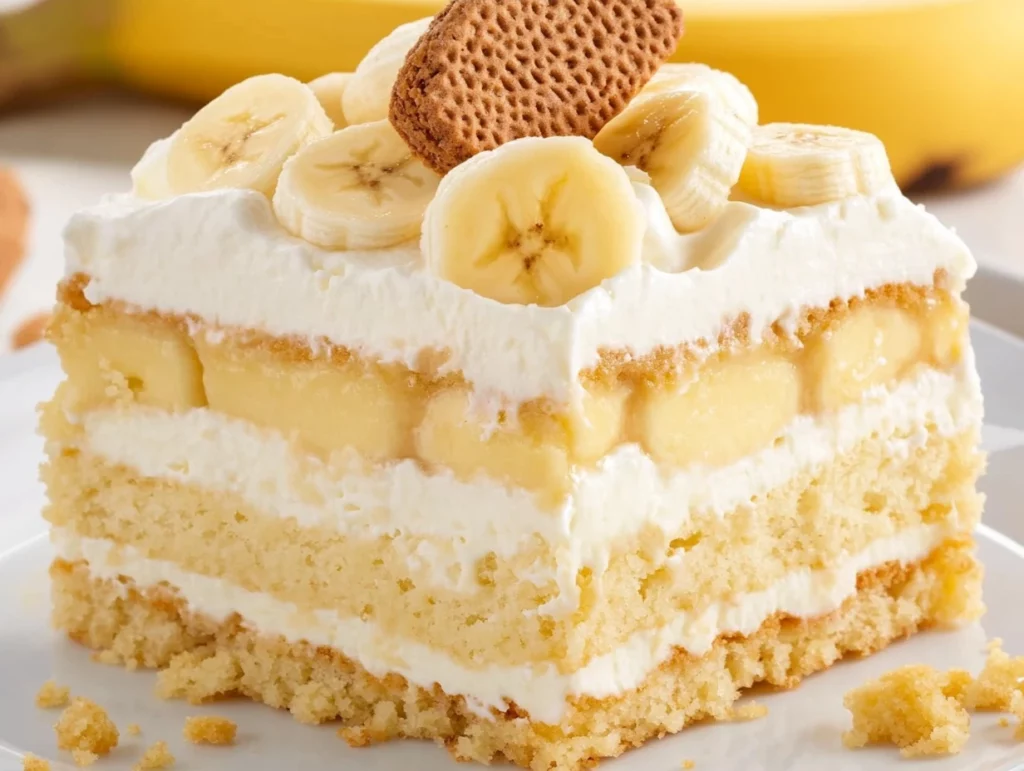
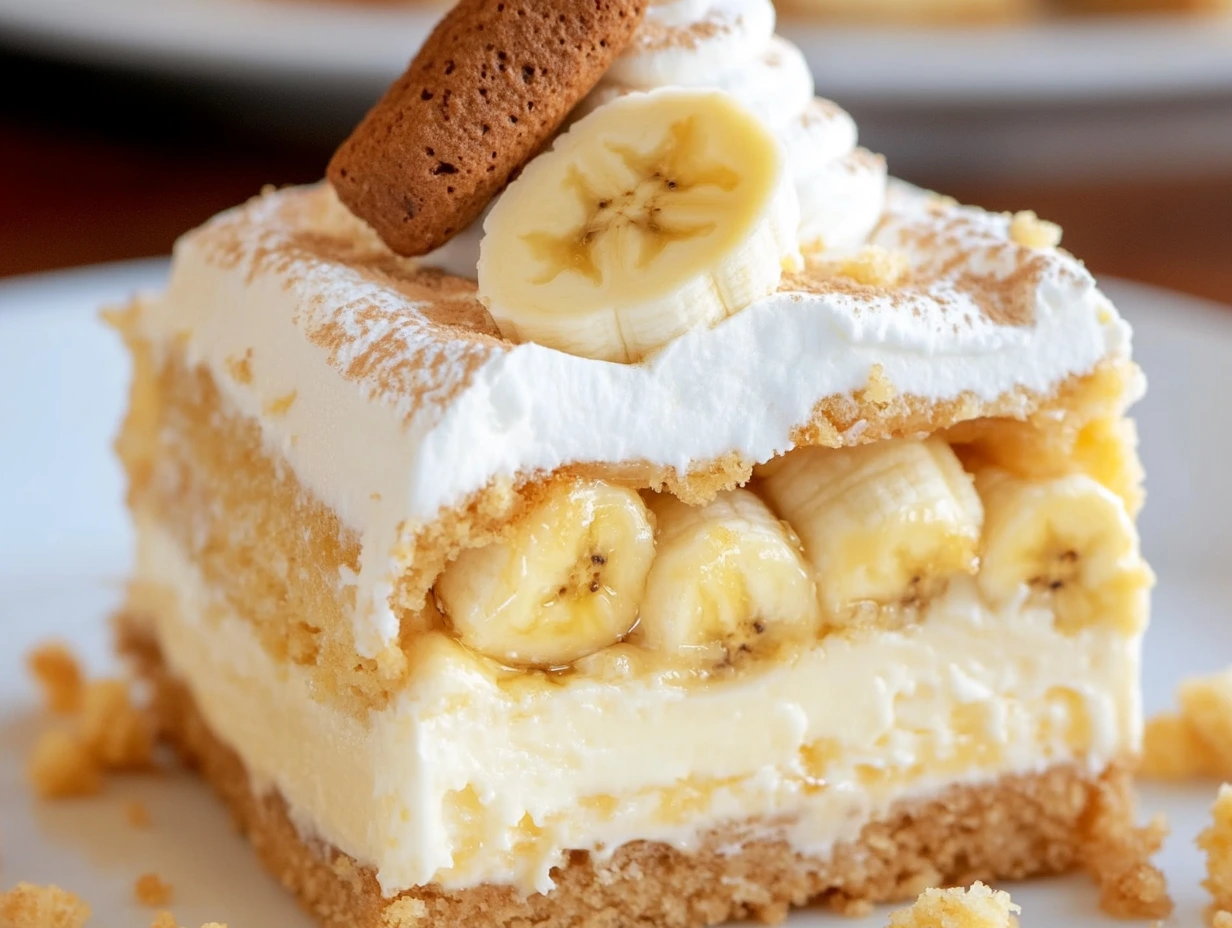
There are desserts that remind us of childhood, family gatherings, and good times with friends, and then there are desserts that take all those memories and elevate them into something even better. Enter Banana Pudding Cake—the treat that combines the soft, fluffy texture of yellow cake with the creamy indulgence of banana pudding. With layers of moist cake, banana-flavored pudding, fresh bananas, and a Cool Whip topping, this dessert is pure comfort in every bite.
I don’t know about you, but banana pudding is one of those desserts that’s hard to resist. It’s nostalgic, comforting, and the perfect blend of creamy and sweet. So, when I discovered a way to turn this classic into a cake, I knew it was going to be a hit. This cake is a breeze to make, requires minimal ingredients, and can be prepped ahead of time, making it perfect for a potluck, a family gathering, or just a cozy weekend dessert. The best part? It looks and tastes like you spent hours in the kitchen, even though it’s really super easy to whip up.
Let’s dive into how you can make this irresistible Banana Pudding Cake and have your friends and family begging for the recipe.
Ingredients You’ll Need
Before we get started, let’s gather all the ingredients. I love this recipe because it calls for just a handful of pantry staples, yet the result is a showstopper. Here’s what you’ll need:
1 box yellow cake mix (this is the easy part! You’ll make it according to the package directions with 1 cup water, ½ cup vegetable oil, and 3 eggs)
5.1 ounces instant banana-flavored pudding (yes, the instant kind is what makes this dessert come together so quickly)
3½ cups whole milk (cold, for that creamy pudding texture)
2 to 3 bananas (peeled and sliced very thin – no more than ¼-inch thick slices)
8 ounces Cool Whip whipped topping (thawed, to give it that light and fluffy finish)
12 vanilla wafers (for garnish and a touch of crunch)
These ingredients are simple yet perfect for creating that iconic banana pudding flavor. Now that we have our shopping list, let’s get started on making this cake!
Steps to Make Your Banana Pudding Cake
Step 1: Preheat and Prepare the Pan
First, preheat your oven to 350°F. This will ensure that your cake bakes perfectly. While the oven heats up, lightly spray a 9×13-inch baking pan with baker’s spray. I find that this keeps the cake from sticking and makes cleanup a breeze later. Set the pan aside, and let’s get the cake mix ready.
Step 2: Mix the Cake Batter
In a large mixing bowl, combine the cake mix, 1 cup water, ½ cup vegetable oil, and 3 eggs. Whisk everything together by hand for about 1 minute or until the batter is smooth and there are no lumps. This is where the magic happens—the cake mix combines with the wet ingredients to create a light and fluffy batter. Don’t worry about overmixing; just make sure everything is well incorporated.

Step 3: Bake the Cake
Now that your cake batter is ready, pour it into the prepared baking dish. Pop it into the oven and bake for 30 minutes. You’ll know it’s done when a toothpick inserted into the center comes out clean. At this point, your kitchen should smell amazing!
Once the cake is baked, remove it from the oven and allow it to cool slightly. This cooling time is important because we’re going to poke holes in the cake and pour the pudding in, and we don’t want the cake to be too hot or too cold.
Step 4: Poke Holes in the Cake
While the cake is cooling, take the handle of a wooden spoon (or something similar) and gently poke holes all over the top of the cake. You want the holes to be deep enough to allow the pudding to seep in but not too deep that the cake falls apart. This step ensures that the cake will soak up all that delicious banana pudding goodness.
Step 5: Make the Banana Pudding
In a separate mixing bowl, add the packet of instant banana-flavored pudding and the 3½ cups of cold milk. Whisk for about 2 minutes until everything is combined. Be careful not to let it stand too long because you want the pudding to stay pourable, not set up too thick. The key is to pour it onto the warm cake, so it soaks into the holes without thickening too much.

Step 6: Pour the Pudding Over the Cake
Once the pudding is ready, pour half of it over the warm cake, making sure it fills in all the holes. Use the back of a large spoon to gently press the pudding into the holes if needed. After the first layer of pudding is absorbed, add the remaining pudding and smooth it out into an even layer on top of the cake. Now, the cake is looking extra creamy and delicious.
Stay tuned—next up is the best part: layering on the bananas and Cool Whip!
Assembling the Banana Pudding Cake
Now that your cake is soaked with that luscious banana pudding, we’re moving on to the fun part—layering on the fresh bananas, spreading the Cool Whip topping, and finishing it all off with those iconic vanilla wafers. This is where the magic really happens, and your dessert starts to come together in the most delicious way. Let’s continue with the next steps!
Step 7: Layer on the Sliced Bananas
Once the pudding is spread evenly over the cake, it’s time to add the bananas. 2 to 3 bananas should be plenty for this step, but feel free to use more if you love extra banana goodness. Peel the bananas and slice them into thin, even rounds—no more than ¼-inch thick. This will allow them to sit nicely on top of the cake and keep the texture balanced.
Carefully layer the sliced bananas evenly over the entire surface of the cake. You want each bite to have a perfect combination of cake, pudding, and banana, so spread the slices out in a single layer. The bananas add that fresh, fruity sweetness that complements the creamy pudding and fluffy cake. This is where the nostalgic banana pudding flavor really comes to life.
Step 8: Spread the Cool Whip Topping
Next, it’s time to top everything off with 8 ounces of thawed Cool Whip. This is what gives the cake that light, airy, and perfectly sweet finish. Using a spatula, spread the Cool Whip evenly over the bananas, creating a smooth and fluffy layer that will keep everything together.
Make sure to cover the bananas completely with the Cool Whip. This layer not only adds to the overall texture but also helps to lock in the moisture of the pudding and cake, keeping the dessert creamy and delicious. The Cool Whip is the perfect balance of sweet and light, ensuring that each bite is as indulgent as the last.
Step 9: Garnish with Vanilla Wafers
Now comes the fun part—garnishing with the vanilla wafers. This step is optional but adds a nice crunch and that signature banana pudding flavor. Take your 12 vanilla wafers and place them around the top of the cake, either scattered across the surface or strategically placed in a pattern. I like to put one wafer in the center of each serving so that everyone gets a little cookie to enjoy with their slice.
If you want a little extra crunch or flavor, you can even crush some vanilla wafers and sprinkle them over the top of the Cool Whip layer just before serving. This adds a nice texture contrast to the creamy layers beneath and takes the flavor to the next level.
Step 10: Refrigerate the Cake
This is the most important step in the whole process—refrigerate the cake for 12 hours or, better yet, overnight. I know, it’s hard to wait, but trust me, the flavors need time to meld together and for the pudding to fully set. This gives the cake time to absorb the pudding and makes each slice even more delicious.
The refrigeration process also allows the Cool Whip to firm up a bit, so when you slice into the cake, the layers hold their shape and each piece comes out looking picture-perfect. Plus, chilling it overnight ensures that every bite is refreshingly cool—perfect for those warm days when you need a comforting yet light dessert.
FAQs and Conclusion
Now that your Banana Pudding Cake has had time to chill and all the layers have melded together perfectly, it’s time to serve up this indulgent dessert. But before you dig in, let’s address some common questions about this recipe to ensure everything goes smoothly. Whether you’re making it for the first time or looking for some expert tips, I’ve got you covered. Plus, I’ll wrap things up with some final thoughts on why this dessert should become your go-to treat for any occasion.
Frequently Asked Questions
1. Can I make this cake ahead of time?
Absolutely! In fact, I recommend making it a day ahead. The longer it sits in the fridge, the better the flavors meld, and the texture of the cake soaks up more of the pudding. Making it in advance also saves you time on the day of your event, so you can focus on other things and still serve an impressive dessert. Just be sure to refrigerate it for at least 12 hours before serving to get the best results.
2. Can I use a different type of cake mix?
While the yellow cake mix gives this dessert its light, sweet flavor, you can certainly experiment with different cake mixes. A white cake mix would work just as well if you prefer a more neutral base. Some people even swap in a banana cake mix to really amp up the banana flavor, but I find that the yellow cake mix provides the perfect balance of richness without overpowering the pudding.
3. Can I substitute the Cool Whip for something else?
If you’re not a fan of Cool Whip or prefer a more natural topping, you can substitute it with whipped cream or homemade whipped cream. If you’re going the homemade route, just whip up some heavy cream with a bit of sugar until soft peaks form. This will give you a fresh, light topping that’s just as delicious as Cool Whip.
4. How long will the Banana Pudding Cake last in the refrigerator?
If there are any leftovers (which is rare because this cake tends to disappear quickly!), you can store them in an airtight container in the fridge for up to 3 to 4 days. The cake will stay moist and the flavors will continue to develop, though I recommend enjoying it within a few days for the freshest taste.
5. Can I add other fruits or flavors to this cake?
Yes, you can absolutely get creative with this dessert! Strawberries or blueberries would pair wonderfully with the banana and pudding. Just layer them between the bananas or scatter them over the top. You can also add a little bit of vanilla extract or cinnamon to the cake batter for an extra pop of flavor. The versatility of this cake makes it easy to tailor it to your personal tastes.
6. Can I use a different type of pudding mix?
If you want to switch things up, you can try using a different flavor of instant pudding mix, like vanilla, chocolate, or butter pecan. Just be aware that these substitutions will change the overall flavor profile of the dessert, but they can be a fun variation if you’re looking to try something new.
7. Is it possible to make this dessert gluten-free?
Yes! You can make this cake gluten-free by using a gluten-free yellow cake mix and ensuring that all the other ingredients you use (like the pudding mix) are gluten-free as well. Just double-check the labels to make sure everything is certified gluten-free. The result will still be a delicious and satisfying dessert, just without the gluten.
Conclusion: Why You’ll Love This Banana Pudding Cake
In conclusion, this Banana Pudding Cake is the perfect combination of nostalgia, simplicity, and indulgence. The layers of moist cake, creamy banana pudding, fresh bananas, Cool Whip, and vanilla wafers come together to create a dessert that’s not only easy to make but will have everyone asking for the recipe. It’s a crowd-pleaser that works for all sorts of occasions—family dinners, potlucks, birthdays, or even just a weekend treat.
The best part? You can make it ahead of time, which makes it a stress-free dessert for any event. Whether you’re serving it to a group of friends or just sharing it with family, this cake has all the qualities of a classic that everyone will adore. So, next time you’re looking for a showstopping dessert that’s guaranteed to impress, you’ve got the perfect recipe right here.
I hope you give this Banana Pudding Cake a try. Don’t forget to come back and let me know how it turned out! Feel free to leave a comment with any tweaks or variations you’ve tried, and share this recipe with anyone who loves a good dessert. Happy baking!
Print
Banana Pudding Cake
- Author: Andrew Recipes
Description
This delicious dessert combines the classic flavors of banana pudding with a moist, fluffy cake base. The combination of cake, banana pudding, fresh bananas, and Cool Whip creates a creamy, indulgent treat perfect for any occasion. It’s easy to make and requires minimal ingredients, yet the result is a showstopper that will impress family and friends alike.
Ingredients
1 box yellow cake mix (made according to package directions with 1 cup water, ½ cup vegetable oil & 3 eggs)
5.1 ounces instant banana-flavored pudding
3½ cups whole milk (cold)
2 to 3 bananas (peeled and sliced very thin – no more than ¼-inch thick slices)
8 ounces Cool Whip whipped topping (thawed)
12 vanilla wafers (for garnish)
Instructions
Preheat the oven to 350°F. Lightly spray a 9×13-inch baking pan with baker’s spray. Set aside.
In a large mixing bowl, add the water, vegetable oil, eggs, and contents of the yellow cake mix. Whisk by hand for 1 minute or until completely combined and no lumps remain.
Pour the yellow cake batter into the prepared baking dish and bake for 30 minutes. A toothpick inserted into the center should come out clean when done.
Once the cake is removed from the oven, using the handle of a wooden spoon, poke holes all over the cake. Allow the cake to cool slightly on the counter while you make the instant banana pudding.
In a large mixing bowl, add the packet of instant banana-flavored pudding and milk. Whisk for 2 minutes by hand until combined. You want this to still be pourable, so DO NOT let it stand for the entire 5 minutes that is stated on the box directions for the pudding before pouring it into the holes poked into the warm cake.
Pour half the banana pudding mixture over the top of the warm cake, being sure to get it into all the holes. You can use the back of a large spoon to gently push the pudding into all the holes.
Add the remaining half of the banana pudding and smooth the pudding into an even layer over the cake.
Place the thinly sliced banana pieces into an even layer over the entire surface of the cake.
Spread the thawed whipped topping evenly over the banana slices and garnish with the vanilla wafers. I like to place 1 vanilla wafer into the center of each serving of cake. This way each person gets a cookie on the top of their piece.
Refrigerate this banana pudding cake for 12 hours, or overnight, before slicing and serving.
Notes
For best results, make sure to refrigerate the cake for at least 12 hours before serving. This gives the flavors time to meld together and ensures the pudding has fully set. If you’re looking to add a little extra sweetness, you can sprinkle some crushed vanilla wafers over the top just before serving for added crunch. The cake can be made ahead of time, making it a great option for stress-free entertaining. If you prefer a richer flavor, try using whole milk for the pudding, as it makes the dessert extra creamy.

