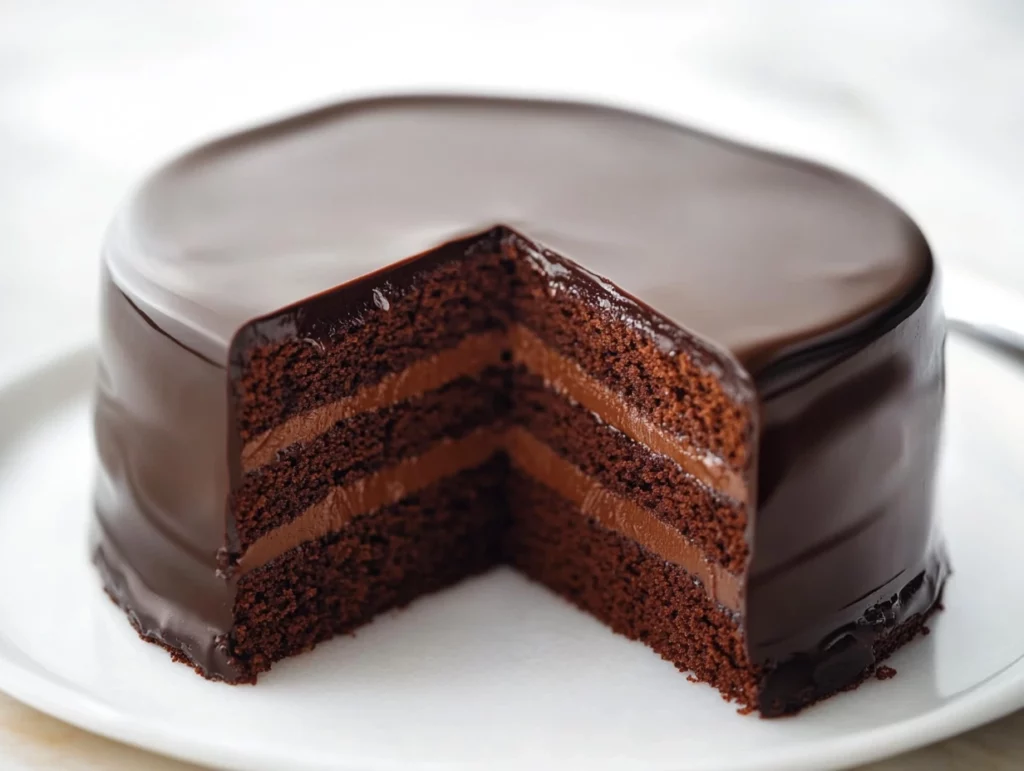
When it comes to indulgence, there’s nothing quite like a rich, dark, and oh-so-moist chocolate cake. If you’re someone who loves the deep, intense flavor of chocolate, then this Black Magic Cake is about to become your new favorite. This cake is so decadent that each bite feels like a chocolatey hug. The secret to its amazing flavor and texture lies in the perfect balance of cocoa powder and brewed coffee. And let’s not forget about the velvety smooth ganache that takes it from great to absolutely extraordinary. Whether you’re celebrating a special occasion or simply craving something sweet, this cake is guaranteed to impress.
I first stumbled upon this recipe a few years ago, and I’ve been hooked ever since. The name “Black Magic Cake” totally lives up to its reputation because every time I make it, people are blown away. It’s the kind of cake that leaves everyone asking for the recipe (which, of course, you can happily share because it’s so easy to make!).
So, grab your mixing bowl and let’s dive into the magic of this cake. I promise, it’s going to be worth every second.
Ingredients for Black Magic Cake
Before we get started with the steps, let’s gather everything you’ll need. Here’s what you’ll need to make this chocolate wonder:
1¾ cups all-purpose flour
¾ cup unsweetened cocoa powder
2 cups granulated sugar
2 teaspoons baking soda
1 teaspoon baking powder
1 teaspoon salt
1 cup milk or buttermilk
2 large eggs, at room temperature
1 cup black coffee or 2 shots of espresso with added water
1 teaspoon vanilla extract
½ cup vegetable oil
For the Ganache:
12 ounces dark chocolate chips
1½ cups heavy whipping cream
Steps for Making Black Magic Cake
Now that we have everything ready, let’s get started! This cake is incredibly straightforward to make, and the best part is that you can enjoy the delicious result in just a couple of hours. Here’s how you do it:
1. Preheat and Prepare the Pans
The first step in any great cake-making adventure is preparing the oven and pans. Preheat your oven to 350°F. While it’s warming up, line the bottoms of two 8-inch round cake pans with parchment paper. Don’t forget to spray the sides and bottoms of the pans with non-stick spray—this ensures your cakes come out easily and without a mess. Trust me, you don’t want to lose even a single crumb of this cake.

2. Combine the Dry Ingredients
In a large mixing bowl (or, even better, in the bowl of a stand mixer if you have one), whisk together the dry ingredients. Add in your all-purpose flour, cocoa powder, granulated sugar, baking soda, baking powder, and salt. You want to make sure everything is mixed together well so that every bite of cake has the perfect amount of sweetness and flavor.
3. Add the Wet Ingredients
Now it’s time to add the wet ingredients to your dry mixture. Pour in the milk (or buttermilk if you’re feeling extra indulgent), the eggs, black coffee (or espresso shots with water), vanilla extract, and vegetable oil. Beat everything together on medium speed for about 2 minutes. Don’t forget to scrape down the sides and bottom of the bowl halfway through to ensure everything gets mixed evenly. The batter should be nice and smooth with a slightly runny consistency.

4. Bake the Cake Layers
Once your batter is ready, divide it evenly between the two prepared cake pans. You want the layers to be about the same thickness for an even bake. Place the pans in the preheated oven and bake for 35 minutes. It’s always a good idea to check for doneness by inserting a toothpick into the center of one of the cakes. If it comes out with a few moist crumbs, you’re good to go!
5. Cool the Cakes
After baking, let the cakes cool in the pans for about 10 to 15 minutes. This gives them a chance to firm up slightly so they’ll be easier to handle. Once that time is up, transfer them to a wire rack to cool completely. Cooling is important because if the cakes are still warm, the ganache will melt and slide off. We want that ganache to stay exactly where we put it
Ganache, Assembling, and Tips for Perfecting Your Black Magic Cake
Now that your cakes are completely cooled, it’s time for the most exciting part: adding that smooth, silky ganache and assembling your cake. Trust me, the ganache is what truly elevates this dessert to “next level” status. The way it glides over the moist cake layers and hardens into a glossy, decadent finish is absolutely irresistible.
Making the Ganache
Before we dive into assembling, let’s focus on making the ganache. This part is simple, but it’s the key to achieving that luxurious, rich finish on your Black Magic Cake.
1. Heat the Cream
In a saucepan (or the microwave, if you prefer), heat your heavy whipping cream until it starts to steam. You don’t need it to come to a full boil, just steaming hot. This is important because the heat helps the cream melt the chocolate smoothly, creating that velvety texture we all love.
2. Pour the Hot Cream Over the Chocolate
Once your cream is steaming, pour it over the dark chocolate chips in a heatproof bowl. Cover the bowl with a plate or a lid and let it sit for about 2 to 3 minutes. The heat from the cream will begin to melt the chocolate. After the waiting period, you can remove the plate and whisk the mixture until it becomes smooth and glossy.
Pro Tip: Make sure to use good-quality dark chocolate for this ganache. The richness of the chocolate is what gives the ganache that deep flavor, and it’s a huge part of what makes this cake special. Don’t skimp on this step!
3. Let the Ganache Cool and Thicken
Once the ganache is smooth, let it cool for a bit. If you’d like a thicker ganache, simply let it sit for 10-15 minutes until it firms up slightly. This will make it easier to spread over the cake layers later. The ganache should still be pourable, but not runny. If it becomes too thick, you can gently reheat it to bring it back to a spreadable consistency.
Assembling the Cake
Okay, here comes the fun part—putting everything together! Now that your cakes are cool and your ganache is ready, you can start assembling your Black Magic Cake.
1. Level the Cakes
First things first, you’ll want to level your cakes to make sure they sit evenly when stacked. Using a serrated knife, gently trim the tops of your cakes to create a flat surface. This will help the layers stack neatly and ensure your ganache is evenly spread.
2. Spread the Ganache Between the Layers
Place one of the cake layers on a serving plate or cake stand. Take about ½ cup of the ganache and spread it over the top of the first layer. Use an offset spatula or the back of a spoon to smooth it out evenly. This will create a luscious filling between the layers.
3. Add the Second Layer
Once your ganache is spread evenly, carefully place the second layer of cake on top. I like to invert the second layer (flip it upside down) so that the top is perfectly flat. This gives the cake a cleaner, more polished look once the ganache is added.
4. Pour the Remaining Ganache
Now, it’s time for the finishing touch: pouring the remaining ganache over the top of the cake. Pour the ganache in the center and gently use your offset spatula to spread it out over the top and down the sides. Take your time here to make sure the ganache coats the cake evenly and looks smooth. For an even more professional finish, you can let the ganache sit for about 15 minutes to firm up slightly before smoothing it out with a spatula again.
5. Final Touches
Once the ganache is applied and the cake is looking gorgeous, you can leave it as is or add your own finishing touches. A light dusting of cocoa powder, chocolate shavings, or even some fresh berries would be lovely if you want to dress it up a little. But honestly, this cake is so stunning on its own that it really doesn’t need anything extra.
Tips for Perfecting Your Black Magic Cake
Here are a few extra tips to help you achieve the most perfect Black Magic Cake possible:
Use Buttermilk for Extra Moisture: If you want to take the moistness of your cake to the next level, try substituting buttermilk for regular milk. Buttermilk adds a subtle tang and helps make the cake even more tender.
Make Sure the Cake Layers Are Cool: I know it’s tempting to dive in right away, but make sure your cake layers are completely cool before you add the ganache. If they’re still warm, the ganache could melt right off the sides of the cake, and we definitely don’t want that!
Coffee is Your Friend: The coffee doesn’t make the cake taste like coffee, but it intensifies the chocolate flavor in a way that’s just magical. Don’t skip this step—trust me, you’ll notice the difference in taste!
Let the Cake Rest: While this cake is delicious right away, it’s actually even better the next day. The flavors deepen as it sits, and the ganache firms up perfectly, giving you that clean, polished finish.
FAQs and Conclusion – Everything You Need to Know About Black Magic Cake
At this point, you’ve made your Black Magic Cake, and it’s looking absolutely irresistible. But before you dive into that first slice, let’s go over some frequently asked questions to ensure your cake turns out perfectly every time. These tips will address some common issues and help answer any lingering questions you might have.
FAQs About Black Magic Cake
1. Can I use milk instead of buttermilk?
Absolutely! While buttermilk adds a little extra tenderness and flavor to the cake, regular milk will work just fine. If you want to replicate the tangy richness of buttermilk without running to the store, you can make a quick substitute by adding a tablespoon of vinegar or lemon juice to one cup of regular milk. Let it sit for five minutes before using it in your recipe.
2. Can I make this cake ahead of time?
Yes! In fact, this cake actually gets better the next day as the flavors have more time to develop and meld together. Once the cake is fully assembled and the ganache is set, store it in an airtight container at room temperature for up to three days. If you want to prepare it even earlier, you can bake the cake layers a day or two ahead of time and store them in an airtight container at room temperature. Just make sure the ganache is added the day you plan to serve it.
3. What’s the best way to store leftover cake?
After enjoying a slice (or several), make sure to store any leftovers in an airtight container. This cake does best when kept at room temperature for up to three days, but you can also refrigerate it if you prefer. Just know that the ganache will firm up a bit more in the fridge. If you like it soft, let it sit at room temperature for 30 minutes before serving.
4. Can I use a different type of coffee?
You can! If you’re not a fan of regular black coffee, you can use decaffeinated coffee or espresso for this recipe. Just remember, the coffee is there to enhance the chocolate flavor, not to make the cake taste like coffee. If you prefer, you could also substitute the coffee with hot water, but I recommend sticking with the coffee for that rich, deep flavor.
5. Can I freeze this cake?
Yes, you can freeze the cake! To freeze, wrap the cooled cake layers tightly in plastic wrap and aluminum foil, and place them in a freezer-safe bag or container. When you’re ready to enjoy, allow the cakes to thaw completely at room temperature, then add the ganache and assemble as usual. Keep in mind that the ganache may not be as smooth after freezing, but the cake will still taste just as delicious.
6. How can I make the ganache thicker?
If you want a thicker ganache, you can reduce the amount of cream used in the recipe. Start with 1 cup of heavy cream instead of 1½ cups, or you can let the ganache sit longer to firm up before applying it to the cake. If you want it thicker after it’s made, simply chill it in the refrigerator for a few minutes and then whisk it again to make it easier to spread.
7. Can I add anything to the ganache?
Definitely! If you’re feeling adventurous, you can flavor the ganache with a splash of liquor (like Kahlua, Baileys, or rum) or add a little cinnamon, sea salt, or even a touch of chili powder for a unique twist. For a richer flavor, you can also add a tablespoon of butter to the ganache after it’s melted for an even creamier finish.
Conclusion – Why You Should Make This Cake Today
Let me just say it again: this Black Magic Cake is pure chocolate magic. From the perfectly moist layers to the rich ganache that coats every inch, it’s the kind of dessert that will make everyone around the table swoon. Whether you’re celebrating a special occasion or simply treating yourself to something extraordinary, this cake is sure to impress.
And while the recipe may seem like a bit of a labor of love, the results are totally worth it. The deep chocolate flavor, combined with the hint of coffee, creates something that goes beyond your typical chocolate cake. Plus, the ganache? It’s an absolute game-changer.
So, I highly encourage you to try this recipe out—whether it’s for a birthday, a dinner party, or just because you need a little chocolate therapy. Once you taste this cake, you’ll see why it’s called Black Magic!
I’d love to hear about your experience making this cake. If you try any fun variations or find new ways to make it your own, please share them in the comments below! Enjoy every decadent bite of this masterpiece, and happy baking!
Print
Black Magic Cake
- Author: Andrew Recipes
Description
Rich, dark, and impossibly moist, Black Magic Cake is the ultimate chocolate lover’s dream. The deep flavor comes from a blend of cocoa powder and brewed coffee, enhancing the cake’s intensity while keeping the crumb tender and soft. A silky ganache made with heavy cream and dark chocolate takes it over the top, making this dessert perfect for celebrations or anytime indulgence.
Ingredients
All-purpose flour – 1¾ cups
Unsweetened cocoa powder – ¾ cup
Granulated sugar – 2 cups
Baking soda – 2 teaspoons
Baking powder – 1 teaspoon
Salt – 1 teaspoon
Milk or buttermilk – 1 cup
Large eggs – 2, at room temperature
Black coffee or 2 shots of espresso with added water – 1 cup
Vanilla extract – 1 teaspoon
Vegetable oil – ½ cup
Ganache
Dark chocolate chips – 12 ounces
Heavy whipping cream – 1½ cups
Instructions
Preheat the oven to 350°F. Line the bottom of two 8-inch round cake pans with parchment paper and spray the sides and bottoms with non-stick spray.
In the bowl of a stand mixer, whisk together the flour, cocoa powder, sugar, baking soda, baking powder, and salt until combined.
Add the milk, eggs, coffee, vanilla extract, and vegetable oil to the dry ingredients. Beat on medium speed for 2 minutes, pausing to scrape down the sides and bottom of the bowl halfway through.
Divide the batter evenly between the two prepared pans and bake for 35 minutes or until a toothpick inserted in the center comes out with a few moist crumbs.
Allow the cakes to cool in the pans for 10 to 15 minutes before transferring them to a wire rack to cool completely.
To make the ganache, heat the heavy cream until steaming, either in a saucepan or in the microwave. Pour the hot cream over the dark chocolate chips in a bowl, cover with a plate, and let sit for 2 to 3 minutes. Whisk the mixture until smooth and glossy.
Once the cakes are cool, level the tops with a serrated knife. Spread about ½ cup of ganache over one cake layer. Place the second layer on top, inverted so the top is flat.
Pour the remaining ganache over the top of the cake, using an offset spatula to smooth it over the top and sides. For a clean, polished finish, allow the ganache to rest for about 15 minutes, then smooth again with the spatula.
Notes
Using coffee enhances the chocolate flavor without making the cake taste like coffee. For a more intense richness, use buttermilk instead of regular milk. Make sure the cake layers are completely cool before adding ganache to prevent melting. This cake is even better the next day as the flavors deepen and the ganache sets beautifully.

