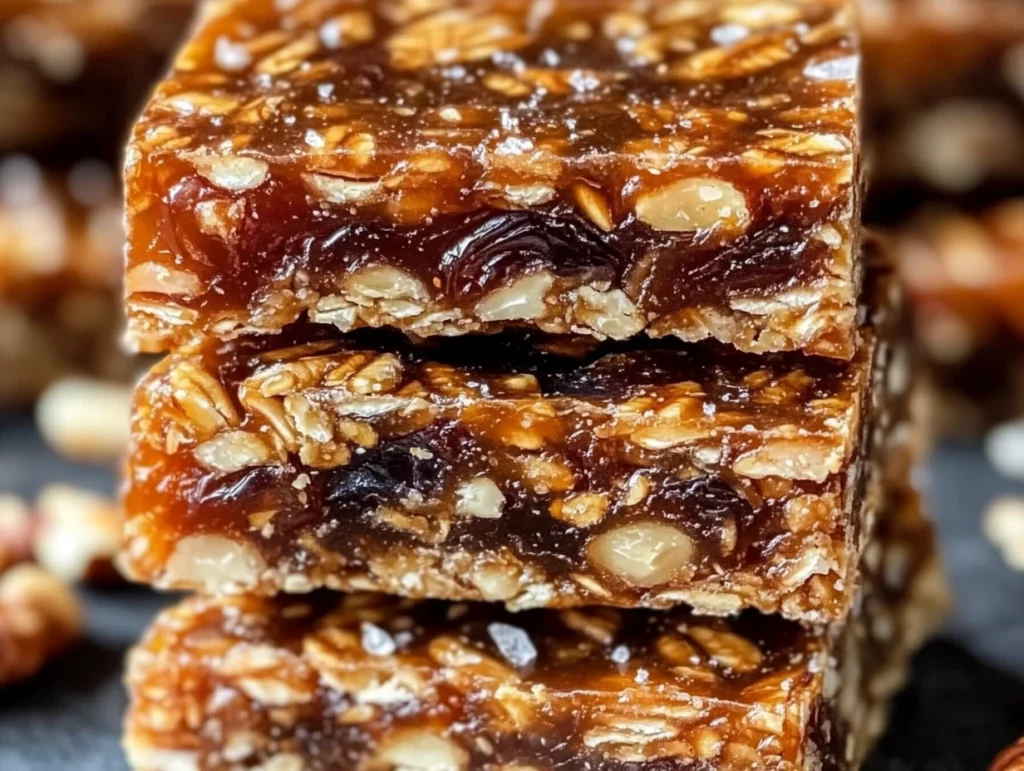
If you’re anything like me, you’re always on the lookout for a quick snack that’s not only delicious but also good for you. Something that fills you up, provides energy, and doesn’t come with a bunch of artificial ingredients. Well, my friend, look no further—these Chewy & Nutritious Date and Walnut Snack Bars are exactly what you need.
These snack bars are packed with all the good stuff: fiber, healthy fats, protein, and natural sweetness. The best part? They’re totally customizable to your taste and dietary preferences. Whether you’re an athlete in need of a post-workout snack, someone who skips breakfast on busy mornings, or you just need something wholesome to nibble on throughout the day, these bars are a game-changer. Trust me, they’re chewy, satisfying, and the perfect balance of indulgent and nutritious.
I’ve been making these bars for years, and every time I do, I get asked for the recipe. They’re easy to prepare, require only a few simple ingredients, and come together so quickly. Plus, you can tweak them in so many ways to make them your own, which is why I’m so excited to share this with you.
Ingredients You’ll Need
Before we dive into the recipe steps, let’s take a quick look at the ingredients. Don’t worry; nothing fancy here! You probably already have most of these items in your pantry.
For the bars:
1 ½ cups pitted Medjool dates – These are the star of the show, giving the bars that perfect natural sweetness. If your dates are a bit on the dry side, just soak them in warm water for about 10 minutes to bring them back to life.
1 cup walnuts – You can totally swap these for your favorite nuts like almonds, pecans, or cashews if you prefer. Walnuts add a nice earthy flavor and a bit of crunch.
½ cup rolled oats – These are the base of the bars, and they help create that chewy texture. If you need a gluten-free version, just use certified gluten-free oats.
2 tablespoons honey – I love using honey for a little touch of sweetness. You can also use maple syrup if you’re going for a vegan option.
1 teaspoon vanilla extract – This adds a nice, warm flavor that complements the dates and walnuts.
¼ teaspoon salt – Just a pinch to bring out all those yummy flavors.
Optional ingredients:
Chia seeds, flaxseeds, or shredded coconut – These are completely optional, but they can really boost the nutrition and texture of your bars.
Chocolate coating – For a fun twist, you can drizzle some melted dark chocolate over the bars for a touch of indulgence. A sprinkle of sea salt or shredded coconut on top makes them even better!
Step 1: Prepare the Dates
Start by preparing the dates. If they’re on the dry side (I’m talking about the ones you have to pry apart because they’re so tough!), soak them in warm water for about 10 minutes. This will soften them up and make them easier to blend. Once softened, drain the water and pat the dates dry with a paper towel. You want them nice and sticky for that perfect chewy texture in your bars.

Step 2: Blend the Ingredients
Now, grab your food processor (you can also use a blender if you don’t have one). First, pulse the walnuts until they’re finely chopped but not powdered. You still want a bit of texture. Then, add the softened dates, oats, honey, vanilla extract, and salt to the processor. Pulse everything together until it forms a sticky dough. You may need to stop a few times to scrape down the sides of the food processor to ensure everything gets mixed evenly.
If you’re using any optional add-ins like chia seeds or flaxseeds, throw them in now and pulse just briefly to distribute them. They’re great for adding some extra fiber and omega-3s, but it’s completely up to you if you want to include them.
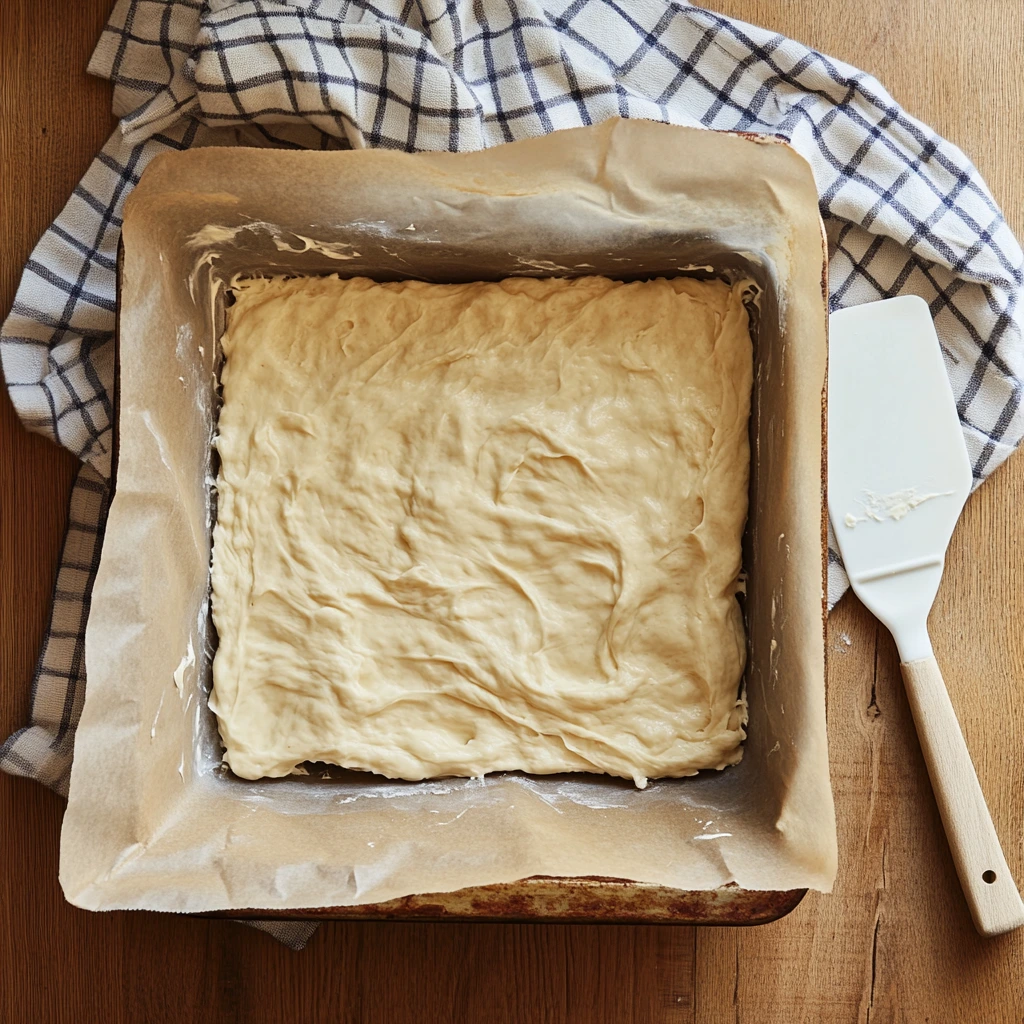
Step 3: Shape the Bars
Next, line an 8×8-inch baking pan with parchment paper. Make sure there’s a little overhang on the sides so you can easily lift the bars out later. Transfer the sticky dough to the pan, then use your hands or the back of a spatula to press it down firmly and evenly. You want the surface smooth and compact. The denser and more compact the dough, the better the bars will hold together once they set.
Step 4: Chill and Set
Once the dough is pressed into the pan, place it in the refrigerator for at least 1–2 hours to firm up. Don’t rush this step—it’s important for getting that perfect chewy texture. Once set, remove the dough from the pan using the parchment paper overhang, and place it on a cutting board. Now, you’re ready to cut your bars into whatever shape you like—squares, rectangles, or even fun little triangles.
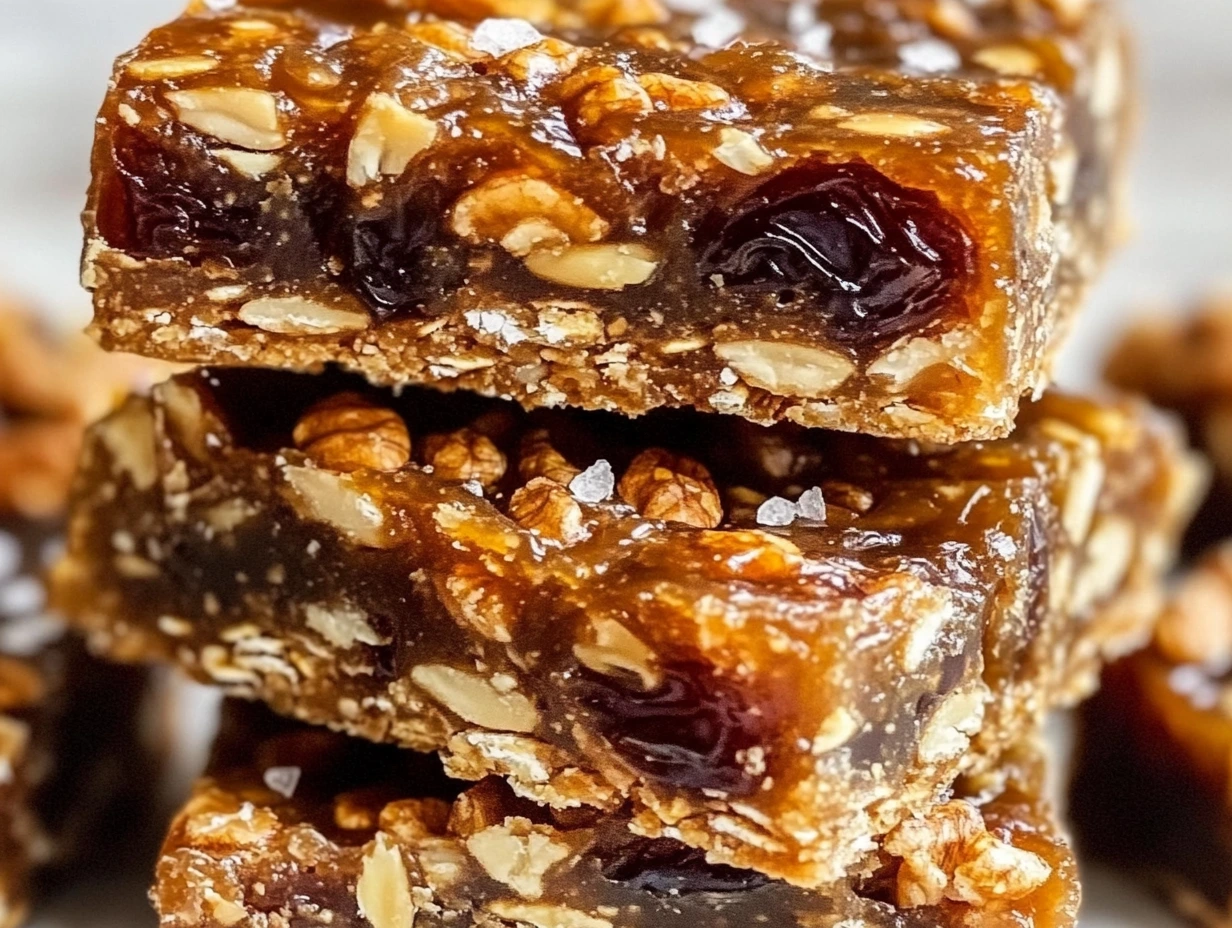
Step 5: Cut and Customize
This is where you can get creative! Cut the dough into bars of your desired size. For an extra indulgent touch, melt some dark chocolate and drizzle it over the bars. If you want to keep things lighter, skip the chocolate and keep the bars as is. You can also sprinkle a little sea salt or shredded coconut over the chocolate for a lovely finishing touch. Then, just pop the bars back into the fridge for a few minutes to allow the chocolate to set.
And there you have it—chewy, nutty, and totally customizable snack bars that you can grab anytime. These bars store well in an airtight container in the fridge, so you’ll have a healthy snack on hand whenever hunger strikes.

Step 6: Optional Add-Ins for Extra Nutrition and Flavor
One of the best things about these bars is how customizable they are. If you want to pack in more nutrition or flavor, there are tons of optional add-ins that can take your bars from great to exceptional. Here are some of my favorites:
Chia seeds – These tiny little seeds are a powerhouse of nutrients. They’re full of fiber, protein, and omega-3 fatty acids. Plus, they add a subtle crunch that enhances the texture of your bars.
Flaxseeds – Another nutritional winner. Flaxseeds are rich in fiber and healthy fats. If you grind them up before adding, they’ll blend seamlessly into the dough, but whole flaxseeds work too.
Shredded coconut – If you’re a coconut fan (like me!), adding shredded coconut gives your bars a lovely tropical flavor and extra texture. It’s not only tasty but also adds a bit of healthy fat.
Cacao nibs – If you want a chocolatey twist without all the sugar, cacao nibs are a fantastic addition. They’re less sweet than chocolate but still give you that chocolatey crunch.
Cinnamon – A teaspoon of ground cinnamon will give your bars a warm, cozy flavor. It’s especially delicious if you add in some dried fruit like raisins or cranberries.
Feel free to experiment with these add-ins or even come up with your own combinations. You really can’t go wrong! The goal is to add a little extra goodness without compromising the bar’s texture. Keep in mind, though, that adding too many extra ingredients might affect how well the bars hold together, so don’t go overboard.
Step 7: Swapping Nuts and Seeds
While walnuts are the star of the show in this recipe, they’re not the only nut that can work. If you’re allergic to walnuts or simply prefer another nut, feel free to swap them out for any nut or seed of your choice. Here are some alternatives that work beautifully:
Almonds – These are slightly sweeter and have a milder flavor than walnuts, but they add a nice crunch. You could even use almond meal or almond butter if you want a smoother consistency.
Pecans – If you like a buttery, rich flavor, pecans are the way to go. They add a softer bite and are delicious when paired with the sweetness of the dates.
Cashews – Cashews provide a creamy, soft texture, which gives the bars a more delicate chew. If you’re looking for a more subtle nut flavor, these are your best bet.
Sunflower seeds – For a nut-free option, sunflower seeds work wonders. They provide a bit of crunch and are a great alternative for those with nut allergies.
The versatility of nuts and seeds is what makes this recipe so great. Not only can you adjust the flavor, but you can also cater it to your dietary needs or preferences.
Step 8: Adjusting the Sweetness
Now, if you’re someone who loves a super sweet treat, you might want to adjust the amount of sweetener you use. The combination of dates and honey (or maple syrup) already provides a good level of sweetness, but you can easily make the bars sweeter or less sweet depending on your taste. Here’s how:
For a sweeter bar: Add an extra tablespoon of honey or maple syrup. You can also increase the amount of dates if you want to dial up the natural sweetness even more.
For a less sweet bar: Cut back on the honey or maple syrup. You can also reduce the number of dates slightly, though that may impact the texture since dates help bind everything together.
If you prefer to use a different sweetener, options like agave syrup or even stevia can work, though I find that honey and maple syrup create the best texture and flavor.
Step 9: Perfecting the Chocolate Coating
The chocolate coating is optional, but it really adds a decadent touch to these bars. If you’re looking to indulge just a little bit (but still keep it healthy), drizzling melted dark chocolate over the bars is the way to go. Here’s how you can do it:
Melt the chocolate: Simply break up a couple of ounces of dark chocolate and melt it in the microwave or on the stove using a double boiler. I like to use dark chocolate with at least 70% cacao, but any chocolate you prefer will work.
Drizzle and set: Once the chocolate is melted, use a spoon to drizzle it over the bars in a zig-zag pattern. If you’re feeling fancy, you can even dip the bars halfway into the chocolate for a more indulgent coating. Afterward, sprinkle some sea salt or shredded coconut on top for an extra flavor boost. Then, pop the bars back into the fridge to allow the chocolate to harden.
The chocolate gives the bars a rich, slightly bitter contrast to the sweetness of the dates, which makes for the perfect balance. If you’re going the chocolate route, be sure to allow the bars to set properly so the chocolate firms up before you dive in.
Step 10: Storing Your Snack Bars
Once your Chewy & Nutritious Date and Walnut Snack Bars are ready to go, it’s time to think about storage. Here are a few tips to keep your bars fresh and ready to eat for days:
In the fridge: These bars will keep well in an airtight container in the fridge for up to a week. The cold temperature helps preserve their freshness and chewy texture.
For longer storage: If you want to keep them for a longer period, you can freeze the bars. Just wrap them individually in wax paper or plastic wrap, then place them in a ziplock bag or airtight container in the freezer. They’ll last for up to 2 months in the freezer, and you can pull one out whenever you need a snack.
On the go: If you’re taking these bars with you on a hike, to work, or to the gym, just make sure to store them in a container or wrap them up tightly. They hold up pretty well without refrigeration for a few hours, but the texture is best when chilled.
Wrapping It Up
And there you have it! These Chewy & Nutritious Date and Walnut Snack Bars are so versatile, so easy to make, and so perfect for any time of day. You can tweak the recipe to suit your tastes, add different nuts or seeds, or even skip the chocolate coating if you want to keep it lighter. They’re perfect for busy mornings, a post-workout snack, or when you just need a quick pick-me-up.
Chewy & Nutritious Date and Walnut Snack Bars: FAQs and Final Thoughts
We’ve made it to the final part of our journey! By now, you should have a solid understanding of how to create these Chewy & Nutritious Date and Walnut Snack Bars, and I hope you’re excited to try them out. But I know there are still a few questions that might be on your mind. Let’s address some of the most frequently asked questions to ensure you get the best results possible.
FAQ Section
1. Can I use other types of dates besides Medjool?
Medjool dates are the best choice for this recipe because they’re soft, sticky, and naturally sweet, which helps bind everything together. However, if you can’t find Medjool dates, you can use other types of dates like Deglet Noor. Just keep in mind that these are firmer and less sweet, so you may need to soak them a little longer or add a bit more sweetener (honey or maple syrup) to achieve the desired texture and flavor.
2. Can I use rolled oats that aren’t gluten-free?
Absolutely! The rolled oats in this recipe are the base for the chewy texture, so any regular rolled oats will work perfectly. If you’re not concerned about gluten, using regular oats is totally fine. However, if you need the recipe to be gluten-free, be sure to use certified gluten-free oats to avoid cross-contamination.
3. Can I make these bars nut-free?
Yes! If you need to make these bars nut-free, you can swap the walnuts for seeds like sunflower seeds or pumpkin seeds. These will provide a nice crunch and are packed with nutrients. Just make sure to use the same amount (1 cup) of seeds in place of the nuts.
4. How long do these bars last?
These bars stay fresh for up to a week in the fridge when stored in an airtight container. If you want to keep them longer, you can freeze them for up to 2 months. When you’re ready to enjoy them, just take one out of the freezer and let it thaw for a few minutes before eating.
5. Can I use a different sweetener like stevia or agave syrup?
You can definitely experiment with other sweeteners, but I would recommend sticking with honey or maple syrup for the best results in terms of texture and flavor. If you decide to use stevia, you’ll need to adjust the amount since it’s much sweeter than honey. Agave syrup could work similarly to maple syrup, but it has a slightly milder flavor.
6. Can I make these bars without a food processor?
While a food processor makes the blending of the dates, oats, and nuts much easier, you can still make these bars without one. If you don’t have a food processor, you can finely chop the nuts by hand, mash the dates, and mix everything in a bowl. The texture may be a bit chunkier, but the bars will still be delicious!
7. Can I add dried fruit to these bars?
Yes, adding dried fruit is a great idea! You can add a handful of dried cranberries, raisins, apricots, or even dried figs. Just make sure to chop them up into smaller pieces before mixing them into the dough so they distribute evenly. Dried fruit will also add extra sweetness, so you may want to reduce the amount of other sweeteners accordingly.
Conclusion: Give These Bars a Try!
There you have it! I hope you’re feeling inspired to give these Chewy & Nutritious Date and Walnut Snack Bars a try. They’re such a great snack to have on hand when you need something wholesome, filling, and energizing. Whether you’re using them as a quick breakfast, a mid-afternoon snack, or a post-workout treat, these bars are sure to keep you satisfied and nourished.
Don’t be afraid to get creative with your ingredients and make these bars your own. The beauty of this recipe is how customizable it is—you can tweak it based on your preferences or what you have available in your pantry. Swap in different nuts, add some extra seeds, or drizzle on that chocolate for an extra touch of indulgence.
Print
Chewy & Nutritious Date and Walnut Snack Bars
- Author: Andrew Recipes
Description
These Chewy & Nutritious Date and Walnut Snack Bars are the perfect wholesome treat, packed with natural sweetness and rich in fiber, healthy fats, and protein. They’re ideal for a quick breakfast, midday snack, or even a post-workout bite. The combination of dates, walnuts, and oats creates a satisfying and chewy texture, while the optional chocolate coating adds a touch of indulgence.
Ingredients
For the Bars:
1 ½ cups pitted Medjool dates (soft and sticky; soak in warm water if dry)
1 cup walnuts (or your favorite nuts like almonds, pecans, or cashews)
½ cup rolled oats (gluten-free if needed)
2 tablespoons honey (or maple syrup for a vegan option)
1 teaspoon vanilla extract
¼ teaspoon salt
Optional:
1–2 tablespoons chia seeds, flaxseeds, or shredded coconut for added nutrition
Optional Coating:
2 tablespoons melted dark chocolate
Sprinkle of sea salt or shredded coconut
Instructions
1️⃣ Prepare the dates: If your dates are dry, soak them in warm water for 10 minutes to soften. Drain and pat them dry with a paper towel.
2️⃣ Blend the ingredients: In a food processor, pulse the walnuts until they’re finely chopped but not powdery. Add the dates, rolled oats, honey, vanilla extract, and salt. Process until the mixture forms a sticky dough. You may need to scrape down the sides a few times to ensure everything is well combined. If using optional add-ins like chia seeds or flaxseeds, pulse them in briefly to distribute evenly.
3️⃣ Shape the bars: Line an 8×8-inch baking pan with parchment paper, leaving an overhang on the sides for easy removal. Transfer the dough to the pan and press it down firmly and evenly using your hands or the back of a spatula. Make sure the surface is smooth and compact.
4️⃣ Chill and set: Place the pan in the refrigerator for at least 1–2 hours to allow the bars to firm up. Once set, lift the dough out of the pan using the parchment paper and transfer it to a cutting board.
5️⃣ Cut and customize: Cut the dough into bars, squares, or rectangles of your desired size. For an extra touch, drizzle melted dark chocolate over the bars and sprinkle with sea salt or shredded coconut. Return them to the fridge to set the chocolate.
Notes
These bars are incredibly versatile – feel free to swap out the walnuts for your favorite nuts or seeds. The optional add-ins like chia seeds or flaxseeds increase the nutritional value, while shredded coconut can add a delightful tropical flavor. If you prefer, you can skip the chocolate coating for a lighter version, or you can drizzle it on top for a decadent finish.

