
There are few things in life more satisfying than biting into something crispy on the outside and creamy on the inside—and these Chicken Potato Rolls are exactly that kind of joy. Whether you’re planning a party, prepping a weeknight snack, or just looking for something hearty to make with leftover chicken and potatoes, this recipe is a true go-to. Trust me, once you try them, they’ll become a regular request in your home.
I actually stumbled upon this recipe when trying to clean out the fridge one weekend. I had leftover mashed potatoes from dinner and some cooked chicken breast just sitting there, begging to be transformed into something delicious. I wanted something warm, crunchy, and filling—something that even my picky eater of a 7-year-old would happily munch on. That’s how these little golden rolls were born. And honestly? I haven’t looked back since.
They’re kind of like a mash-up between a croquette and a stuffed potato bite, with a creamy, savory chicken filling tucked inside a seasoned mashed potato shell. And the best part? You can bake them or fry them, depending on your mood (or how many dishes you’re willing to clean up!).
Let’s walk through the first part of this recipe so you can get rolling—literally.
Ingredients You’ll Need
For the Potatoes:
4 medium potatoes, boiled and mashed
2 tablespoons butter (or olive oil for a lighter version)
¼ teaspoon salt
¼ teaspoon black pepper
For the Chicken Filling:
1 lb cooked chicken breast, shredded or diced
¼ cup mayonnaise (or Greek yogurt for a healthier twist)
¼ cup diced celery (optional, for a bit of crunch)
¼ cup chopped green onions
1 teaspoon garlic powder
1 teaspoon dried parsley
Salt and pepper to taste
STEP 1: Prepare the Mashed Potatoes
Start by boiling your potatoes until they’re fork-tender—this usually takes about 15 to 20 minutes depending on how small you’ve cut them. Once they’re soft, mash them up with butter, salt, and pepper. I like mine super smooth, but if you like a little texture, leave a few lumps in there. Let the mashed potatoes cool slightly before you move on to shaping them; hot mashed potatoes are way too sticky and hard to handle.
Tip: If you’re using leftover mashed potatoes, just warm them slightly in the microwave so they’re easier to mix and mold.

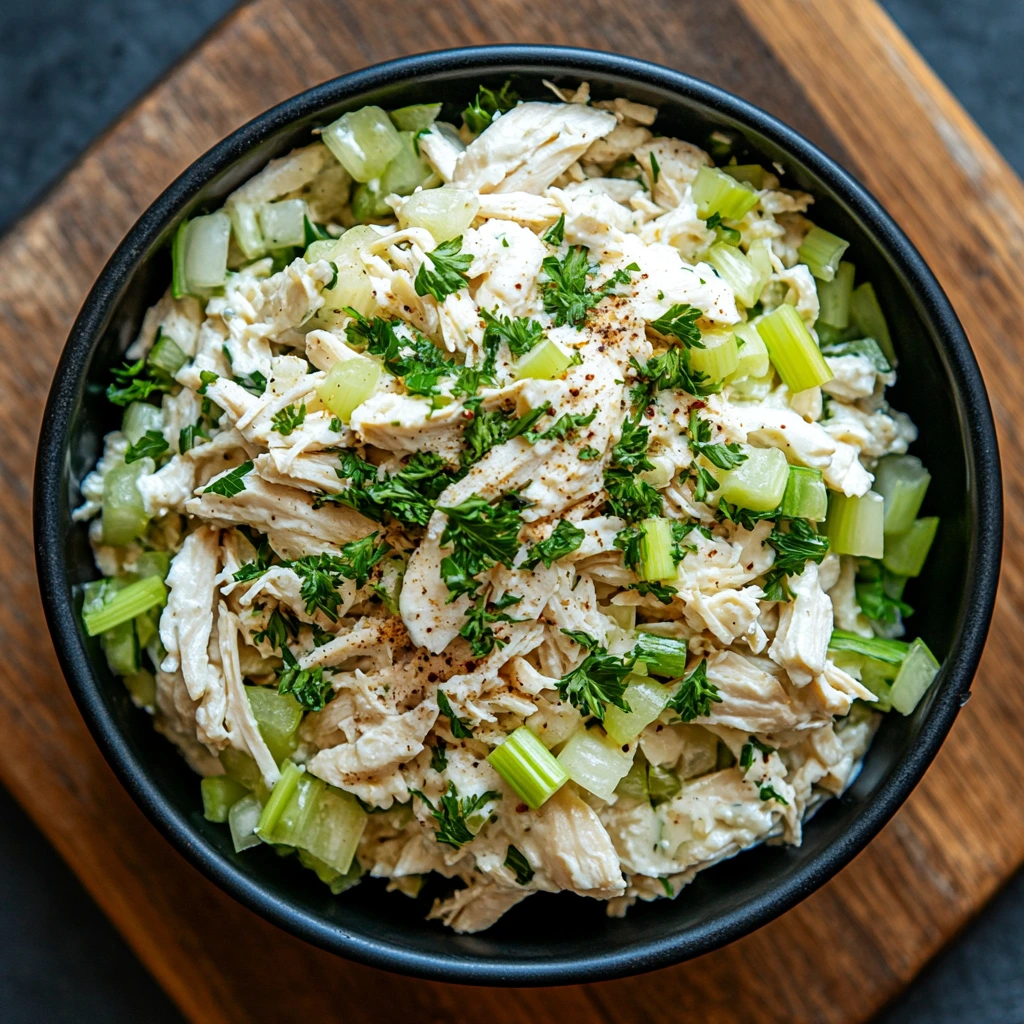
STEP 2: Mix the Chicken Filling
While your potatoes are cooling, you can throw together that tasty chicken filling. In a mixing bowl, combine your shredded or chopped cooked chicken with mayo (or Greek yogurt if you want a lighter version), diced celery, chopped green onions, garlic powder, dried parsley, and a little salt and pepper.
What you’re going for here is a creamy, slightly herby mixture with some fresh bite from the celery and onions. If you’re making this ahead, you can keep this mixture in the fridge for up to 2 days—great for meal prep!
Optional Twist: Want to take it up a notch? Add a handful of shredded cheddar cheese into the filling for a creamy, melty surprise in the center. My kids love this version!
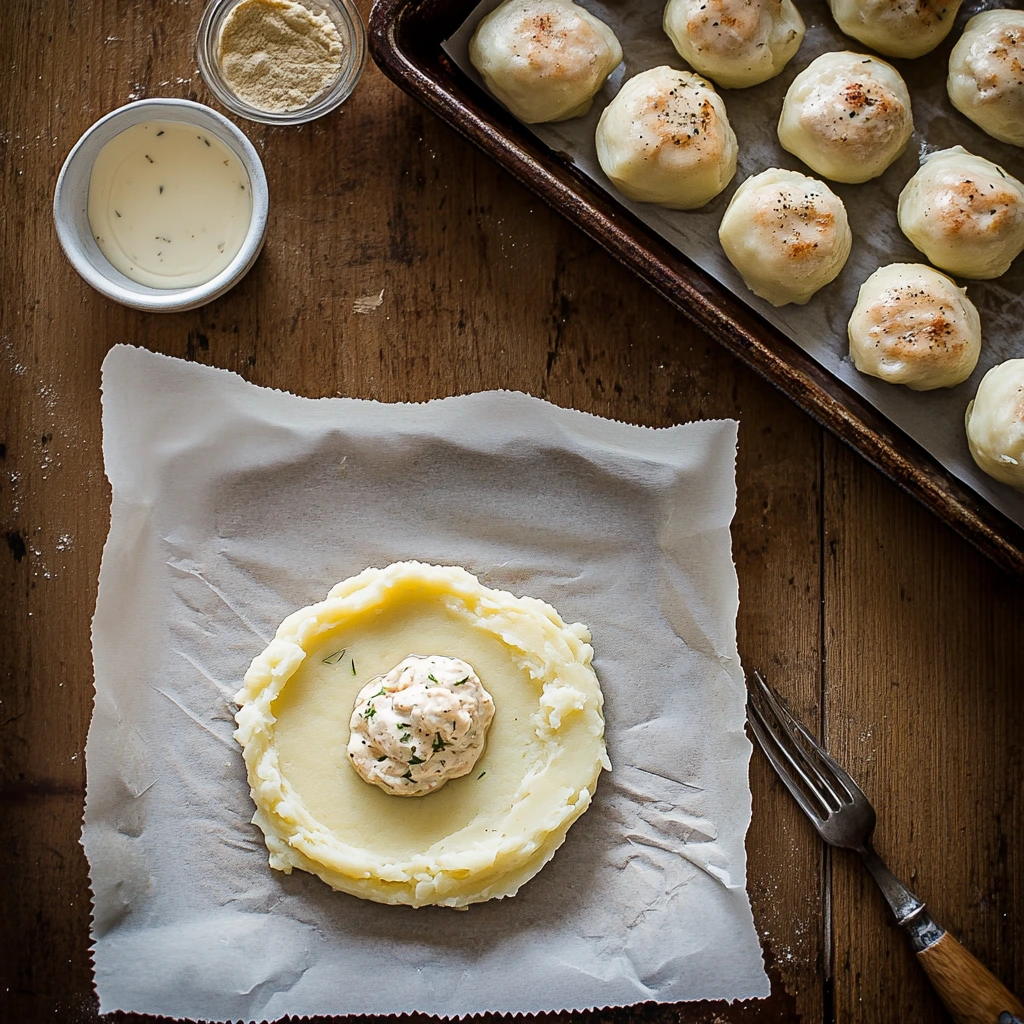
STEP 3: Form the Rolls
Now comes the fun part—building your potato rolls! Take about ¼ cup of your mashed potato mixture and flatten it into a circle in your palm. It doesn’t have to be perfect, just big enough to hold a spoonful of that chicken filling.
Scoop about a tablespoon of filling into the center, then gently wrap the potato around the filling and press to seal. You should end up with a log or oval-shaped roll that holds its shape. If it’s too sticky, lightly oil your hands or chill the mashed potatoes a bit longer before handling.
Keep going until you’ve used up all your potatoes and filling—you should end up with about 10–12 rolls, depending on how big you make them.
How to Cook Chicken Potato Rolls: Baked or Fried to Perfection
Now that your chicken potato rolls are prepped and ready, it’s time to decide how you want to cook them. I love that this recipe gives you two really great options: baking for a lighter, hands-off approach, or frying for that extra crispy, golden exterior that’s just so satisfying.
Whether you’re planning a cozy dinner or prepping for a get-together, this next part is where the magic happens. I’ve made both versions multiple times, and honestly, it all depends on the mood (and how much oil I feel like cleaning up afterward). Either way, the end result is a crowd-pleaser.
Let’s jump into the final steps and a few easy tips that will guarantee your rolls come out beautifully every single time.
STEP 4: Bake or Fry (Your Choice!)
To Bake:
If you’re going the baking route, start by preheating your oven to 400°F (200°C). Line a baking sheet with parchment paper—this helps prevent sticking and keeps cleanup easy.
Place your assembled rolls onto the sheet, leaving a little space between them. Then brush each one with a bit of melted butter or olive oil. This step is important because it helps the outside crisp up and turn golden while baking.
Bake for 20 to 25 minutes, flipping halfway through if you want an even golden color on all sides. They should come out lightly crisped on the outside, and warm and creamy inside.
Pro Tip: For even more texture, roll the potato logs in breadcrumbs before baking. You’ll get that satisfying crunch without having to deep fry anything.
To Fry:
Prefer something a little more indulgent? Frying delivers a crispy, golden crust that’s hard to resist.
Start by heating about ½ inch of oil in a large skillet over medium heat. You’ll know it’s ready when a small piece of potato sizzles as soon as it hits the pan.
Gently place the rolls in the skillet—don’t overcrowd the pan—and fry them for 3 to 4 minutes per side. You’re looking for a deep golden color and a crunchy exterior. Once they’re done, transfer them to a paper towel-lined plate to soak up any excess oil.
Safety Note: Be careful when flipping the rolls, especially if they’re packed full. A wide spatula helps keep them intact.
STEP 5: Serve and Enjoy
Once your rolls are golden and done, give them a few minutes to cool slightly. This not only helps firm them up a bit more but also saves your tongue from a molten-hot surprise!
You can serve these whole or slice them in half for a nice presentation—especially if you’re adding them to a party platter or serving with different dipping sauces.
Here are a few of our family favorites:
Ranch dressing – Classic and kid-approved
Honey mustard – Sweet, tangy, and perfect with the creamy center
Marinara sauce – A warm, tomatoey twist that’s perfect for dipping
Spicy mayo or sriracha aioli – For those who like a little kick
Tips and Tricks for the Best Chicken Potato Rolls
Make Ahead Friendly: You can assemble these rolls in advance and keep them in the fridge for up to 24 hours before baking or frying. This is a huge time saver if you’re planning for a party or busy weeknight.
Freezer Option: Freeze them uncooked on a baking sheet until solid, then transfer to a zip-top bag. When ready to cook, either bake straight from frozen (add 5-10 extra minutes to baking time) or let them thaw slightly before frying.
Add Cheese for a Melty Center: Shredded mozzarella, cheddar, or even cream cheese can be added to the filling for an extra-rich bite.
Customize the Filling: Use leftover rotisserie chicken, turkey, or even canned tuna. The mashed potato shell is super versatile and pairs well with lots of flavors.
Use Leftover Mashed Potatoes: Just make sure they’re not too runny. If needed, add a spoonful of breadcrumbs or flour to thicken them up before shaping.
Chicken Potato Rolls: Your Questions Answered + Final Thoughts
We’ve walked through the full process of making these delicious chicken potato rolls—from prepping the mashed potatoes to choosing between baking or frying. Whether you’re serving them up at a family dinner or bringing them to a party, there’s no doubt these rolls are going to disappear fast.
Before we wrap things up, let’s go over some of the most commonly asked questions about this recipe. From storage to substitutions, I’ve got you covered with simple, helpful answers that’ll make your cooking experience even easier.

Frequently Asked Questions
1. Can I make these chicken potato rolls ahead of time?
Yes! You can prepare and shape the rolls up to 24 hours in advance. Just store them in an airtight container in the refrigerator until you’re ready to bake or fry. If you’re tight on time, this is a great way to stay ahead of the game.
2. Can I freeze them?
Absolutely. After shaping the rolls, place them on a baking sheet lined with parchment paper and freeze until firm. Then transfer to a freezer-safe bag or container. You can bake them directly from frozen—just add a few extra minutes to the cooking time.
3. What kind of chicken works best for the filling?
Cooked, shredded chicken breast is ideal because it holds together nicely and mixes well with the other ingredients. But you can also use rotisserie chicken, leftover grilled chicken, or even canned chicken in a pinch.
4. Are there vegetarian options for this recipe?
Yes! You can swap the chicken with mashed chickpeas, sautéed mushrooms, or even a mix of cooked lentils and veggies. Just make sure the filling is not too wet, so the rolls hold their shape.
5. How can I make the potato layer crispier?
For extra crunch, roll the formed potato rolls in seasoned breadcrumbs before baking or frying. You can also give them a quick spray of cooking oil before baking to help them crisp up beautifully in the oven.
6. What dipping sauces go well with these?
You really can’t go wrong here. Ranch dressing, honey mustard, garlic aioli, spicy mayo, or classic marinara all pair beautifully with the creamy potato and savory chicken filling.
7. Can I use sweet potatoes instead of regular potatoes?
Definitely! Sweet potatoes bring a slightly sweeter flavor and a boost of nutrition. Just be aware that they tend to be softer, so you may need to chill the mixture longer or mix in a bit of flour or breadcrumbs for structure.
Final Thoughts: Give These Rolls a Try!
There’s something undeniably comforting about combining two simple ingredients—potatoes and chicken—and turning them into a crispy, satisfying roll that’s perfect for any occasion. These chicken potato rolls are one of those recipes that’s endlessly customizable and almost guaranteed to be a hit with everyone at the table.
What I love most is how flexible they are. Bake them or fry them, load them with veggies or cheese, prep them ahead or whip them up with leftovers—this recipe fits right into real life, no matter how busy things get.
Print
Chicken Potato Rolls
- Author: Andrew Recipes
Description
These chicken potato rolls are a comforting, satisfying snack or appetizer that brings together creamy mashed potatoes and a flavorful chicken filling. Whether baked for a lighter option or fried for extra crispiness, they’re easy to make and even easier to love. Perfect for meal prep, parties, or a fun family dinner, these rolls are versatile and always a hit.
Ingredients
For the Potatoes
4 medium potatoes, boiled and mashed
2 tablespoons butter (or olive oil for a lighter option)
¼ teaspoon salt
¼ teaspoon black pepper
For the Chicken Filling
1 lb cooked chicken breast, shredded or diced
¼ cup mayonnaise (or Greek yogurt for a healthier twist)
¼ cup diced celery (optional, for crunch)
¼ cup chopped green onions
1 teaspoon garlic powder
1 teaspoon dried parsley
Salt and pepper to taste
Instructions
Step 1: Prepare the Mashed Potatoes
Boil the potatoes until tender, then mash them with butter, salt, and pepper until smooth and creamy. Allow the mixture to cool slightly for easier handling.
Step 2: Mix the Chicken Filling
In a bowl, mix the shredded chicken with mayonnaise, celery, green onions, garlic powder, parsley, salt, and pepper. Stir gently until everything is evenly combined.
Step 3: Form the Rolls
Take about ¼ cup of mashed potatoes and flatten into a thin circle using your hands. Spoon some chicken filling into the center. Wrap the potato around the filling and seal to form a roll. Repeat with the remaining mixture.
Step 4: Bake or Fry (Your Choice!)
To Bake:
Preheat your oven to 400°F (200°C) and line a baking sheet with parchment paper.
Arrange the rolls on the sheet, brush with melted butter or olive oil, and bake for 20–25 minutes until golden and crisp.
To Fry:
Heat ½ inch of oil in a skillet over medium heat. Carefully add the rolls and cook for 3–4 minutes per side until crispy and golden. Remove and drain on paper towels.
Step 5: Serve and Enjoy
Let the rolls cool slightly before serving. Enjoy them whole or sliced, with dipping sauces like ranch, honey mustard, or marinara.
Notes
These rolls can be made ahead and frozen before baking or frying. For extra texture, roll them in breadcrumbs before cooking. You can also add cheese to the filling for an extra creamy center.

