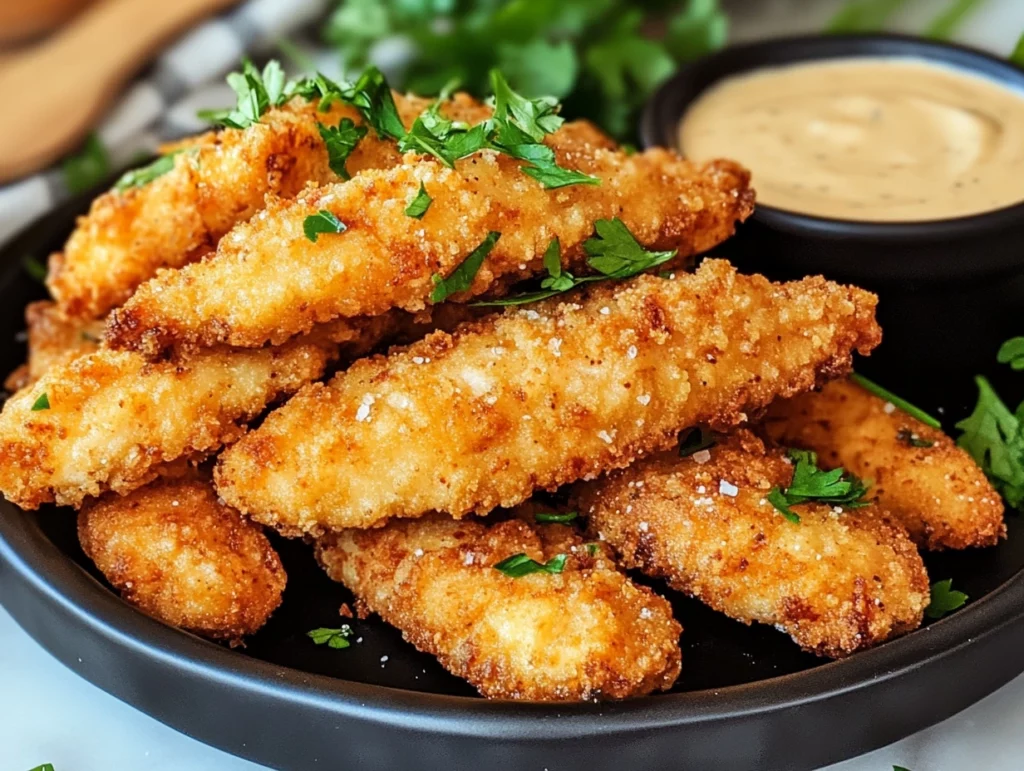
If you’re anything like me, chicken tenders are a staple in your meal rotation—but these Crack Chicken Tenders are next-level. We’re not just talking about plain ol’ tenders here. These are stuffed with a rich, creamy filling of ranch-seasoned cream cheese, melted cheddar, and smoky bacon. Then they’re coated in a crunchy Parmesan-panko breading and baked to crispy, golden perfection.
Honestly, the first time I made these, I didn’t even get a chance to plate them. My family hovered around the oven, grabbing them right off the tray. And I don’t blame them! The smell alone is enough to make your mouth water—cheesy, savory, a hint of garlic, and that toasted Parmesan crust? Total game-changer.
These tenders are everything you want in a comfort food dish: creamy, crunchy, cheesy, and perfectly seasoned. They’re great for family dinners, party appetizers, or even a fun weekend meal with friends. The best part? You can prep them ahead and just pop them in the oven when you’re ready. Let’s dive in.
Ingredients You’ll Need:
1 pound chicken tenderloins
4 ounces cream cheese, softened
½ cup shredded cheddar cheese
½ cup cooked bacon bits
1 cup all-purpose flour
1 tablespoon ranch seasoning mix
½ teaspoon garlic powder
½ teaspoon onion powder
2 large eggs, beaten
1½ cups panko breadcrumbs
½ cup grated Parmesan cheese
Cooking spray or vegetable oil

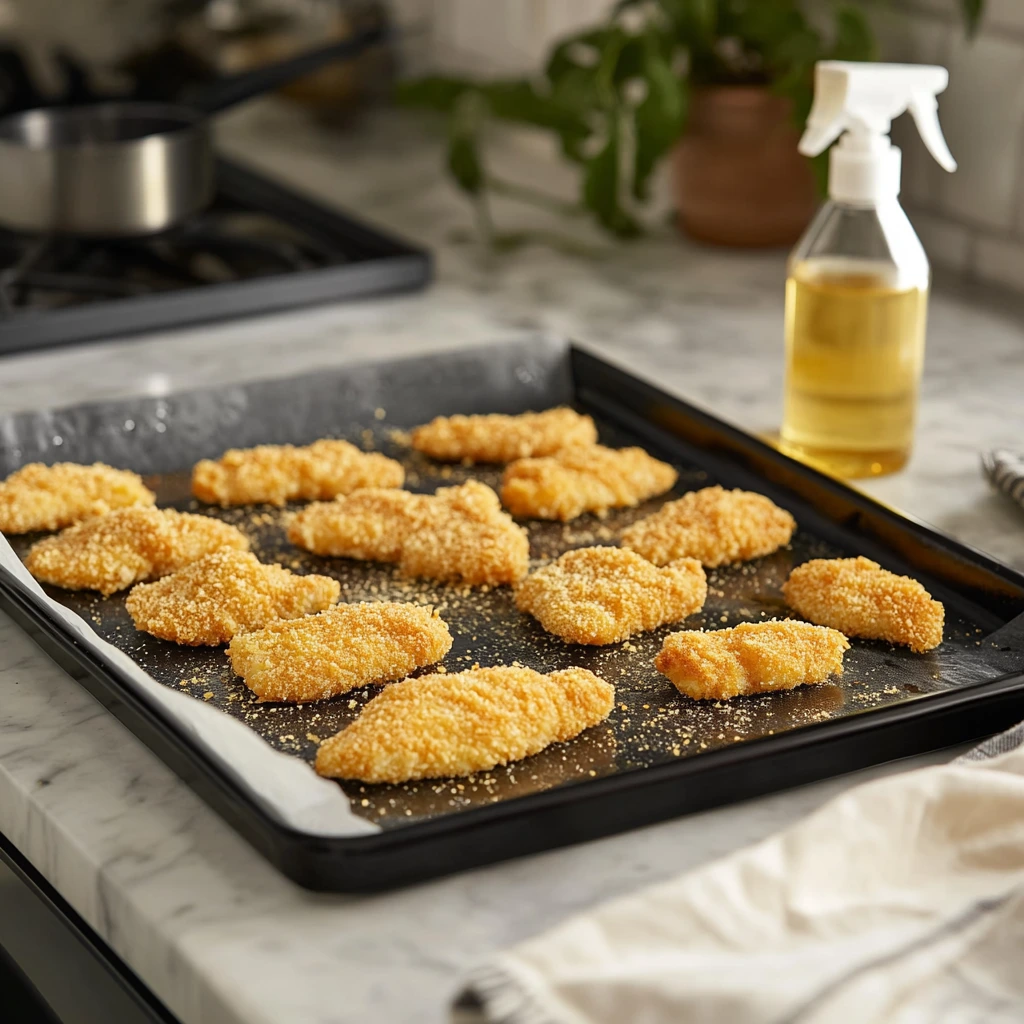
STEP 1: PREP THE OVEN AND BAKING SHEET
Start by preheating your oven to 400°F. Line a baking sheet with parchment paper or foil (trust me, cleanup is way easier this way), and give it a quick spray with cooking spray or a light drizzle of oil. This helps the breading crisp up on the bottom while baking.
STEP 2: BUTTERFLY THE TENDERLOINS
Now, this part may sound a bit fancy, but it’s easier than it seems. Take each chicken tenderloin and, using a sharp knife, slice it lengthwise—but not all the way through. You’re basically making a little pocket, so open it like a book. This is where all that cheesy, creamy goodness will go.
STEP 3: MAKE THE FILLING
In a small bowl, mix together the softened cream cheese, shredded cheddar, and cooked bacon bits. That’s it! The warmth from baking will melt it all together into a gooey, flavorful center that tastes like a mix between jalapeño poppers and ranch dip (minus the heat).
STEP 4: STUFF THE CHICKEN
Take about a tablespoon of your cheese filling and spoon it into each butterflied chicken tender. Don’t worry if it doesn’t close completely—just gently press the edges together to help seal in that creamy center. If a little oozes out while baking, that’s totally fine (and honestly delicious).
STEP 5: SET UP THE BREADING STATION
This is a classic three-step breading process, and it’s the secret to that perfect crunchy exterior:
In your first shallow dish, whisk together the flour, ranch seasoning, garlic powder, and onion powder.
In the second dish, beat the eggs.
In the third, combine the panko breadcrumbs and grated Parmesan.
You’ll coat each stuffed tender in all three layers, and this combo delivers unbeatable crunch and flavor.
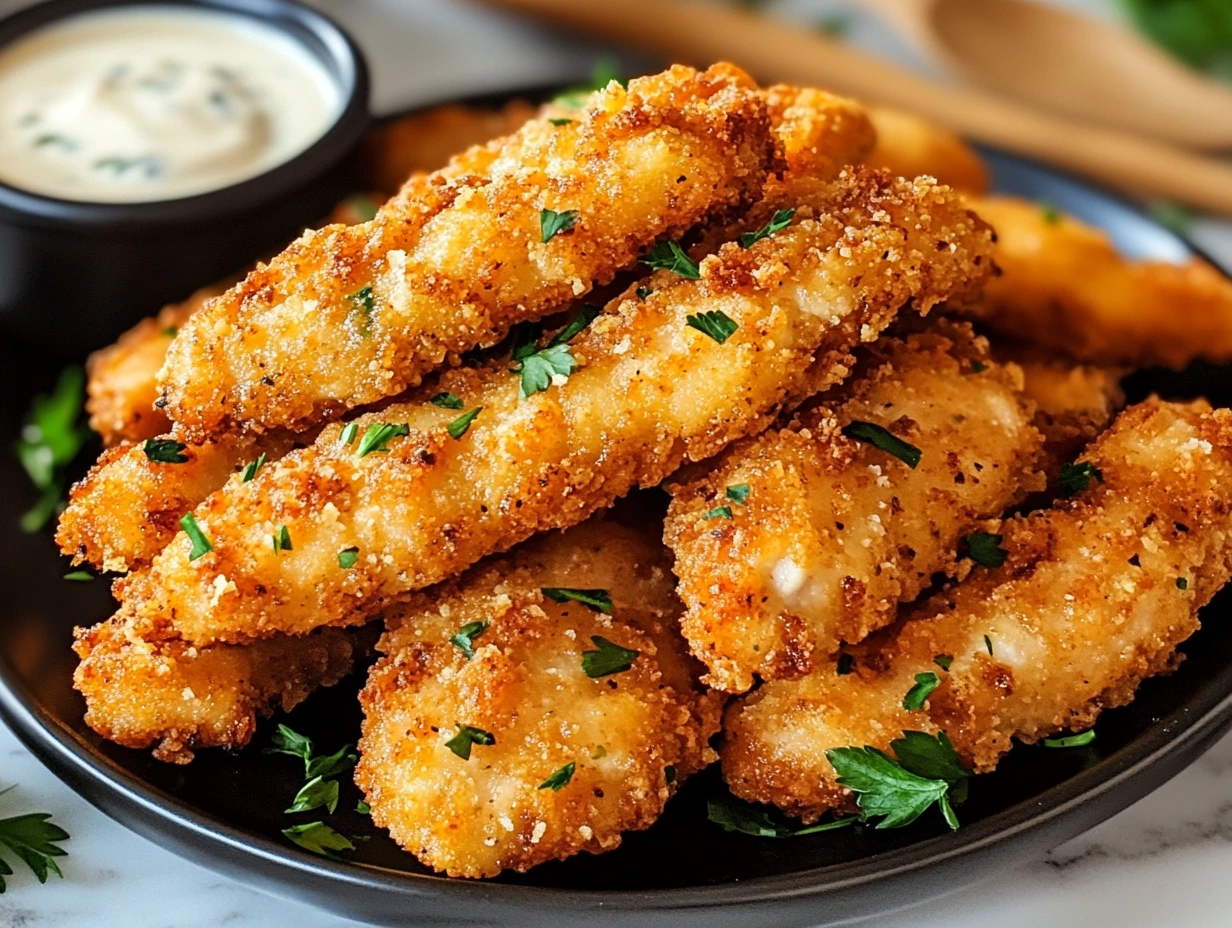
How to Bread and Bake Crack Chicken Tenders to Perfection
The Ultimate Guide to Crispy, Cheesy, Stuffed Chicken Tenders
Alright, now that our chicken tenderloins are butterflied and stuffed with that creamy, bacon-cheddar filling, it’s time to coat them and get them into the oven. This part is where the magic happens—the seasoned flour, ranch flavor, Parmesan, and crispy panko work together to give that unforgettable texture in every bite.
Let’s get into the breading and baking steps, along with a few tried-and-true tips to help you make these chicken tenders perfectly golden and flavorful every single time.
STEP 6: BREAD THE STUFFED TENDERS
Here’s the order you want to follow:
Dredge each stuffed chicken tender in the seasoned flour mixture. Make sure to coat all sides, and shake off any extra flour. This step helps everything else stick better.
Dip the floured chicken into the beaten eggs. A quick flip on both sides will do the trick.
Coat the chicken thoroughly in the panko-Parmesan mixture, gently pressing it in so the crumbs adhere well.
Place each breaded tender on the prepared baking sheet, leaving a little space between them so they bake up evenly.
Tip: Use one hand for dry ingredients and the other for wet. This keeps your hands from turning into breaded mittens.
STEP 7: ADD A LITTLE OIL FOR CRISPINESS
Before popping them into the oven, give the tops of the tenders a light spray with cooking spray, or drizzle them with just a bit of vegetable oil. This step is key for getting that golden, crispy crust you’re after without frying.
STEP 8: BAKE UNTIL GOLDEN AND COOKED THROUGH
Slide your baking sheet into the preheated 400°F oven and bake for 20–25 minutes, flipping the tenders halfway through the cooking time. You’re looking for:
A golden-brown, crunchy exterior
An internal temperature of 165°F (a meat thermometer is your best friend here)
Once done, pull them out of the oven and let them rest for about 5 minutes. This helps the cheese filling set a little and keeps the chicken super juicy.
Optional Step: Frying Instead of Baking
If you’re feeling indulgent (or just want that ultra-crispy texture), you can absolutely fry these instead. Heat about ½ inch of oil in a large skillet over medium heat. Fry the tenders for about 3–4 minutes per side until golden and fully cooked inside.
Just be sure not to overcrowd the pan—fry in batches so you don’t drop the oil temperature too much.
Serving Suggestions
These tenders are packed with flavor, but pairing them with a dip takes things up a notch. Here are a few of our favorite serving ideas:
Classic Ranch Dressing – simple and perfect for bringing out the ranch notes in the crust
Sriracha Mayo – for those who love a little kick
Honey Mustard – that sweet and tangy combo really balances the richness
BBQ Sauce – especially smoky versions, for an extra layer of flavor
Serve them up with a side of fries, a crisp green salad, or even tucked into a sandwich bun for a stuffed chicken sandwich you won’t forget.
Make-Ahead Tips
If you’re meal prepping or hosting a party, you’ll love this: you can assemble the stuffed and breaded tenders in advance, place them on a baking sheet, and keep them refrigerated for a few hours before baking. This makes dinner a breeze when you’re short on time.
You can also store leftovers in an airtight container in the fridge for up to three days. Reheat in the oven or air fryer to bring back that crunch—microwaving will soften the coating a bit, so oven is best.
FAQs and Final Thoughts on Crack Chicken Tenders
Your Questions Answered + Final Tips for This Crowd-Favorite Recipe
By now, your kitchen probably smells incredible and you’re more than ready to dig into a plate of these cheesy, crispy, flavor-packed chicken tenders. Before you do, let’s go over a few commonly asked questions to help you troubleshoot, customize, and perfect your crack chicken tender experience.
Whether it’s your first time making them or you’re already planning your next batch, these quick answers will help you feel confident every step of the way.
FREQUENTLY ASKED QUESTIONS
1. Can I make these ahead of time and freeze them?
Absolutely. You can assemble and bread the tenders, then freeze them raw on a baking sheet until solid. Transfer to a freezer bag and store for up to 2 months. When ready to cook, bake from frozen at 400°F for 30–35 minutes or until the internal temperature hits 165°F.
2. What if I don’t have ranch seasoning mix?
No problem. You can make a simple substitute by combining 1 teaspoon dried parsley, ½ teaspoon dried dill, ½ teaspoon garlic powder, ½ teaspoon onion powder, and a pinch of salt and pepper. It won’t be identical, but it will still bring a similar herby, tangy flavor.
3. Can I use chicken breasts instead of tenderloins?
Yes, just slice them into strips about the size of tenderloins and follow the same steps. You may need to adjust cooking time slightly depending on thickness—just make sure the internal temperature reaches 165°F.
4. How do I keep the filling from leaking out?
It’s totally normal for a little cheese to escape during baking. Pressing the chicken edges together after stuffing and not overfilling each piece will help minimize this. Chilling the tenders for 10–15 minutes before breading can also help the filling stay put.
5. What’s the best way to reheat leftovers?
Use an oven or air fryer for best results. Bake at 350°F for about 10–15 minutes or air fry at 350°F for 6–8 minutes to restore that crispy exterior. Avoid the microwave unless you’re in a pinch—it will make the coating a bit soggy.
6. Can I make these gluten-free?
Yes! Substitute almond flour for the all-purpose flour and use gluten-free breadcrumbs instead of panko. Everything else stays the same.
7. What dipping sauces go best with these tenders?
Ranch is a classic, but spicy sriracha mayo, honey mustard, or chipotle aioli are all great options depending on your taste. The richness of the filling pairs especially well with a little tang or heat.
FINAL THOUGHTS: WHY YOU’LL LOVE THESE CRACK CHICKEN TENDERS
If you’re looking for something that hits all the right notes—creamy, crunchy, savory, and satisfying—these crack chicken tenders are it. They’ve got that wow factor you want in a comfort food recipe, but without being overly complicated. The stuffing keeps the chicken moist and flavorful, and the crispy coating gives you that perfect bite every time.
They’re also surprisingly versatile:
Make them as a game-day appetizer
Serve them over salad for a hearty lunch
Pop them into wraps or sliders for an easy dinner idea
And let’s not forget—you can prep these ahead, freeze them, and even fry them if you’re feeling a little extra. Whether you’re cooking for picky kids or a crowd of hungry adults, this recipe is always a hit.
Print
Crack Chicken Tenders
- Author: Andrew Recipes
Description
Juicy chicken tenderloins are stuffed with a creamy blend of ranch-seasoned cream cheese, cheddar and crisp bacon, then coated in a crunchy ranch-Parmesan breading and baked until golden. These irresistible “crack” tenders deliver a perfect balance of creamy, salty, and crispy in every bite.
Ingredients
1 pound chicken tenderloins
4 ounces cream cheese, softened
½ cup shredded cheddar cheese
½ cup cooked bacon bits
1 cup all-purpose flour
1 tablespoon ranch seasoning mix
½ teaspoon garlic powder
½ teaspoon onion powder
2 large eggs, beaten
1½ cups panko breadcrumbs
½ cup grated Parmesan cheese
Cooking spray or vegetable oil
Instructions
Preheat the oven to 400°F. Line a baking sheet with parchment or foil and lightly grease with cooking spray.
Using a sharp knife, butterfly each chicken tenderloin by slicing lengthwise almost through, then open like a book.
In a small bowl, stir together the softened cream cheese, shredded cheddar and bacon bits until evenly combined.
Spoon about one tablespoon of the cream-cheese mixture into each butterflied tender, then press the edges closed around the filling.
In a shallow dish, whisk together the flour, ranch seasoning mix, garlic powder and onion powder. In a second dish, beat the eggs. In a third dish, mix the panko breadcrumbs with the grated Parmesan.
Dredge each stuffed tender first in the seasoned flour, shaking off any excess, then dip in the beaten eggs, and finally coat completely with the panko–Parmesan mixture.
Arrange the breaded tenders on the prepared baking sheet, spacing them about an inch apart. Lightly mist the tops with cooking spray (or drizzle with a little oil) to encourage browning.
Bake for 20–25 minutes, turning once halfway through, until the coating is golden and the chicken’s internal temperature reaches 165°F.
Remove from the oven and let rest for 5 minutes before serving.
Notes
These tenders can be fried in 1/2-inch oil over medium heat for 3–4 minutes per side instead of baking for an even crispier crust. For a gluten-free version, substitute almond flour for the all-purpose flour and gluten-free breadcrumbs. The filling and breaded tenders can be assembled a few hours ahead and kept refrigerated until ready to bake. Serve with ranch dressing or spicy sriracha mayo for dipping. Leftovers keep in an airtight container in the refrigerator for up to three days.

