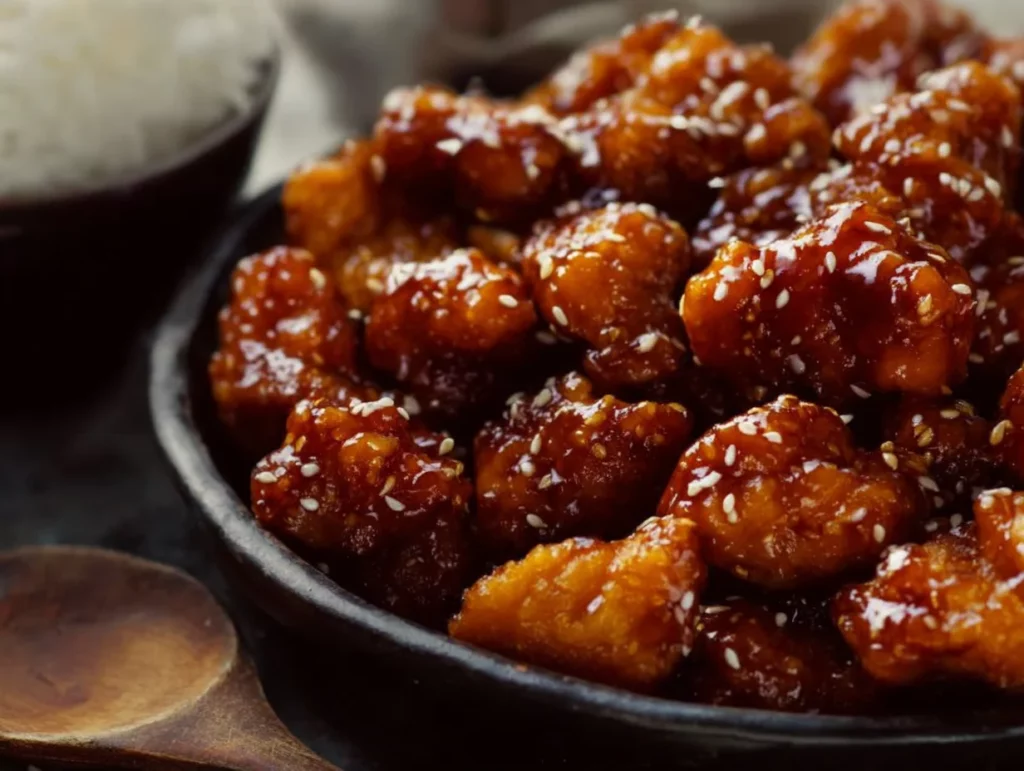
There’s something about Chinese takeout that just hits the spot, right? And for me, crispy sesame chicken is always one of the first things I order. That golden, crunchy chicken coated in a sticky, sweet-savory sauce? Pure comfort food. But guess what—I finally figured out how to make it at home, and I’m telling you, it’s even better than the restaurant version!
This Crispy Sesame Chicken is one of those recipes that instantly wins over a crowd. The chicken is lightly battered, perfectly crunchy, and then tossed in the most addictive sesame sauce that balances sweet, tangy, and savory flavors. And the best part? You don’t need a wok or any fancy equipment—just a skillet or deep pan, a few pantry staples, and about 30 minutes.
We make this on busy weeknights when we’re craving something fun but don’t want to wait on delivery. Serve it over steamed rice, tuck it into lettuce wraps, or pair it with some quick stir-fried veggies—it’s a total winner no matter how you plate it.
Let’s get into how to make it, step by step!
Ingredients You’ll Need
For the Chicken:
500g boneless, skinless chicken thighs or breasts, cut into bite-sized pieces
1 egg
3 tbsp cornstarch
3 tbsp all-purpose flour
Salt and pepper to taste
Vegetable oil, for frying
For the Sauce:
3 tbsp soy sauce
2 tbsp ketchup
2 tbsp brown sugar
1 tbsp rice vinegar
1 tbsp sesame oil
1 tbsp cornstarch mixed with 2 tbsp water (slurry)
1 tsp minced garlic
1 tsp grated ginger
2 tbsp water
1 tbsp toasted sesame seeds
STEP 1: PREPARE THE CHICKEN
We’re going to start by seasoning the chicken lightly with salt and pepper. This adds a base layer of flavor. Then, whisk an egg in a bowl and add your cornstarch and flour to create a thick batter. This mix is key—it gives you that light but crisp coating without being too heavy.
Toss the chicken pieces into the batter and make sure each piece is well-coated. I like to use my hands or tongs to really press the batter onto the chicken. Don’t worry if it looks a little lumpy—that’s exactly what we want for extra texture when it fries.

STEP 2: FRY UNTIL GOLDEN AND CRISPY
Now let’s heat up some oil. You’ll want enough oil to deep-fry, so aim for about 1 to 1½ inches in your skillet or deep pan. Heat it over medium-high heat until it reaches about 350°F (or until a drop of batter sizzles instantly).
Fry the chicken in batches, being careful not to overcrowd the pan. Each batch should take about 4 to 5 minutes to get that deep golden brown color. You’ll know it’s ready when the coating is firm and crisp to the touch.
Once fried, transfer the pieces to a paper towel-lined plate or wire rack to drain off excess oil. If you’re going for extra crunch (and trust me, it’s worth it), you can double-fry. Just let the chicken rest for a few minutes, then fry it again for another 1 to 2 minutes.
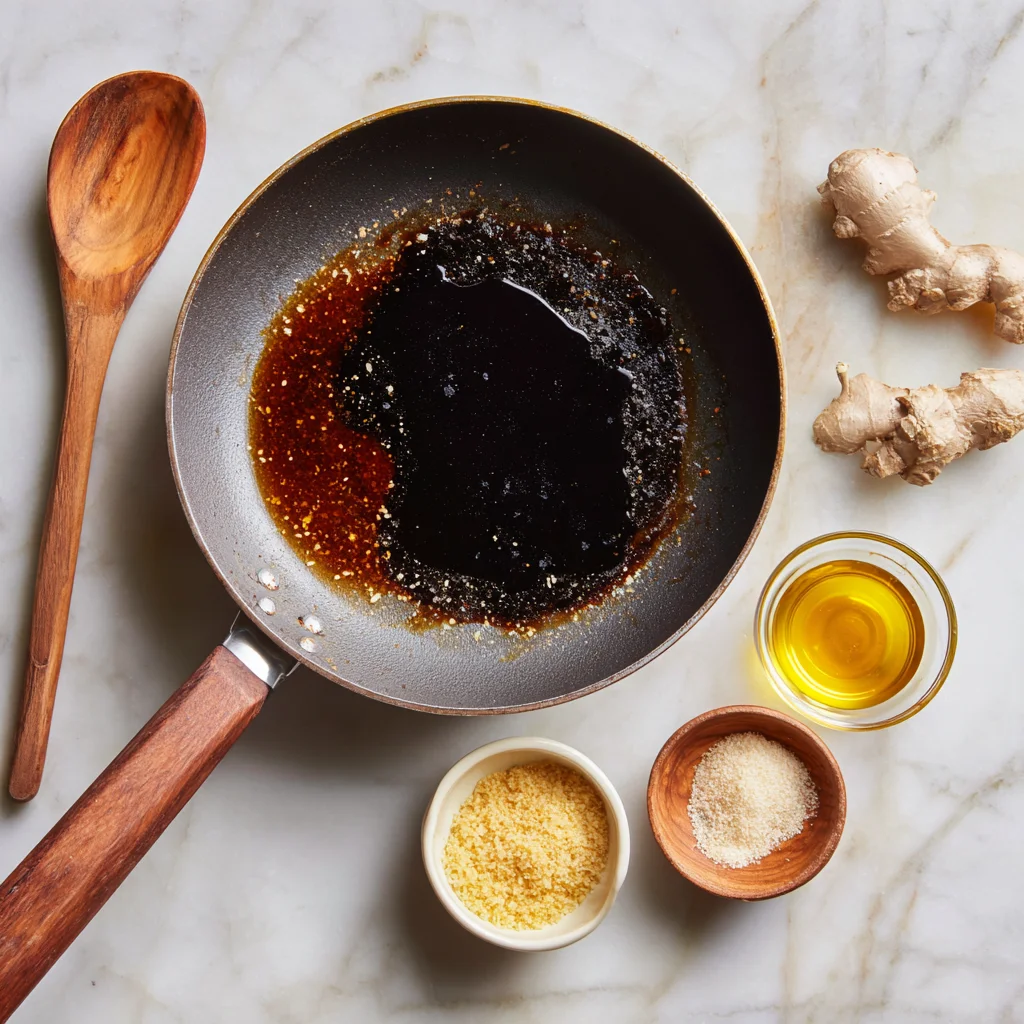
STEP 3: MIX UP THAT SWEET & SAVORY SAUCE
While the chicken’s draining, it’s time to make the sauce—and this is where the magic happens.
Grab a separate pan or wok and toss in the soy sauce, ketchup, brown sugar, rice vinegar, sesame oil, garlic, ginger, and water. Bring it all to a simmer over medium heat, stirring occasionally so the sugar dissolves and the aromatics (that garlic and ginger!) start to work their magic.
Once the sauce is bubbling gently, add the cornstarch slurry and stir continuously. You’ll see it start to thicken and get that glossy, sticky texture—this only takes a minute or two. Make sure not to walk away here. Keep stirring so it doesn’t clump or burn.
Crispy Sesame Chicken Better Than Takeout!
Now that we’ve got our crispy golden chicken ready and that sweet-savory sesame sauce simmering away, it’s time to bring everything together. This is where your kitchen starts to smell like your favorite takeout spot—but better, because you made it yourself!
This final part of the recipe is all about coating the chicken in that sticky sauce and adding a few finishing touches. I’m also going to share some helpful tips and a few fun ways to customize the recipe depending on your mood (or what’s in your fridge!).
Let’s finish this dish off in the most delicious way possible.
STEP 4: COMBINE THE CHICKEN WITH THE SAUCE
As soon as your sauce has thickened to that glossy consistency, go ahead and add your fried chicken pieces directly into the pan. If your pan isn’t large enough, you can do this in a big mixing bowl—just pour the sauce over the chicken and toss everything well.
Use a spatula or tongs to gently turn the chicken so every single piece gets beautifully coated in that sauce. This part is super satisfying, and you’ll instantly notice how the sauce clings to the crispy coating, soaking in just enough to flavor it without making it soggy.
Once everything’s coated, let it sit in the pan for about 30 seconds to a minute—just enough to warm everything through and let the sauce settle into all the nooks and crannies.
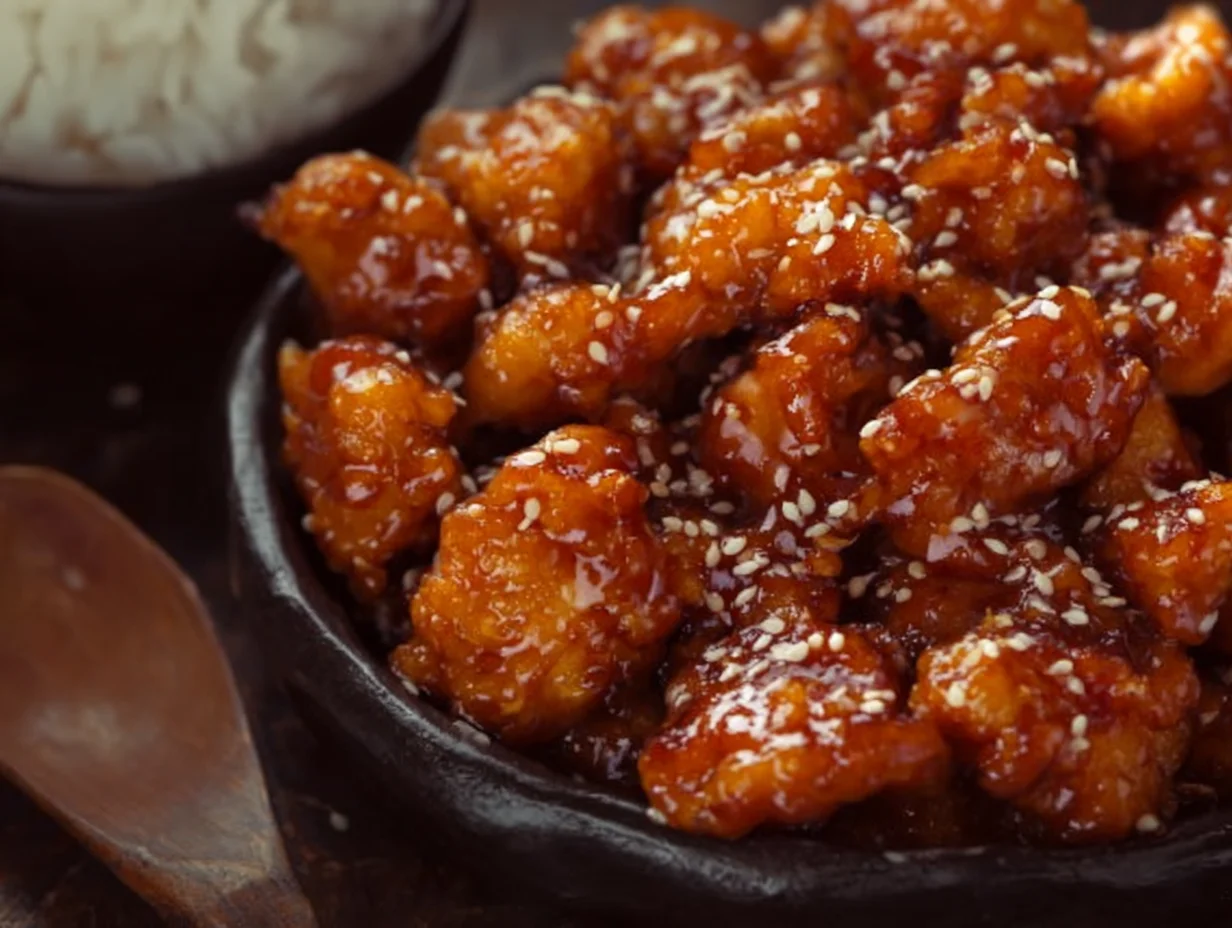
STEP 5: FINISH WITH SESAME SEEDS AND SERVE
Now for the finishing touch—sprinkle toasted sesame seeds over the top of the chicken. These little guys add a toasty, nutty flavor and a bit of crunch that takes everything up a notch.
I love serving this over a big bowl of hot, fluffy jasmine rice. The rice soaks up that extra sauce like a dream. But you could also go with steamed broccoli or stir-fried vegetables if you want to balance things out a bit more. And if you’re feeling fancy, a side of garlic noodles? Yes, please.
TIPS FOR CRISPY CHICKEN AND PERFECT SAUCE
Even though this recipe is super straightforward, here are a few tips that can make a big difference:
Double-Frying = Extra Crunch: After the first fry, let the chicken rest for 5 minutes, then fry again for 1 to 2 minutes. This trick is what makes restaurant fried chicken stay crispy under sauce.
Adjust the Sweetness: Not a big fan of sweet sauces? You can cut the brown sugar down to 1 tablespoon, or even swap it with honey for a more floral, mellow flavor.
Add a Kick: Like a little heat? A pinch of red chili flakes or a drizzle of chili oil in the sauce can give it that extra punch.
Thick Sauce, Not Gluey: Be careful not to overcook the sauce after adding the cornstarch slurry—it should be thick enough to coat the back of a spoon, not gloopy. If it gets too thick, just whisk in a tablespoon of water at a time to loosen it up.
Use Chicken Thighs for Juicier Results: While chicken breast works great, thighs stay juicier and more flavorful after frying. Plus, they’re a little more forgiving if you overcook them slightly.
VARIATIONS TO TRY
Once you’ve nailed the classic version, you can absolutely switch things up depending on what you like or what you have on hand:
Sesame Chicken Lettuce Wraps: Skip the rice and wrap the crispy chicken in butter lettuce leaves for a fun, low-carb option.
Sticky Sesame Chicken Bowls: Layer the chicken over rice with sliced cucumbers, carrots, and a drizzle of sriracha mayo for a takeout-style bowl.
Sesame Orange Chicken: Add a couple tablespoons of orange juice and a bit of zest to the sauce for a citrusy twist.
Gluten-Free Version: Use tamari instead of soy sauce and substitute rice flour for all-purpose flour. Just make sure your cornstarch is gluten-free, too.
Crispy Sesame Chicken (Better Than Takeout!)
We’ve made it to the final stretch of this delicious Crispy Sesame Chicken journey! By now, you’ve got golden, crunchy chicken coated in a glossy sesame sauce, sprinkled with toasted sesame seeds, and ready to serve over rice or veggies.
Before we wrap things up, let’s go over some of the most frequently asked questions about this recipe—things like how to reheat it, whether it freezes well, and how to switch things up based on dietary needs or preferences. These little details can make your cooking experience a whole lot smoother.
FREQUENTLY ASKED QUESTIONS
1. How do I keep the chicken crispy after adding the sauce?
The key is to make sure your sauce is thick and not watery. A well-reduced sauce will coat the chicken without soaking into the crispy batter too much. Also, add the chicken to the sauce right before serving—don’t let it sit in the pan for too long after mixing.
2. Can I make this recipe ahead of time?
Yes and no. You can definitely prep the chicken and the sauce separately. Fry the chicken and store it in an airtight container in the fridge for up to 24 hours. Reheat the chicken in a hot oven (about 375°F/190°C) for 10–12 minutes to bring back the crisp, then toss in freshly reheated sauce right before serving.
3. What’s the best way to reheat leftovers?
The best method is to reheat the chicken in the oven or air fryer to regain some crispiness. Avoid the microwave if possible, as it tends to make the coating soggy. If you must use a microwave, reheat in short bursts and don’t overdo it.
4. Can I bake or air fry the chicken instead of deep frying?
Yes! While you won’t get quite the same level of crunch, it’s still tasty. For baking: place battered chicken on a lined baking sheet, spray with oil, and bake at 425°F (220°C) for about 20–25 minutes, flipping halfway through. For air frying: spray both sides of the chicken pieces lightly and air fry at 390°F (200°C) for 12–15 minutes.
5. Can I make it gluten-free?
Absolutely. Just substitute the all-purpose flour with rice flour or a 1:1 gluten-free flour blend. Use tamari instead of regular soy sauce, and double-check that your ketchup and cornstarch are gluten-free.
6. Is there a vegetarian version of this recipe?
You bet! Swap out the chicken for crispy tofu or cauliflower florets. Prepare the same batter and fry the pieces just like the original recipe. Then toss in the sesame sauce as usual. It’s a great option if you’re cutting back on meat.
7. How do I store leftovers, and how long do they last?
Store any leftover sesame chicken in an airtight container in the fridge for up to 3 days. Just keep in mind that the coating will lose its crispiness over time. For best results, reheat in the oven or air fryer instead of the microwave.
CONCLUSION: TIME TO DIG IN!
And there you have it—crispy, sticky, sweet-and-savory sesame chicken that’s just as satisfying as takeout (if not more), made right in your own kitchen. Whether you’re cooking for a weeknight dinner, a cozy date night, or just because you’re craving something bold and flavorful, this recipe hits the mark every time.
Once you’ve got the basics down, don’t be afraid to make it your own. Adjust the sweetness, add heat, serve it with whatever sides you love—there’s no wrong way to enjoy it. And if you do try any fun variations, I’d love to hear about them!
Print
Crispy Sesame Chicken
- Author: Andrew Recipes
Description
This Crispy Sesame Chicken recipe is a delicious takeout-inspired dish made right at home. Tender chicken pieces are coated in a light, crunchy batter and tossed in a sweet, tangy, and savory sesame sauce. It’s perfect served over steamed rice or with stir-fried vegetables for a satisfying meal.
Ingredients
For the chicken:
500g boneless, skinless chicken thighs or breasts, cut into bite-sized pieces
1 egg
3 tbsp cornstarch
3 tbsp all-purpose flour
Salt and pepper to taste
Vegetable oil, for frying
For the sauce:
3 tbsp soy sauce
2 tbsp ketchup
2 tbsp brown sugar
1 tbsp rice vinegar
1 tbsp sesame oil
1 tbsp cornstarch mixed with 2 tbsp water (slurry)
1 tsp minced garlic
1 tsp grated ginger
2 tbsp water
1 tbsp toasted sesame seeds
Instructions
1 Prepare the chicken by seasoning it lightly with salt and pepper. In a bowl, whisk the egg, then add the cornstarch and flour. Mix to form a batter and coat the chicken pieces evenly in the mixture.
2 Heat oil in a deep pan or skillet over medium-high heat. Once hot, fry the chicken in batches until golden brown and crispy, about 4 to 5 minutes per batch. Remove and drain on paper towels.
3 In a separate pan or wok, combine soy sauce, ketchup, brown sugar, rice vinegar, sesame oil, garlic, ginger, and water. Bring to a simmer over medium heat.
4 Stir in the cornstarch slurry and continue to simmer, stirring constantly, until the sauce thickens and becomes glossy.
5 Add the fried chicken to the sauce and toss well to coat all pieces evenly.
6 Sprinkle with toasted sesame seeds and serve hot with steamed white rice or noodles.
Notes
For extra crunch, double-fry the chicken by letting it rest for a few minutes after the first fry, then frying it again for 1 to 2 minutes. Adjust sweetness by reducing the brown sugar if you prefer a less sweet sauce. Add chopped scallions or a dash of chili flakes for extra flavor and heat.

