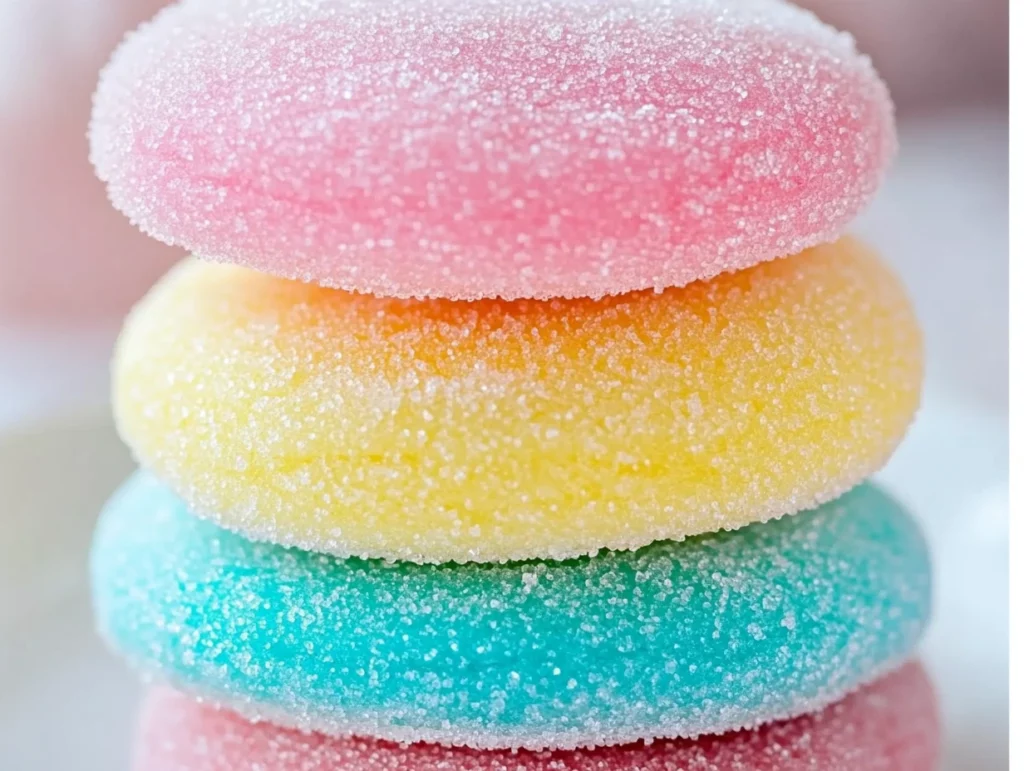
There’s just something so happy about Easter baking, isn’t there? After a long winter of heavy desserts and comfort food, it feels so refreshing to whip up something colorful, sweet, and a little whimsical. That’s exactly what these Easter Day Jello Cookies are all about—bright, fruity flavors packed into soft, chewy cookies that are just as fun to look at as they are to eat.
Growing up, Easter was always a big deal in our house. We’d spend the whole weekend decorating eggs, putting together baskets, and, of course, baking all the sweet treats we could dream up. These Jello cookies take me right back to those kitchen memories—only now, they’re even easier to make with a fun twist: using flavored gelatin to color and flavor the dough!
These cookies are perfect for letting your creativity shine. You can stick with a couple of pastel colors or go all out with a whole rainbow of Easter hues. Whether you’re hosting a brunch, filling up your dessert table, or just looking for a fun baking project to do with the kids, this recipe is sure to bring a little extra brightness to your holiday.
Alright, let’s get into the fun part—making them!
Ingredients You’ll Need
For the Cookies:
1 box (3 oz) flavored gelatin (like strawberry, lemon, or lime for those perfect Easter colors)
1/2 cup unsalted butter, softened
1/2 cup granulated sugar
1 large egg
1 teaspoon vanilla extract
1 cup all-purpose flour
1/2 teaspoon baking powder
Pinch of salt
For Decorating (Optional):
Colored sugar sprinkles
Easter-themed sprinkles
Royal icing (for piping designs)
These ingredients are so simple, and you might already have most of them in your pantry. The flavored gelatin is the secret star here, adding not just color, but a punch of fruity flavor that makes every bite so yummy.
STEPS TO MAKE EASTER DAY JELLO COOKIES
Step 1: Preheat and Prep
Start by preheating your oven to 350°F (175°C). Go ahead and line your baking sheet with parchment paper or a silicone baking mat so you’re ready to roll once the dough is mixed.
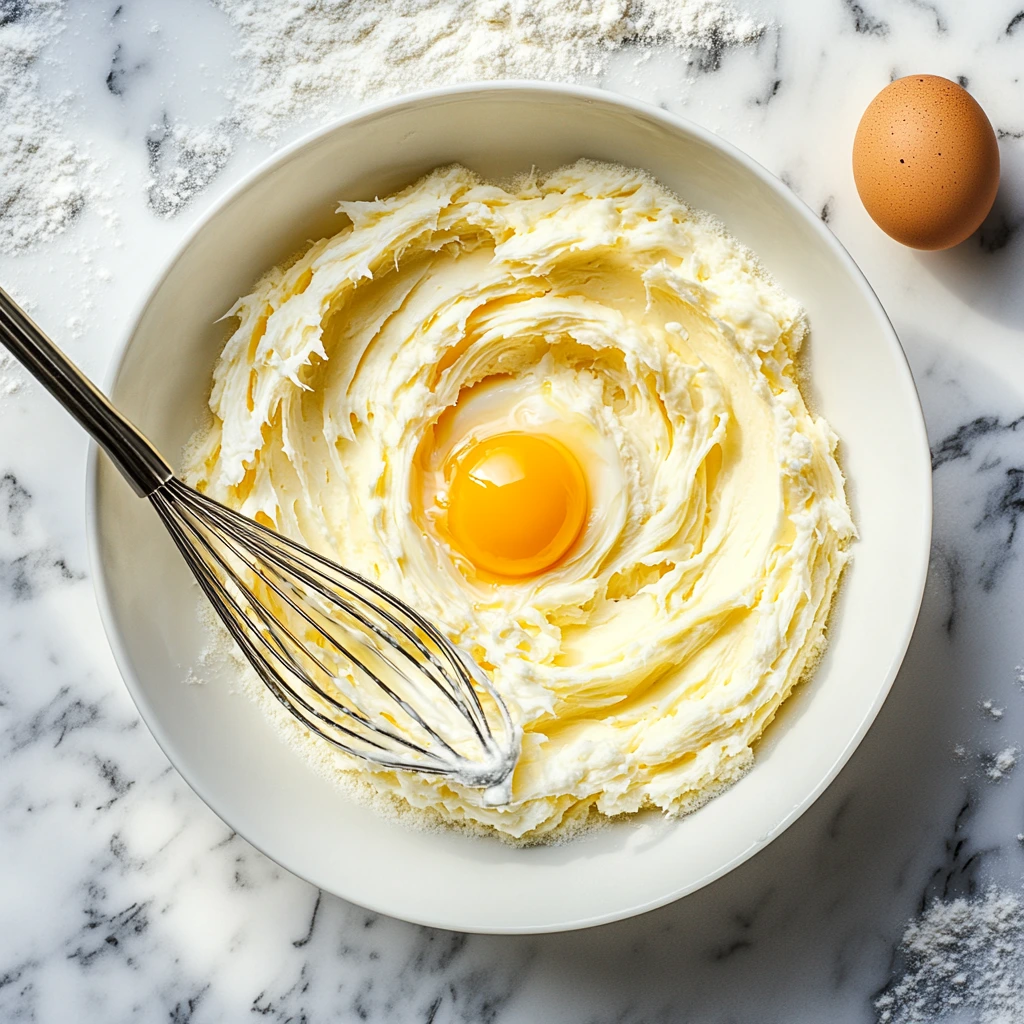
Step 2: Cream Butter and Sugar
In a large mixing bowl, cream the softened butter and sugar together until it’s nice and light. This should take about 2 to 3 minutes. I like to use my hand mixer for this part because it really gets the mixture fluffy, but you can totally do it by hand too if you’re up for a little workout!
Step 3: Add Egg and Vanilla
Once your butter and sugar are perfectly whipped, beat in the egg and vanilla extract. This helps bring everything together and adds that sweet, cozy flavor we all love in a good cookie.
Step 4: Mix Dry Ingredients
In another bowl, whisk together your flour, flavored gelatin, baking powder, and a pinch of salt. The gelatin powder gives the dough its vibrant color and fruity taste—plus it smells amazing as soon as you mix it in!
Step 5: Combine Wet and Dry
Gradually add the dry ingredients to the wet mixture. Mix just until everything comes together into a soft dough. Try not to overmix here—you want the cookies to stay nice and tender.

How to Shape, Bake, and Decorate Your Easter Day Jello Cookies
Now that you’ve got your sweet, colorful dough ready to go, it’s time for the really fun part—shaping, baking, and adding those adorable Easter touches. Trust me, this is the part where the kids (and the kids-at-heart) will want to jump in and help.
These cookies are so easy to customize, whether you keep things simple with colored sugar or go all out with royal icing and festive sprinkles. There’s really no wrong way to make them your own!
Alright, let’s get back into it.
STEPS TO FINISH AND DECORATE YOUR COOKIES
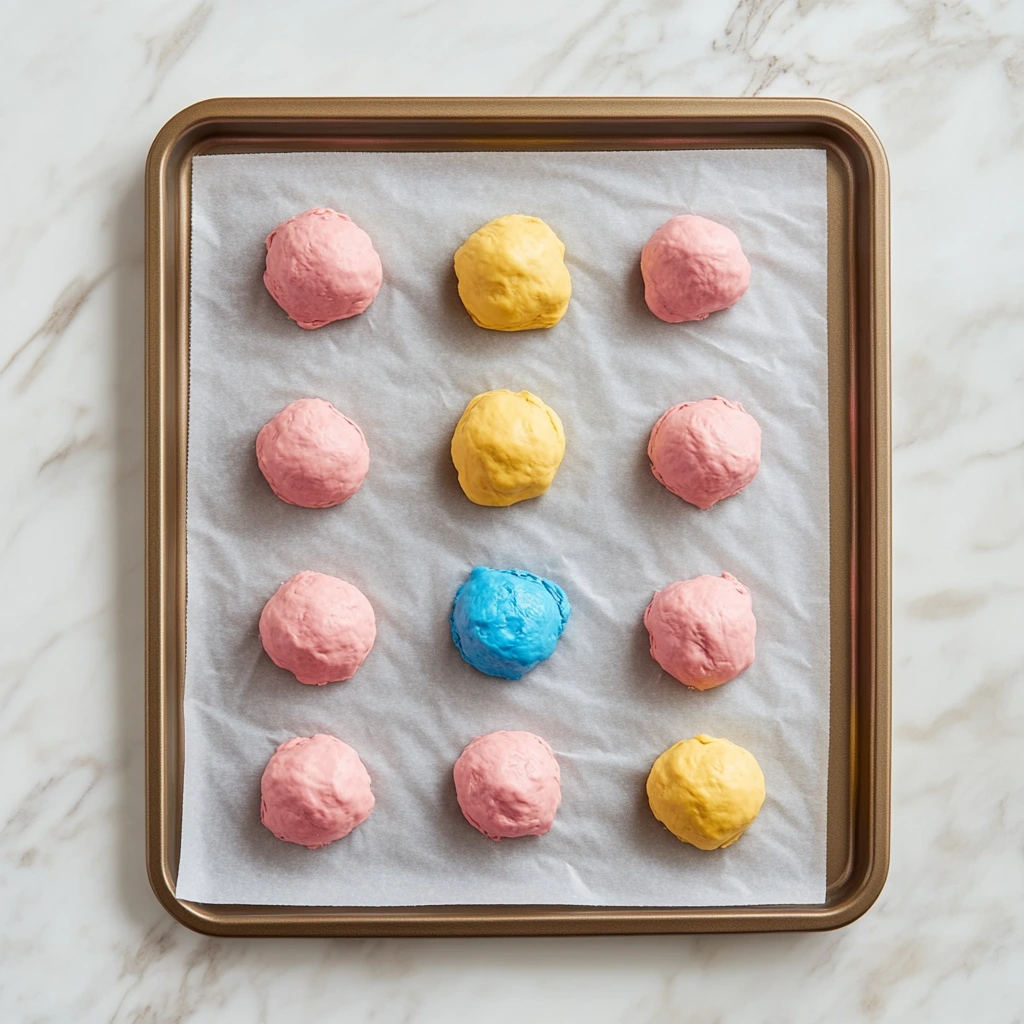
Step 6: Roll and Shape the Dough
Scoop out tablespoon-sized portions of dough. I find that using a small cookie scoop makes this super quick and keeps all the cookies the same size. Roll each portion between your palms into a smooth ball.
Place the dough balls onto your prepared baking sheet, making sure to leave about 2 inches between each one. These cookies spread just a little as they bake, so giving them space is important for those nice, round shapes.
Step 7: Flatten the Dough Balls
Once your dough balls are arranged on the sheet, gently flatten each one slightly. You can use the bottom of a glass or just press down with your fingers. You’re not aiming for flat cookies here—just a slight press to help them bake evenly.
Step 8: Add Some Festive Sparkle
This part is optional but highly recommended: before baking, sprinkle the tops with colored sugar or Easter-themed sprinkles. It gives the cookies that extra festive look without much effort at all.
Step 9: Bake to Perfection
Slide your baking sheet into the oven and bake for 8 to 10 minutes. Keep a close eye on them—you want the edges to be set, but the centers should still be a little soft. They’ll continue to firm up a bit as they cool.
A good tip: If the cookies still look a little underbaked in the center when you take them out, that’s perfect. That’s what keeps them chewy instead of dry.

Step 10: Cool and Decorate
Let the cookies cool on the baking sheet for about 5 minutes. Then transfer them to a wire rack to cool completely.
If you want to go the extra mile with decorations, wait until the cookies are fully cooled. You can drizzle or pipe royal icing in fun designs, add more sprinkles, or even get creative with little Easter shapes like flowers, bunnies, and eggs.
Tips for the Best Easter Jello Cookies
Switch Up the Flavors: Strawberry, lemon, lime, and orange are my favorite Easter colors, but feel free to experiment. Grape or berry blue could also be really fun for something different.
Don’t Overmix the Dough: As soon as the flour and gelatin are incorporated, stop mixing. Overworking the dough can make the cookies a little tough.
Watch the Bake Time: Every oven is a little different, so start checking your cookies around the 8-minute mark. Soft and slightly underbaked is exactly what you want.
Get Creative with Colors: If you’re feeling fancy, you can even divide the dough and use different gelatin flavors to make multiple colors in one batch. Imagine how pretty a pastel rainbow platter would look on your Easter table!
Storage Tips: Store your cookies in an airtight container at room temperature. They stay soft and delicious for up to 5 days—but honestly, they rarely last that long around here.
Easter Day Jello Cookies: Your Questions Answered
Before you dive into baking, let’s tackle a few of the most common questions that pop up when making these colorful Easter Day Jello Cookies. Trust me, if you’ve thought it, someone else probably has too!
FAQ: Easter Day Jello Cookies
1. Can I use sugar-free gelatin for this recipe?
Yes, you can use sugar-free gelatin if you prefer. Just be aware that the color might not be quite as vibrant, and the flavor could be slightly less intense compared to regular gelatin.
2. Can I freeze the cookie dough ahead of time?
Absolutely! Scoop and shape the dough balls, then freeze them on a baking sheet. Once frozen solid, transfer them to a freezer-safe bag or container. When you’re ready to bake, just add an extra minute or two to the baking time—no need to thaw first.
3. What’s the best way to decorate these cookies after baking?
Royal icing works great if you want to add detailed designs like flowers, bunnies, or Easter eggs. You can also drizzle a simple glaze or stick with colorful sugar sprinkles if you want a quicker option.
4. Can I make these cookies in different shapes using cookie cutters?
This dough is soft and not ideal for rolling and cutting with cookie cutters. It’s best suited for scoop-and-roll cookies. If you’re looking for cut-out cookies, you might want to try a sturdier sugar cookie dough instead.
5. How long do the cookies stay fresh?
Stored in an airtight container at room temperature, these cookies stay soft and fresh for about 5 days. If you want to keep them longer, you can freeze the baked cookies and thaw them as needed.
6. Can I mix two gelatin flavors together for a new color and taste?
You sure can! Mixing two flavors can give you a fun new color and a unique fruity twist. Just make sure the total amount of gelatin stays close to 3 ounces so you don’t throw off the dough texture.
7. Why did my cookies turn out dry?
Dry cookies usually happen if they’re overbaked. Make sure to pull them from the oven when the edges are just set and the centers still look a little soft. They’ll firm up as they cool and stay nice and chewy.
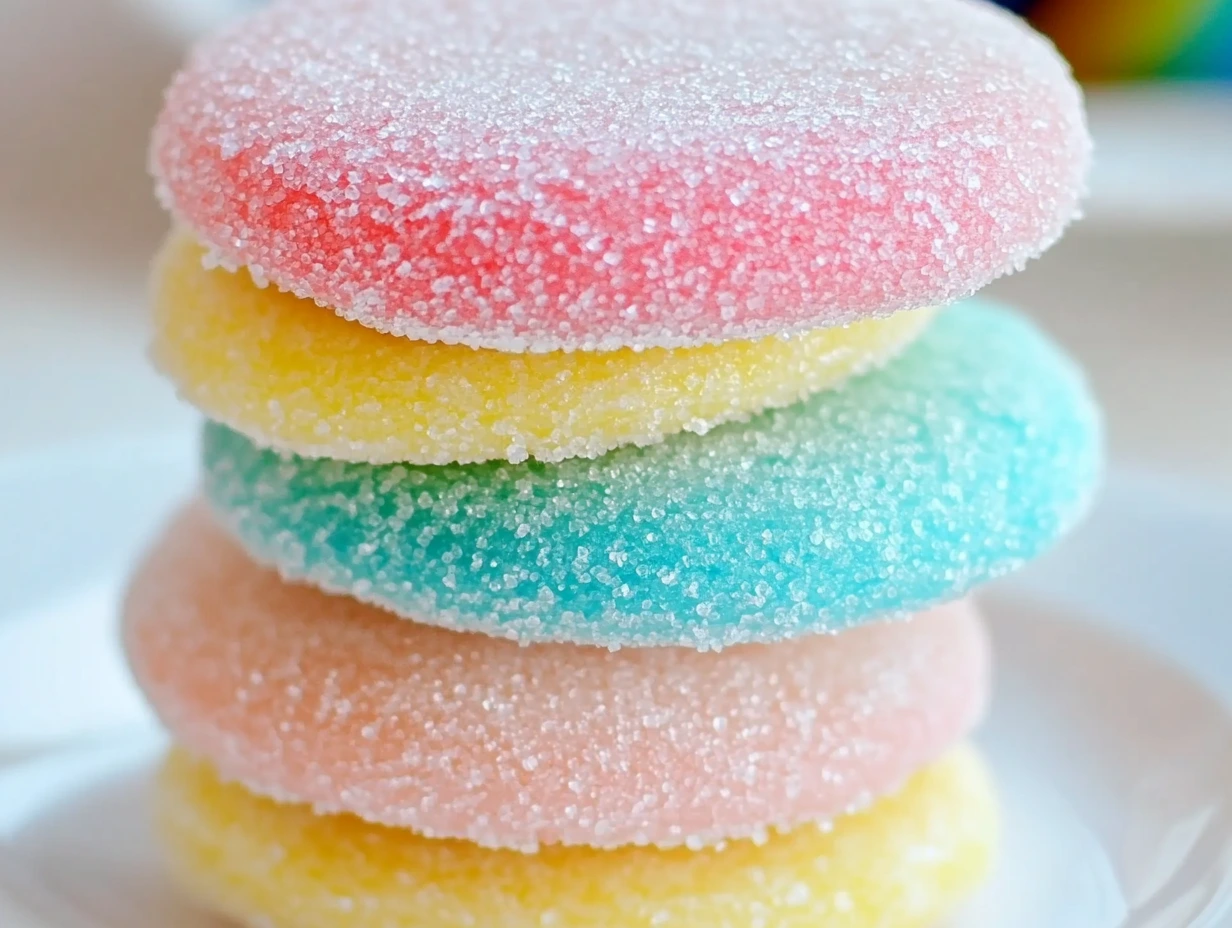
Bring Some Extra Cheer to Your Easter with These Jello Cookies
If you’re looking for a festive, easy, and downright fun Easter treat, these Easter Day Jello Cookies are going to be your new favorite recipe. I love how versatile they are—you can stick with a few colors or go wild and make a whole rainbow of flavors. Plus, they’re so soft, chewy, and packed with fruity flavor that one cookie is never enough.
This recipe is perfect for a family baking day, a spring-themed party, or just to add a pop of color to your Easter dessert table. And since they’re so simple to whip up, you don’t need any fancy ingredients or equipment—just a few pantry staples and a little creativity.
I’d love to hear how your cookies turn out! Feel free to leave a comment, share what flavors and decorations you used, or let us know any fun twists you tried.
Happy baking and have a wonderful, colorful Easter!

Easter Day Jello Cookies
- Author: Andrew Recipes
Description
Bright, colorful, and bursting with fruity flavor, these Easter Day Jello Cookies are a fun and festive treat perfect for your holiday celebrations. Made with flavored gelatin, these cookies are soft, chewy, and easy to customize with your favorite Easter colors and decorations. Whether you keep them simple or get creative with icing and sprinkles, they’re sure to be a hit with kids and adults alike.
Ingredients
For the Cookies
1 box (3 oz) flavored gelatin (such as strawberry, lemon, or lime for Easter colors)
1/2 cup unsalted butter, softened
1/2 cup granulated sugar
1 large egg
1 teaspoon vanilla extract
1 cup all-purpose flour
1/2 teaspoon baking powder
Pinch of salt
For Decorating (Optional)
Colored sugar sprinkles
Easter-themed sprinkles
Royal icing (for piping designs)
Instructions
Preheat your oven to 350°F (175°C). Line a baking sheet with parchment paper or a silicone baking mat.
In a large mixing bowl, cream the softened butter and sugar together until light and fluffy, about 2 to 3 minutes.
Beat in the egg and vanilla extract until fully combined.
In a separate bowl, whisk together the flour, gelatin, baking powder, and salt. Gradually add the dry ingredients to the wet mixture, mixing until a soft dough forms.
Scoop tablespoon-sized portions of dough and roll them into balls between your palms. Place the dough balls on the prepared baking sheet, spacing them about 2 inches apart. Gently flatten each ball slightly with the bottom of a glass or your fingers. If desired, sprinkle colored sugar or Easter-themed sprinkles on top before baking.
Bake the cookies for 8 to 10 minutes, or until the edges are set but the centers are still soft. Be careful not to overbake—these cookies should remain soft and chewy.
Let the cookies cool on the baking sheet for 5 minutes before transferring them to a wire rack to cool completely.
Once cooled, decorate with royal icing or additional sprinkles for a festive finish.
Notes
You can use different flavors of gelatin to create a variety of colorful cookies. Strawberry, lemon, lime, and orange are great choices for a cheerful Easter palette. If decorating with royal icing, make sure the cookies are fully cooled to prevent the icing from melting. Store the cookies in an airtight container at room temperature for up to 5 days.

