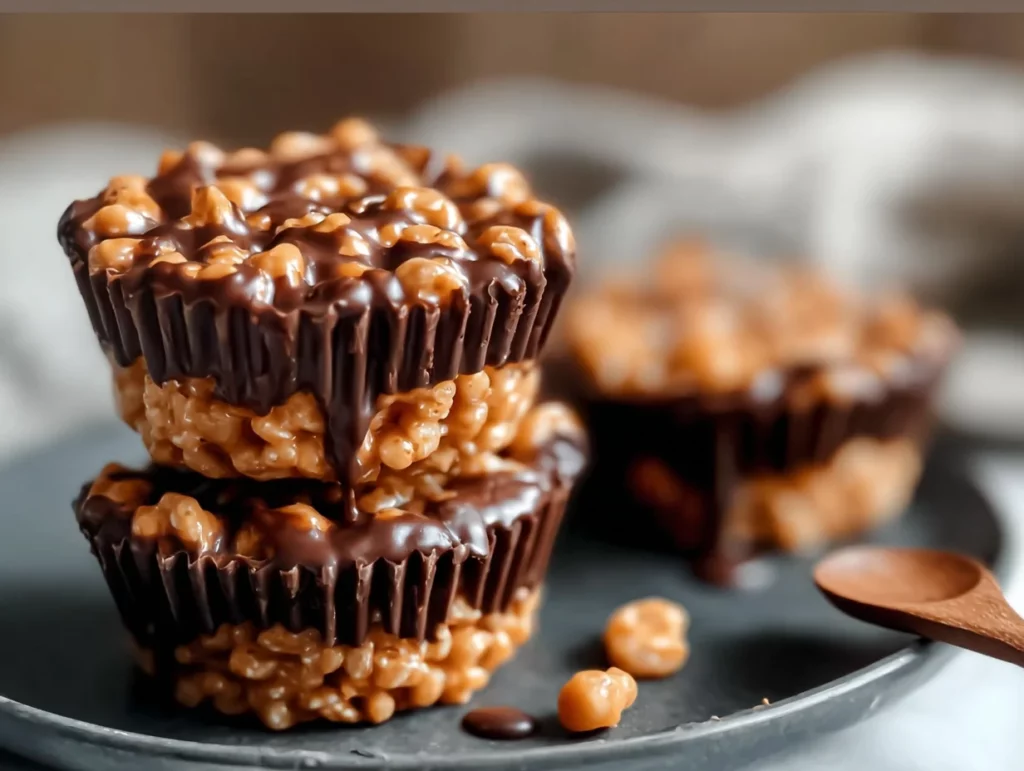
Looking for a sweet treat that’s quick, easy, and dangerously delicious? These Easy Chocolate Peanut Butter Rice Krispie Cups might just become your new go-to dessert. They’re no-bake (yes, really), made with simple pantry staples, and perfect for everything from after-school snacks to potluck favorites. If you love the combo of rich chocolate, creamy peanut butter, and crispy cereal, you’re in for a real treat.
I remember the first time I made these. It was one of those chaotic afternoons when the kids were hungry, I had a sweet tooth, and there was no way I was turning on the oven. I scanned the pantry, spotted a box of Rice Krispies, a jar of peanut butter, and a half-used bag of chocolate chips—and boom, these were born. They’ve been on repeat ever since!
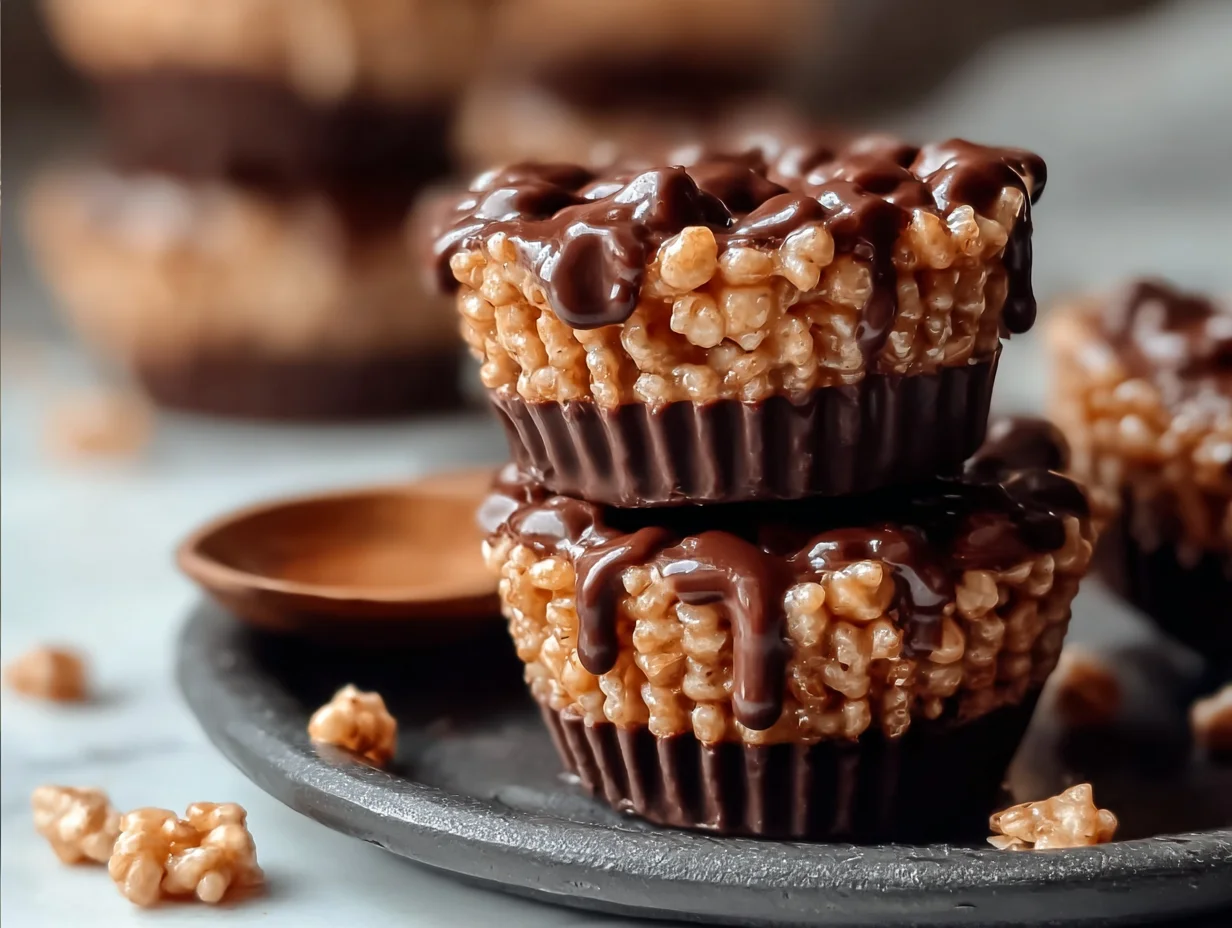
What makes these little cups so special (besides being completely addictive) is how quickly they come together. The texture is spot-on: chewy, crunchy, and just the right amount of gooey. Plus, they’re perfectly portioned in muffin tins, making them easy to grab and go. No messy slicing required!
Alright, enough chatting. Let’s get into the kitchen and whip up a batch of these chocolatey, peanut buttery bites of heaven.
Ingredients You’ll Need
For the Base:
1 cup creamy peanut butter
1/2 cup honey or light corn syrup
1/4 cup brown sugar
1 teaspoon vanilla extract
3 cups Rice Krispies cereal
For the Topping:
1 cup semi-sweet chocolate chips
1/4 cup peanut butter
STEP 1: PREP YOUR MUFFIN TIN
Before you do anything else, go ahead and line a standard muffin tin with paper liners. If you don’t have liners, just lightly grease each cup with non-stick spray or a bit of oil. This helps everything release easily later on.
Tip: If you want mini treats, you can totally use a mini muffin tin—just reduce the quantities a little, and you’ll get bite-sized perfection.

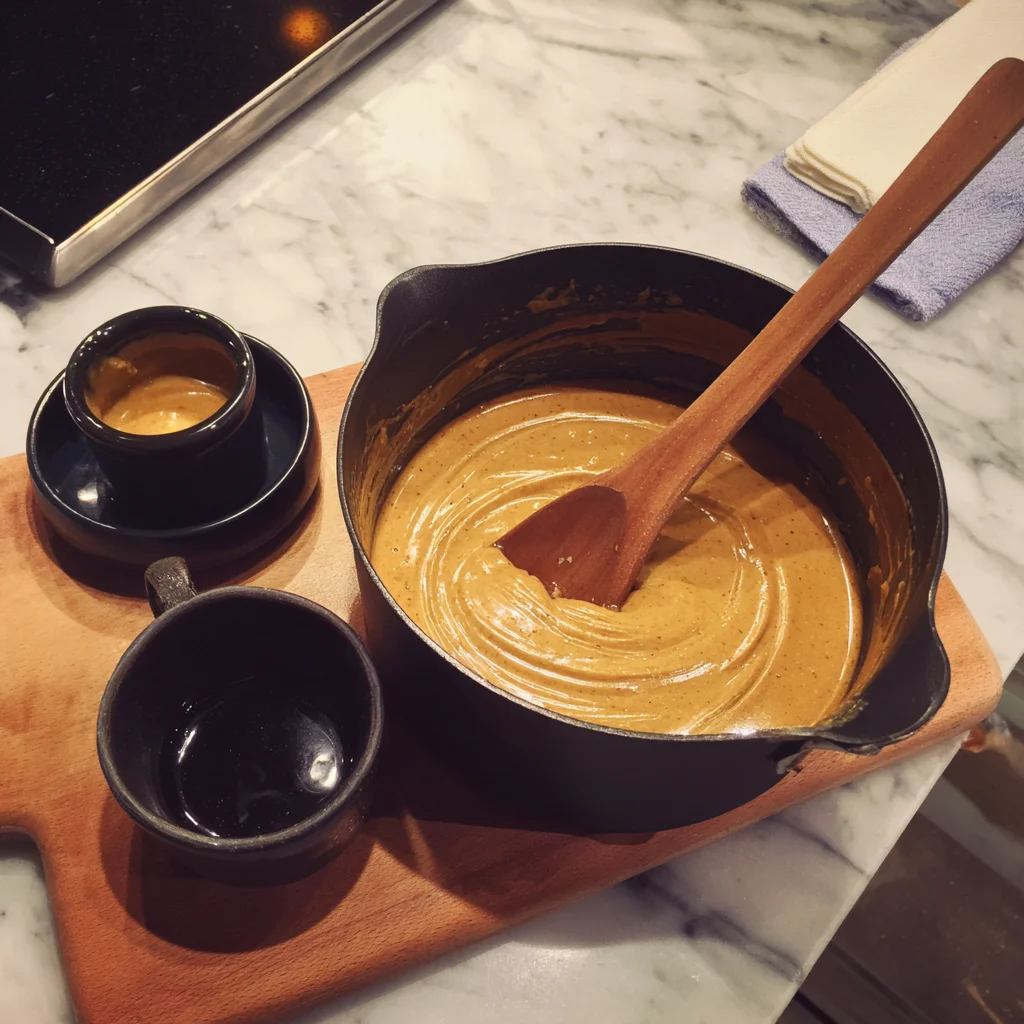
STEP 2: MAKE THE PEANUT BUTTER MIXTURE
Grab a medium saucepan and set it over medium heat. Toss in your 1 cup of creamy peanut butter, 1/2 cup of honey (or corn syrup), and 1/4 cup of brown sugar.
Now stir. Keep stirring as everything starts to melt and combine into a smooth, glossy mixture. You’ll know it’s ready when it just starts to bubble around the edges—don’t let it boil. At this point, remove it from the heat and stir in 1 teaspoon of vanilla extract. Your kitchen should already be smelling amazing right about now!
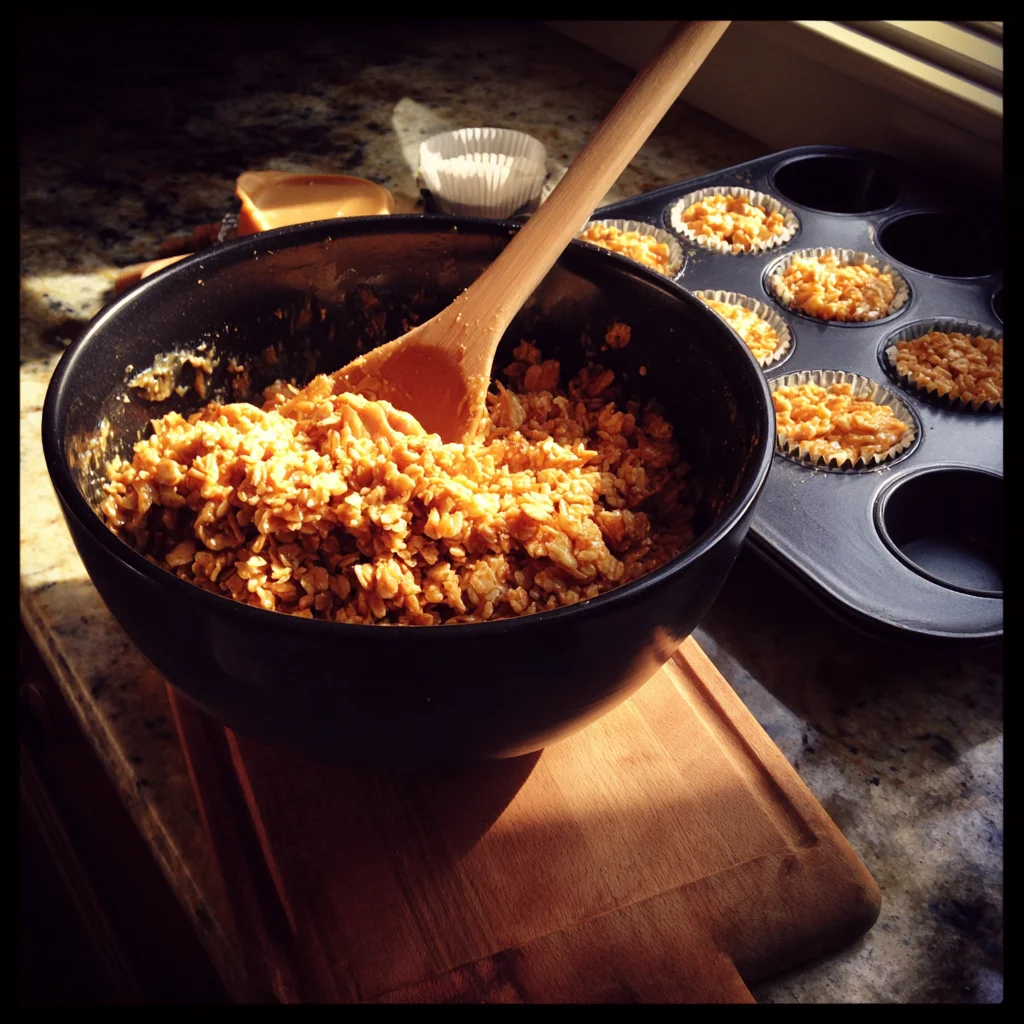
STEP 3: ADD THE RICE KRISPIES
Once your peanut butter mixture is smooth and warm, pour in 3 cups of Rice Krispies cereal. Stir gently but thoroughly, making sure every last bit of cereal is coated in that gooey goodness.
If you’re working with kids in the kitchen, this is a great step for little hands to help (with supervision, of course—it’ll be warm!).
STEP 4: FILL THE MUFFIN TIN
Now it’s time to bring everything together. Spoon the coated cereal mixture evenly into your prepared muffin tin. You want to aim for about 2 tablespoons per cup, depending on your tin size.
Once they’re all filled, gently press the mixture down with the back of a spoon to create a flat, compact layer. Don’t pack it too tightly—just enough to help everything hold together.
Easy Chocolate Peanut Butter Rice Krispie Cups: Finishing Touches and Pro Tips
Welcome back! Now that your peanut buttery cereal base is nestled in the muffin tin and patiently waiting, it’s time to take these treats to the next level—the chocolate peanut butter topping. Honestly, this is where the magic happens. The rich, silky topping sets perfectly in the fridge and adds that luscious, melt-in-your-mouth finish to every bite.
Let’s go ahead and finish these off so you can get them chilling—and more importantly, snacking.
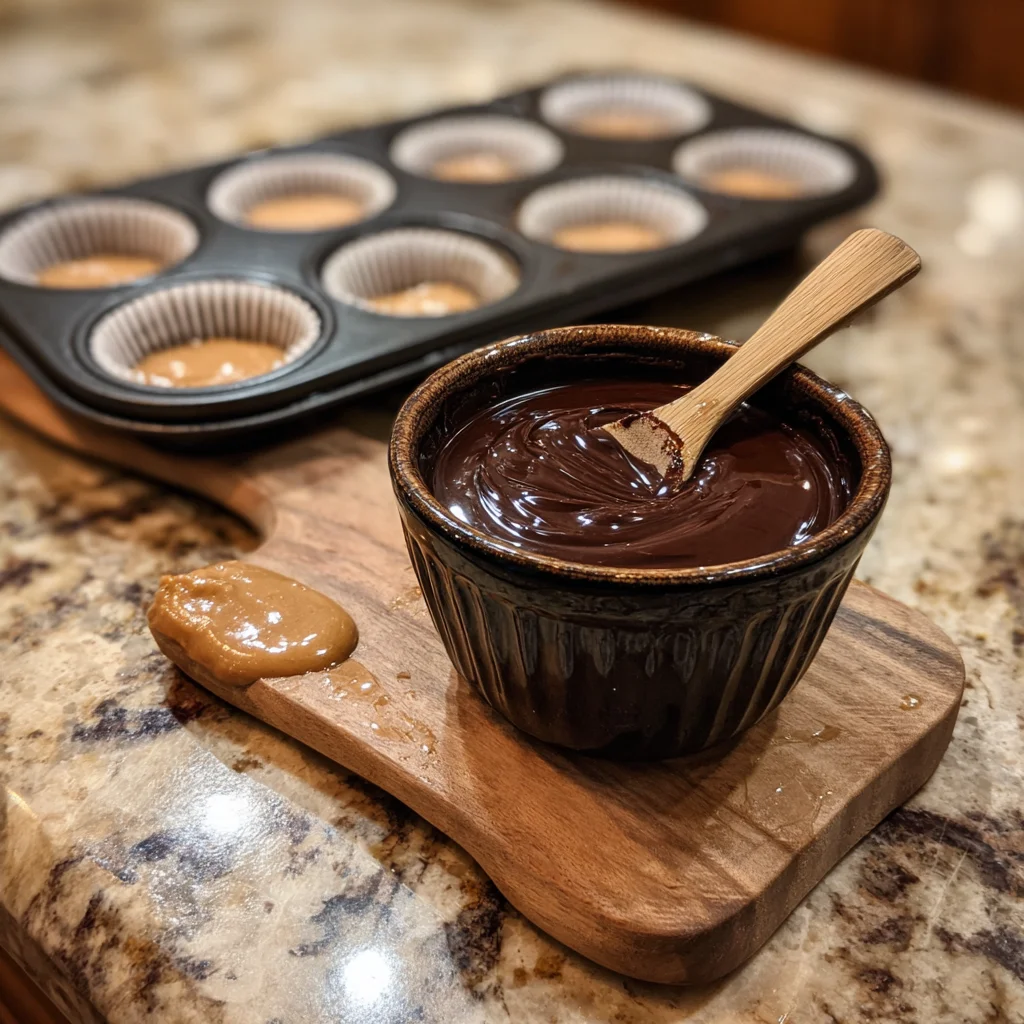
STEP 5: MAKE THE CHOCOLATE-PEANUT BUTTER TOPPING
This step is as simple as it gets. In a microwave-safe bowl, combine 1 cup of semi-sweet chocolate chips and 1/4 cup of peanut butter.
Pop the bowl in the microwave and heat it in 30-second intervals, stirring after each one. It usually takes about 60 to 90 seconds total, depending on your microwave. Stir until the mixture is completely smooth and glossy.
If you don’t have a microwave, no worries—you can do this on the stovetop using a double boiler or by placing a heat-safe bowl over a pot of simmering water. Just keep the heat low and stir constantly so nothing scorches.
STEP 6: TOP YOUR CUPS
Once your chocolate-peanut butter topping is ready, spoon it over each cereal-filled muffin cup, smoothing the tops out with the back of a spoon or an offset spatula. Try to keep the layer even, but don’t stress over perfection—they’re homemade, and that’s part of the charm.
Depending on how generous you are with the topping, you may have a little extra. I won’t tell if you sneak a spoonful or two for yourself. (Okay, maybe just one.)
STEP 7: CHILL UNTIL SET
Now comes the hard part—waiting. Place the muffin tin in the refrigerator for about 1 hour, or until the cups are firm to the touch.
Once they’re set, remove them from the tin and transfer to an airtight container. You can store them in the fridge for up to one week, but let’s be honest—they rarely last that long around here.
OPTIONAL VARIATIONS TO TRY
If you’re anything like me, you might enjoy putting your own twist on a classic recipe. Here are a few easy ways to customize these chocolate peanut butter Rice Krispie cups to suit your taste—or whatever ingredients you’ve got hanging out in your pantry.
Use Crunchy Peanut Butter: Want even more texture? Swap creamy for crunchy peanut butter in the base or topping—or both.
Add a Pinch of Sea Salt: A sprinkle of flaky sea salt on top of the chocolate before chilling adds a lovely contrast to the sweetness.
Mix in Mini Marshmallows or Chopped Nuts: Stir a small handful into the cereal base for extra flavor and texture.
Make Them Dairy-Free: Just use dairy-free chocolate chips, and you’re good to go. Everything else in the recipe is naturally dairy-free.
Press Into a Pan Instead: If you don’t have a muffin tin or want to save time, press the mixture into a parchment-lined 8×8-inch baking dish, top with the chocolate mixture, and cut into bars once chilled.
TIPS FOR THE BEST RESULTS EVERY TIME
Don’t Overheat the Peanut Butter Mixture: You want it warm and melted—not boiling—otherwise it can start to harden too quickly or even burn.
Use Fresh Cereal: This might sound basic, but stale Rice Krispies will throw off the texture. You want that classic crunch.
Work Quickly: Once the cereal mixture is mixed, scoop it into the muffin tin promptly while it’s still warm—it gets harder to press into place as it cools.
Let Them Chill Fully: It’s tempting to dive in early, but giving them time to firm up in the fridge makes them so much easier to eat (and less messy).
Easy Chocolate Peanut Butter Rice Krispie Cups: FAQ & Final Thoughts
You’ve made it to the final stretch! By now, your kitchen probably smells like a dream, and those chocolate peanut butter Rice Krispie cups are chilling away in the fridge. While you wait for them to firm up (or maybe while you sneak one early—we won’t judge), let’s go over some common questions people often have when making this recipe.
Whether you’re planning to serve these for a holiday get-together, stash them away for late-night snacks, or send them off in lunchboxes, the tips below will help ensure they come out perfectly every time.
FREQUENTLY ASKED QUESTIONS
1. Can I freeze these rice krispie cups?
Yes, absolutely! These treats freeze really well. Just make sure they’re fully set before transferring to a freezer-safe container. You can store them for up to 2 months. When you’re ready to eat, just let them thaw in the fridge for about 30 minutes.
2. What’s the best substitute for honey in this recipe?
If you’d rather not use honey, light corn syrup is a great alternative and works just as well. You can also try maple syrup or agave nectar, though the texture may be slightly softer.
3. Can I use a different type of cereal?
Yes! While Rice Krispies give that signature crunch, other puffed rice cereals or even cornflakes can work. Just make sure whatever you use is crisp and fresh. Keep in mind that the texture will vary depending on the cereal.
4. My mixture is too sticky to press—what should I do?
If the mixture is sticking to your spoon or fingers too much while pressing it into the tin, try lightly greasing the spoon (or your hands) with a bit of oil or butter. It makes the process much smoother and keeps things from becoming a sticky mess.
5. Are these gluten-free?
Rice Krispies themselves often contain malt flavoring (which comes from barley), so they’re not technically gluten-free. However, you can find certified gluten-free puffed rice cereals in most grocery or health food stores. Just be sure to check the labels on all your ingredients.
6. Can I make these without peanut butter?
You can! If there’s a peanut allergy in the house, almond butter, sunflower seed butter, or cashew butter all work as alternatives. Just know that each one has a slightly different flavor, but the texture will remain very similar.
7. How long will these stay fresh?
Stored in an airtight container in the fridge, these cups will stay fresh for up to one week. If you’re storing them at room temperature, aim to eat them within 3 to 4 days—they may soften a bit more, especially in warmer weather.
FINAL THOUGHTS
There’s something so satisfying about simple, no-fuss recipes that still deliver big flavor—and these Easy Chocolate Peanut Butter Rice Krispie Cups check every single box. They’re fun to make, require zero baking, and taste like a nostalgic treat with a grown-up twist.
Whether you’re making these with your kids on a rainy afternoon, prepping a batch for a potluck, or just need something sweet in the fridge for those “just one bite” moments, this recipe is a solid winner.
I’d love to hear how yours turned out! Did you stick to the classic version, or did you try a fun variation? Drop a comment below and let me know—your ideas might inspire someone else’s next sweet creation. And if you happen to share them with friends or family, be prepared to hand out the recipe. These don’t stay secret for long.
Print
Easy Chocolate Peanut Butter Rice Krispie Cups
- Author: Andrew Recipes
Description
These no-bake chocolate peanut butter rice krispie cups are the perfect sweet treat—crunchy, creamy, and made with just a few pantry staples. They come together quickly and are ideal for a snack, dessert, or potluck favorite. The combination of rich chocolate and nutty peanut butter, along with the crispy texture of rice cereal, makes them irresistible.
Ingredients
For the base:
1 cup creamy peanut butter
1/2 cup honey or light corn syrup
1/4 cup brown sugar
1 teaspoon vanilla extract
3 cups Rice Krispies cereal
For the topping:
1 cup semi-sweet chocolate chips
1/4 cup peanut butter
Instructions
Line a muffin tin with paper liners or lightly grease each cup.
In a medium saucepan over medium heat, combine the peanut butter, honey, and brown sugar. Stir frequently until the mixture is smooth and just starts to bubble. Remove from heat and stir in the vanilla extract.
Add the Rice Krispies cereal to the saucepan and mix until the cereal is fully coated with the peanut butter mixture.
Spoon the mixture evenly into the muffin tin, pressing it down gently with the back of a spoon to form a compact layer.
In a microwave-safe bowl, combine the chocolate chips and peanut butter for the topping. Microwave in 30-second intervals, stirring between each, until fully melted and smooth.
Spoon the chocolate-peanut butter mixture over the cereal base in each cup, smoothing the tops with a spoon.
Refrigerate the cups for about 1 hour or until firm. Once set, remove them from the tin and store in an airtight container in the fridge.
Notes
You can use crunchy peanut butter if you prefer extra texture.
For a dairy-free version, make sure to use dairy-free chocolate chips.
If you don’t have a muffin tin, press the mixture into an 8×8-inch pan and cut into squares once set.
These treats can be stored in the fridge for up to one week or frozen for longer storage.

