There’s something utterly comforting about a warm, buttery biscuit—especially one that practically swims in garlic-infused goodness. As someone who’s tested countless biscuit recipes over the years, I can confidently say these Garlic Butter Swim Biscuits have earned a permanent spot in my baking rotation. They’re soft, pull-apart squares that soak up every last drop of melted butter, delivering a flavor punch that pairs beautifully with nearly any meal. Whether you’re ladling them alongside a hearty bowl of soup or serving them as an indulgent snack, these biscuits never disappoint.
I first stumbled upon this method of “swimming” biscuits when experimenting with a sheet-pan buttermilk biscuit recipe. I had puddled melted butter in the pan, almost by accident, and then dropped spoonfuls of dough right on top. After baking, each square had this incredible crisp edge where the dough met the butter, and the centers were impossibly tender. Since then, I’ve fine-tuned the flavor with garlic powder, fresh minced cloves, and a parsley-flecked butter topping, and I’m delighted to share the results with you.
Below, you’ll find everything you need to know to recreate these pull-apart delights from scratch. In Part 1, we’ll cover the essential ingredients, equipment, and the first steps—mixing the dough, prepping your pan, and shaping the biscuits. Let’s dive in!

Steps
Preheat & Prep:
Preheat your oven to 450 °F (230 °C). Generously grease a 9×9-inch oven-safe glass or ceramic baking dish with nonstick spray. This step ensures the biscuits won’t stick and makes cleanup a breeze.Combine Dry Ingredients:
In a medium mixing bowl, whisk together:2½ cups all-purpose flour
1 tablespoon granulated sugar
1 tablespoon aluminum-free baking powder
2 teaspoons salt
2 teaspoons garlic powder
Whisking thoroughly distributes the leavening and seasonings, so each biscuit bakes up tender and flavorful.
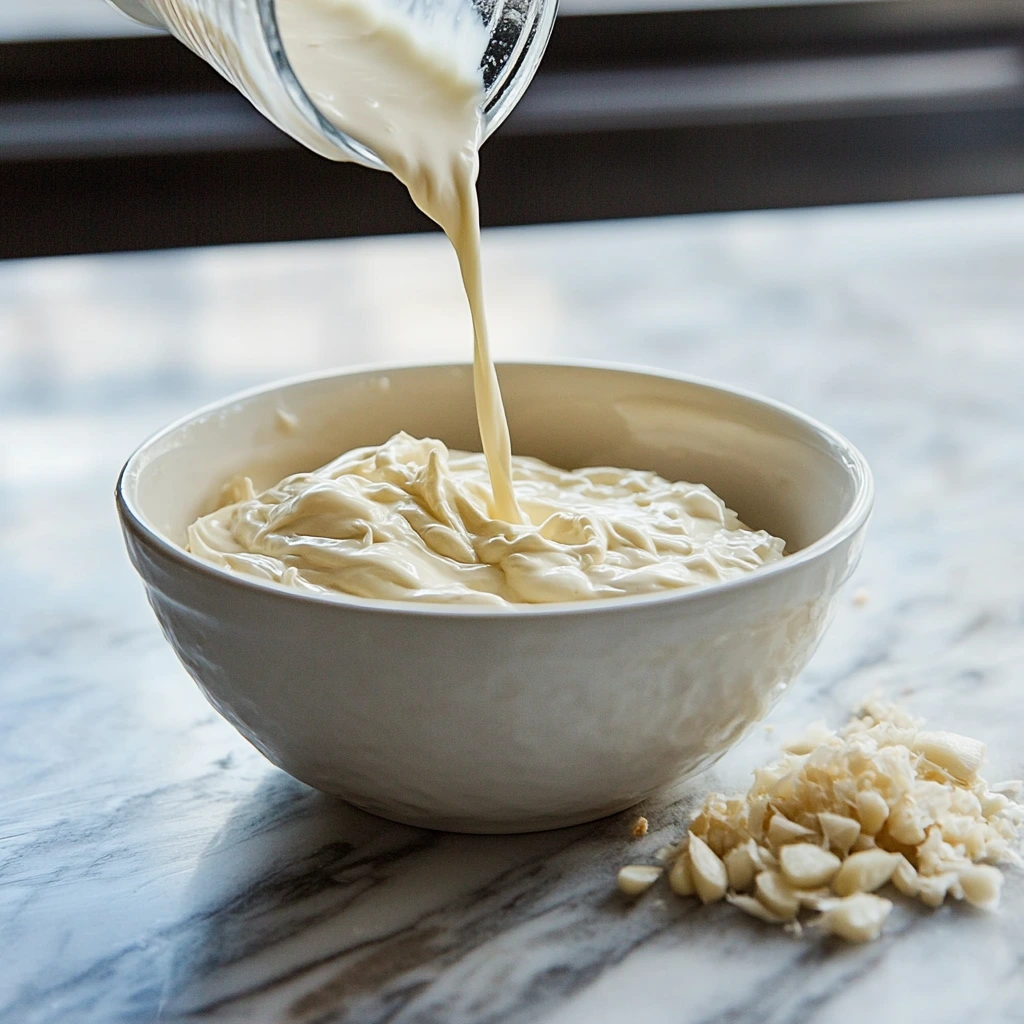
Add Buttermilk & Garlic:
Pour 1¾ cups cold buttermilk into the dry mixture. Add 4 cloves of finely minced garlic. Stir gently with a wooden spoon or rubber spatula until a thick, slightly sticky batter forms. If the dough seems too dry to come together, add buttermilk by the tablespoon—up to 2 cups total—until it just holds itself.Melt Butter in Pan:
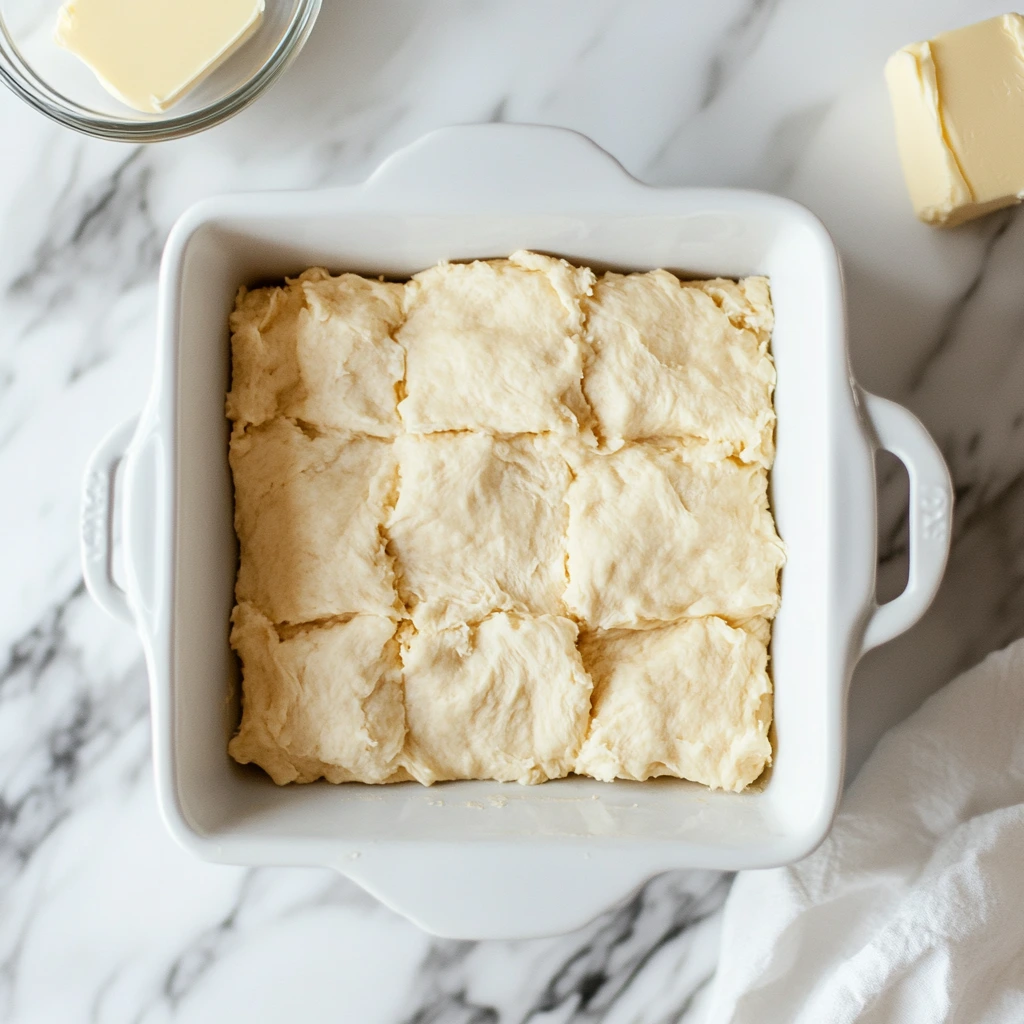
Place ½ cup (1 stick) of salted butter in a microwave-safe bowl and melt on high for about 30 seconds, or until fully liquid. Immediately pour the melted butter into the prepared baking dish, tipping the pan to coat the bottom evenly. This “swimming pool” of butter is what gives these biscuits their signature rich, crisp base.Transfer & Shape the Dough:
Scoop the biscuit dough into the butter-coated dish. Using lightly sprayed hands (or a piece of parchment), gently press and stretch the dough until it fills the pan in an even layer. Don’t worry about perfection—little peaks and valleys will bake up into irresistible nooks.Score for Even Serving:
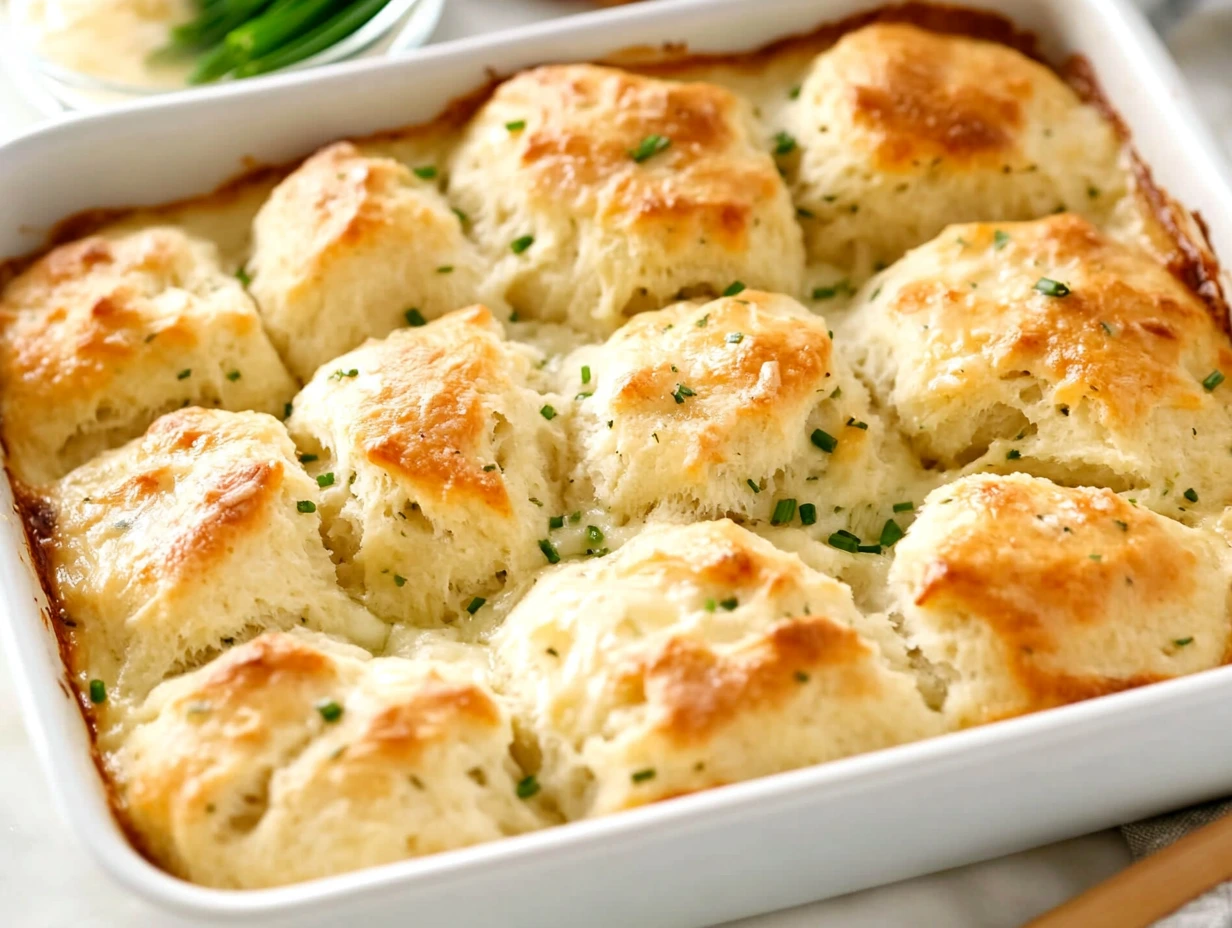
With a sharp knife or an offset spatula, score the dough into nine roughly equal squares. This pre-scoring makes it easier to pull the biscuits apart once they’re baked, ensuring clean lines and uniform serving sizes.
Baking & Finishing Touches
Now that your biscuit dough is tucked into its buttery bath and neatly scored, it’s time for the magic to happen in the oven. In this section, we’ll walk through the baking process step by step, then whisk together the garlic-butter topping that elevates these squares from “just good” to “absolutely irresistible.” Plus, I’ll share a handful of tried-and-true tips to ensure perfect results every time.
Steps
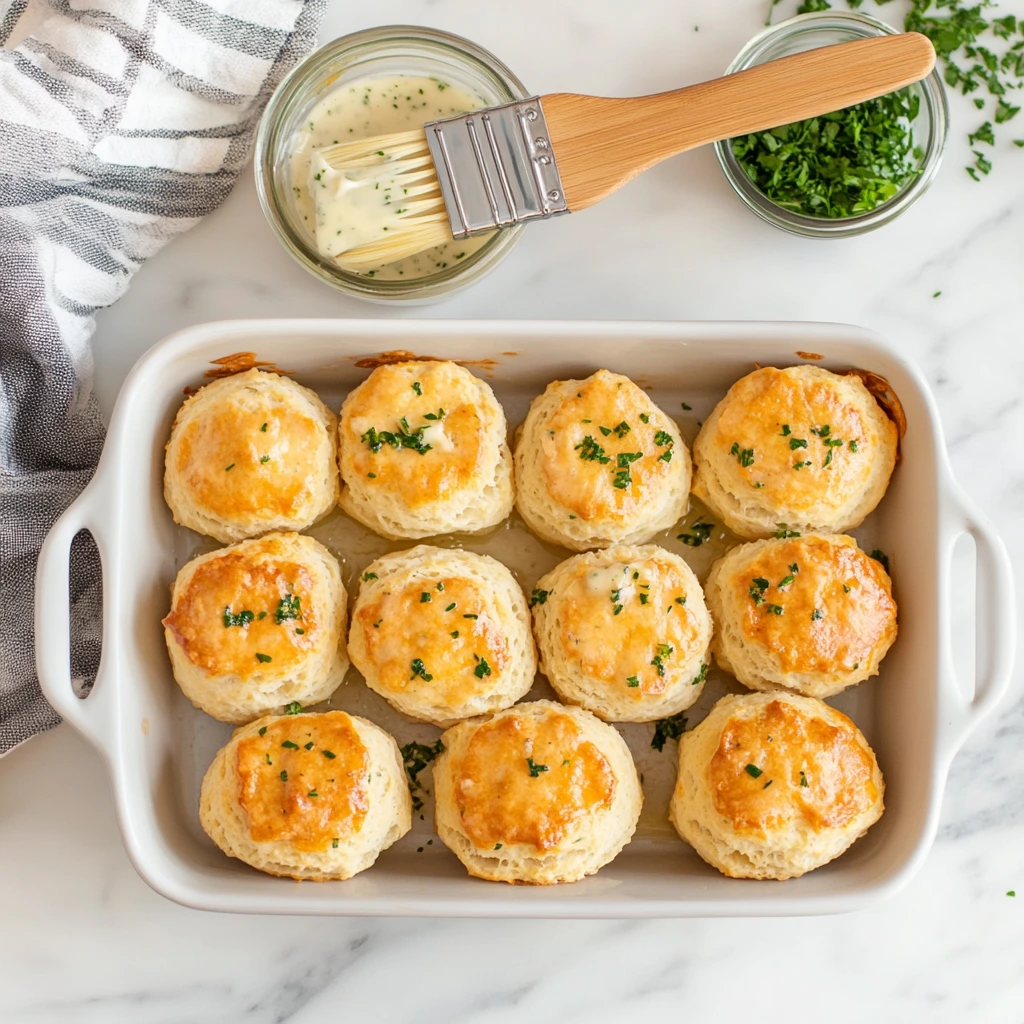
Bake to Golden Perfection
Place the baking dish on the middle rack of your preheated 450 °F oven.
Set a timer for 12–15 minutes, then open the door briefly to rotate the dish 180°. This simple move promotes even browning on all sides.
Continue baking for another 12–15 minutes, or until the tops are a rich golden brown and a toothpick inserted into the center comes out clean (a few moist crumbs are fine, but no wet batter).
Prepare the Garlic-Butter Topping
While the biscuits bake, combine in a small bowl:
¼ cup salted butter, melted
1 teaspoon dried parsley flakes
½ teaspoon garlic powder
Whisk until the parsley and garlic powder are fully suspended in the butter. The residual heat from the biscuits will activate the garlic powder’s flavor and crisp the parsley just slightly for a delicate crunch.
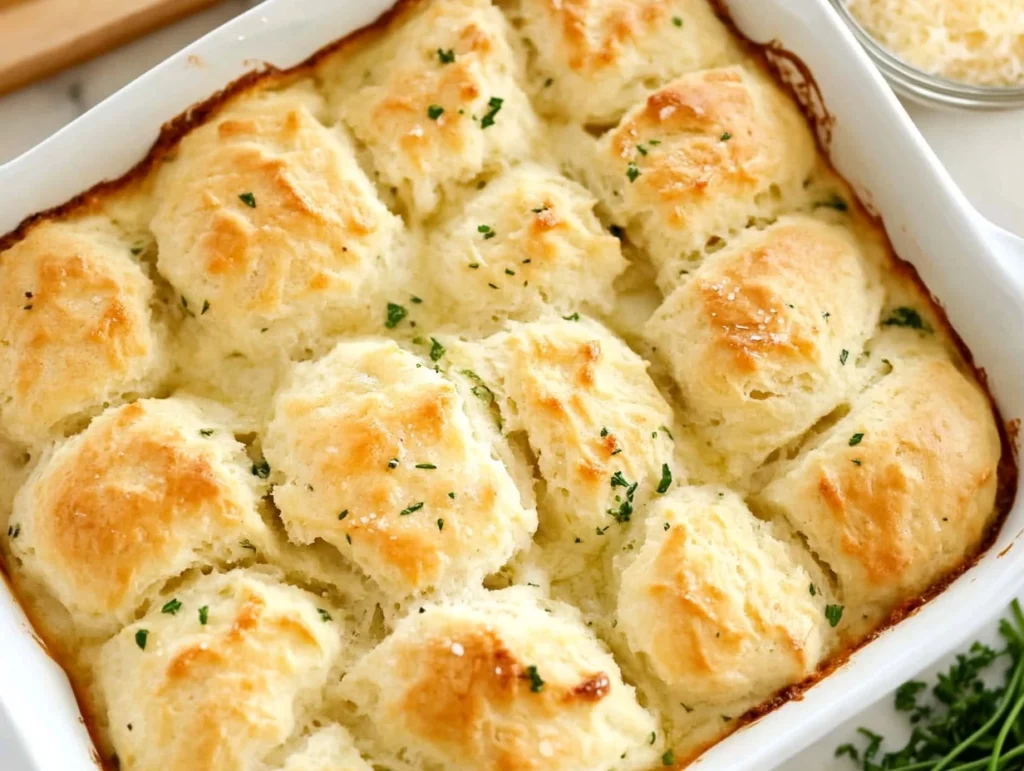
Brush on the Flavor
As soon as you remove the dish from the oven, use a pastry brush (or the back of a spoon) to coat every square’s surface with the garlic-butter mixture. Work quickly so the butter soaks into the warm dough, infusing each bite with garlicky richness.
Re-score & Serve
Because the dough was pre-scored before baking, you can now recut along those lines to release any fused edges and yield nine neat, pull-apart biscuits.
Serve immediately—these are best enjoyed warm, when the edges are still slightly crisp and the centers soft and tender.
Pro Tips & Variations
Parmesan Finish: For an extra layer of savory goodness, sprinkle 2–3 tablespoons of finely grated Parmesan cheese over the hot garlic-butter right before serving. The cheese will melt slightly and create a lacy, golden crust at the edges.
Fresh Herbs: Swap the dried parsley for 2 tablespoons of finely chopped fresh chives, parsley, or even rosemary. The fresh herbs lend a bright, garden-fresh note.
Make-Ahead Convenience: Assemble the dough directly in the baking dish, cover tightly with plastic wrap, and refrigerate overnight. When you’re ready to bake, remove the wrap, preheat your oven, and add 5–10 minutes to the total bake time to account for the cold dough.
Crunch Factor: If you love contrast, once the biscuits are out of the oven, sprinkle a pinch of flaky sea salt (such as Maldon) on top of the garlic-butter before it sets. The delicate crystals add a satisfying pop.
Storing & Reheating: Leftovers can be kept at room temperature in an airtight container for up to two days, or in the refrigerator for up to four. To revive their fresh-baked texture, reheat on a wire rack in a 300 °F oven for 5–7 minutes—this crisps the edges without drying out the centers.
Gluten-Free Option: Replace the all-purpose flour with your favorite 1:1 gluten-free baking blend and ensure your baking powder is gluten-free. You may need to add up to 2 cups of buttermilk total to achieve the right dough consistency.
Below are some of the most common questions I hear when friends and readers tackle these Garlic Butter Swim Biscuits for the first time. If you’ve ever wondered about ingredient swaps, troubleshooting, or storage, read on for quick, actionable answers!
Q1: Can I substitute regular milk for buttermilk?
Absolutely—buttermilk’s acidity reacts with the baking powder to give extra lift and tenderness, so if you use regular milk, stir in 1 tablespoon of lemon juice or white vinegar per cup of milk and let it sit for 5 minutes before measuring. Your biscuits will puff up nicely, though the crumb may be just a touch denser.
Q2: Why did my biscuits turn out dense or gummy?
A couple of usual suspects here:
Under-mixing the dry ingredients: Ensure your baking powder and salt are evenly distributed.
Overworking the dough: Stir just until the batter comes together; overmixing develops gluten, leading to chewiness.
Oven temperature: If your oven hasn’t fully preheated to 450 °F, biscuits may spread instead of rising. Use an oven thermometer if you suspect heat variance.
Q3: Can I make the dough ahead and bake in the morning?
Yes! After pressing the dough into the butter-coated dish and scoring it, cover tightly with plastic wrap and refrigerate overnight. In the morning, let the dish rest at room temperature while the oven preheats, then bake for 30–35 minutes to account for the cold dough.
Q4: What’s the best way to get extra-crispy edges?
Use a metal pan: A light-colored metal baking pan gets hotter at the edges than glass or ceramic.
Finish under the broiler: In the last 1–2 minutes of baking, switch to broil and watch closely—this will lace the bottoms and edges with a golden, buttery crunch.
Q5: Can I freeze these biscuits?
Definitely. After baking and brushing with garlic butter, allow the biscuits to cool completely on a wire rack. Then wrap the entire pan tightly with plastic wrap and aluminum foil, or transfer individual squares into a freezer-safe bag. Freeze for up to 2 months. Reheat from frozen in a 300 °F oven for about 10–12 minutes, or until warmed through.
Q6: How can I add a little heat or extra flavor?
Stir ¼ teaspoon of crushed red pepper flakes or a pinch of cayenne into the garlic-butter topping for a gentle kick. You could also fold 2 tablespoons of shredded cheddar or pepper jack into the biscuit dough for a cheesy, spicy twist.
Whether you’re serving these garlic-butter biscuits at a weeknight dinner or tucking into them straight from the oven as a mid-day snack, they’re guaranteed to disappear fast. The tender pull-apart centers, crisp buttery edges, and rich garlic flavor make them impossible to resist.
I’d love to hear how your batch turns out! Did you try the Parmesan sprinkle or a fresh herb swap? Drop a comment below with your favorite variation, any questions you still have, or just to let me know how they paired with your meal. Happy baking—and here’s to many more buttery, garlicky bites in your kitchen!
Print
Garlic Butter Swim Biscuits
- Author: Andrew Recipes
Description
Tender, pull-apart biscuits soaked in melted butter and infused with garlic create an irresistible accompaniment for any meal. Baked in a single pan so each square absorbs every last bit of buttery flavor, these “swim” biscuits are perfect alongside soups, salads or as a savory snack on their own.
Ingredients
For the biscuits
2½ cups all-purpose flour
1 tablespoon granulated sugar
1 tablespoon aluminum-free baking powder
2 teaspoons salt
2 teaspoons garlic powder
1¾ cups buttermilk (plus up to 2 cups as needed)
4 garlic cloves, finely minced
½ cup (1 stick) salted butter
For the garlic butter topping
¼ cup salted butter, melted
1 teaspoon dried parsley flakes
½ teaspoon garlic powder
Instructions
Preheat the oven to 450 °F and grease a 9×9-inch oven-safe glass or ceramic baking dish with nonstick spray.
In a medium bowl whisk together the flour, sugar, baking powder, salt and garlic powder until evenly combined.
Pour in 1¾ cups of the buttermilk along with the minced garlic and stir until a thick, sticky batter forms, adding up to an extra ¼ cup buttermilk if the dough seems too dry.
Melt the stick of butter in a microwave-safe bowl and immediately pour it into the prepared baking dish so the bottom is coated.
Transfer the biscuit dough to the dish, gently pressing and stretching it to fill the pan—spray your hands lightly with cooking spray if the dough sticks. Use a knife or spatula to divide the dough into nine roughly equal squares, which will make serving easier once baked.
Place the dish on the middle oven rack and bake for 25 to 30 minutes, rotating once halfway through, until the tops are golden brown and a toothpick inserted in the center of a biscuit comes out clean.
While the biscuits bake, combine the melted butter, parsley flakes and garlic powder in a small bowl. As soon as the biscuits come out of the oven, brush this garlic-butter mixture evenly over the warm tops, then recut along the scored lines and serve.
Notes
For extra visual appeal and flavor, sprinkle grated Parmesan or chopped fresh chives over the warm topping. Make these biscuits ahead by preparing the dough in the dish, wrapping tightly, and refrigerating overnight—add five to ten minutes to the bake time if starting cold. Leftovers store covered at room temperature for two days or in the refrigerator for up to four; reheat gently in a low oven to revive their crisp edges.

