There’s just something about Lumpia that brings people together. If you’ve ever been to a Filipino family gathering, chances are you’ve seen a tray of these golden, crispy little rolls disappear in minutes. I’m not exaggerating—they’re always the first to go! Whether it’s a birthday, holiday party, or even just a casual dinner, Lumpia is one of those must-have dishes that feels like a warm hug from someone who loves to feed you well.
Growing up, I remember standing beside my auntie in the kitchen, helping her roll lumpia for hours. We’d be chatting, snacking, and sneaking little bites of the filling while we worked. It wasn’t just about the food—it was about the process, the stories, and the laughter that came with it. And when that first batch came out of the hot oil? Pure magic.
This Filipino Lumpia recipe is simple, satisfying, and incredibly tasty. Made with seasoned ground beef, sweet carrots, and plenty of garlic and onion, these rolls fry up beautifully golden and crisp on the outside, while staying juicy and flavorful on the inside. Best of all, they’re easy to prep ahead and freeze, making them perfect for last-minute guests or those days when you just need a good snack fix.
Let’s dive into how you can make these crowd-pleasers at home!
Ingredients You’ll Need
1 pound ground beef
1 small onion, finely chopped
3 cloves garlic, minced
1 cup shredded carrots
1 tablespoon soy sauce
½ teaspoon salt and pepper, or to taste
25 egg roll wrappers (thin type)
Oil for frying
STEP 1: Make the Filling
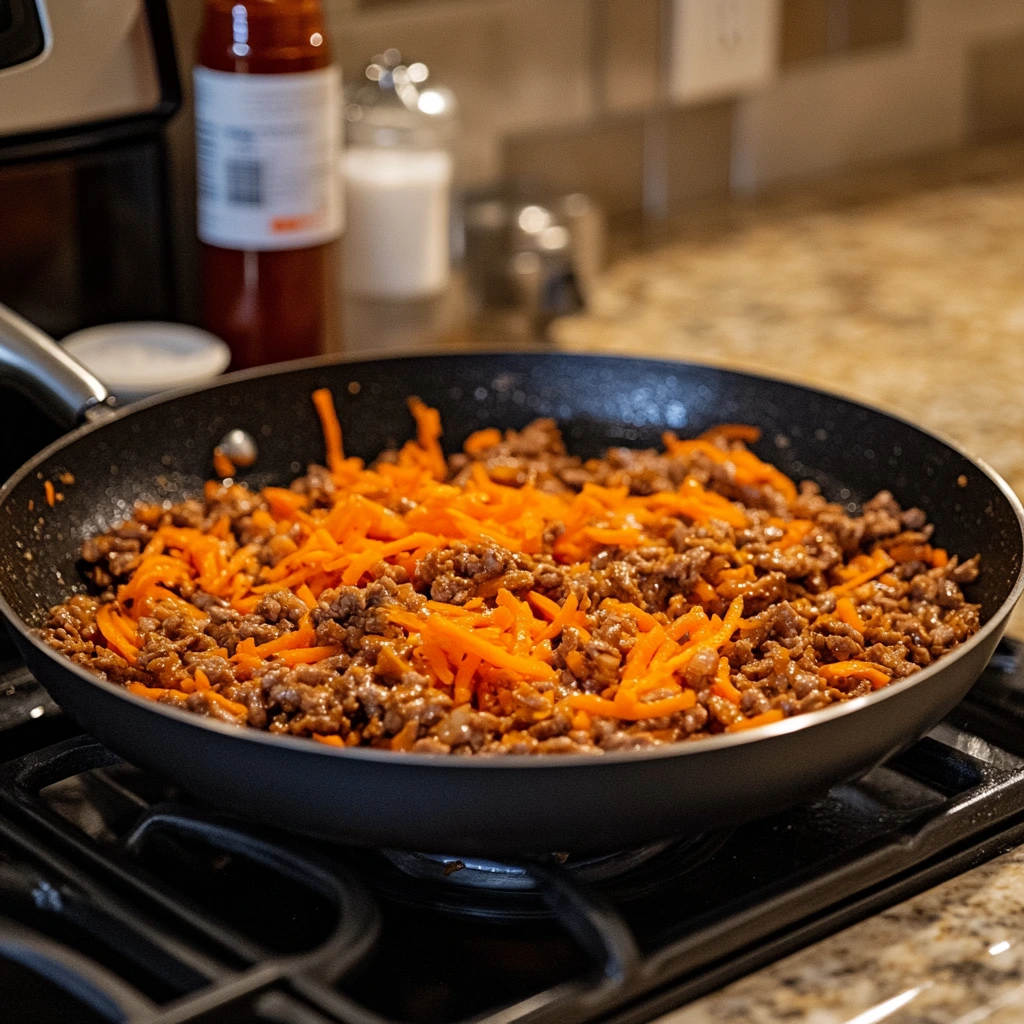
Start by heating a skillet over medium heat. Add the ground beef, chopped onion, and minced garlic. Cook this mixture, stirring often, until the beef is browned and fully cooked through. You’ll want everything nice and fragrant at this point—your kitchen should already be smelling amazing.
Once the beef is done, go ahead and drain off any excess grease. This step is important because we don’t want soggy lumpia. Set the pan back on the heat and add your shredded carrots and soy sauce. Stir everything together and cook for about two more minutes—just until the carrots are slightly tender but still have a bit of bite.
Season your filling with salt and pepper to taste. Then, remove the pan from the heat and let the mixture cool for a few minutes. Trust me, it’s way easier (and safer!) to roll when the filling isn’t steaming hot.

STEP 2: Rolling the Lumpia
Now for the fun part—rolling!
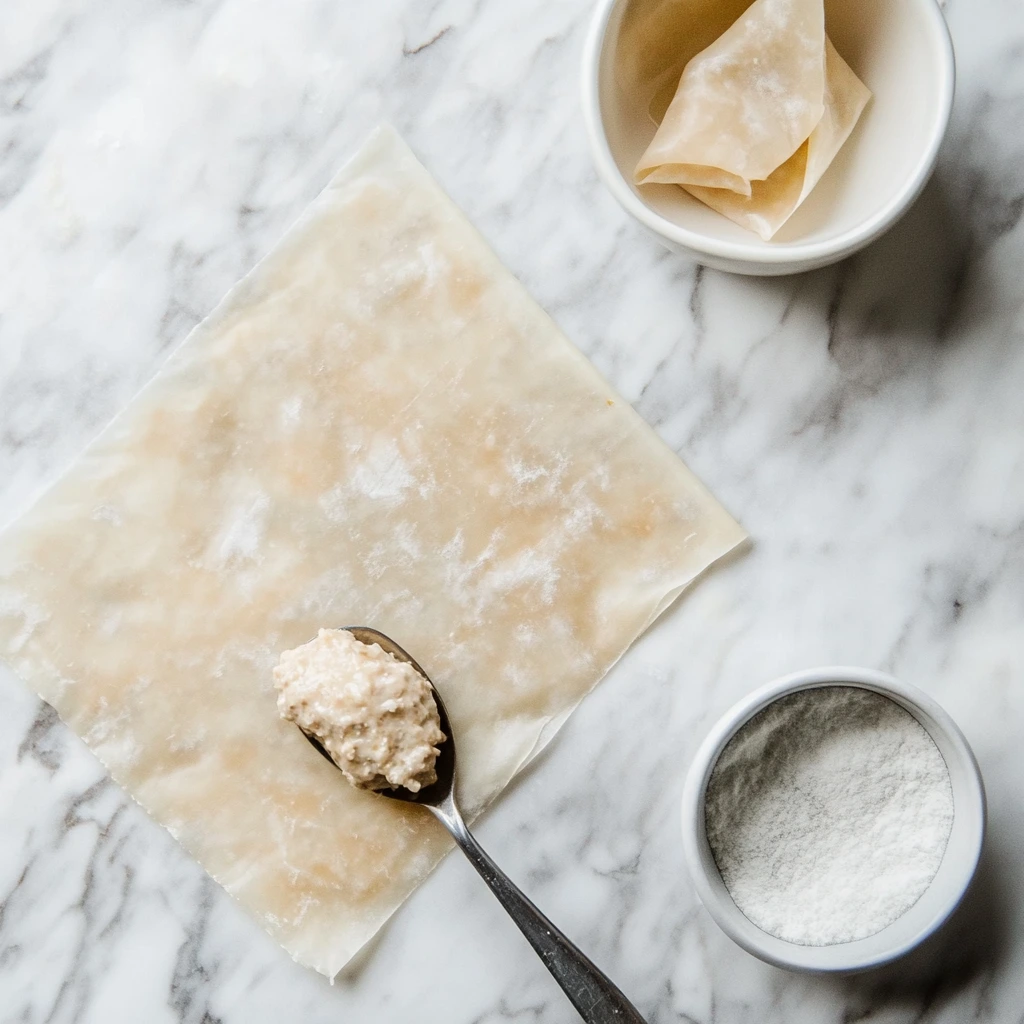
Lay an egg roll wrapper on a clean, flat surface so it looks like a diamond, with one corner pointing toward you. Spoon about 1½ tablespoons of your cooled meat mixture near the bottom corner. Don’t be tempted to overfill—too much filling will make it harder to roll and might cause the wrapper to tear.
Fold the bottom corner over the filling, then bring the two side corners in like you’re making a little envelope. From there, roll it up tightly toward the top corner. Dab a bit of water along the top edge to seal it shut.
Repeat this process until all your wrappers and filling are used up. I recommend keeping the finished lumpia under a damp paper towel or cloth while you work—this keeps them from drying out before they hit the oil.
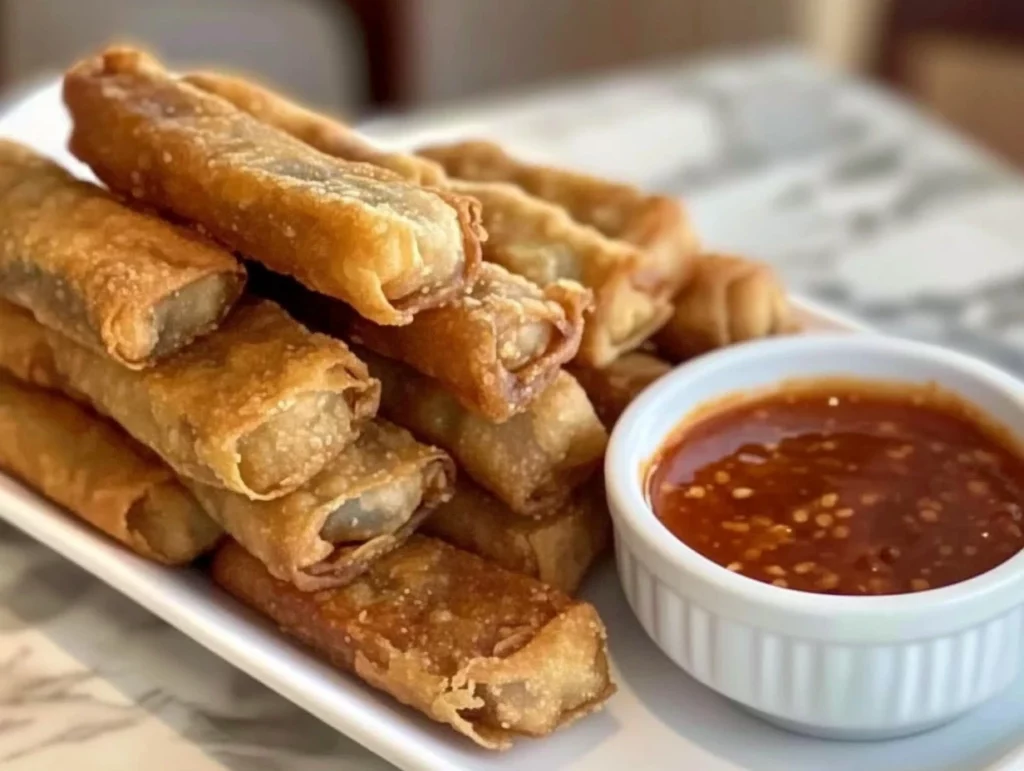
Crispy Filipino Lumpia: A Party-Perfect Snack You’ll Make Again and Again
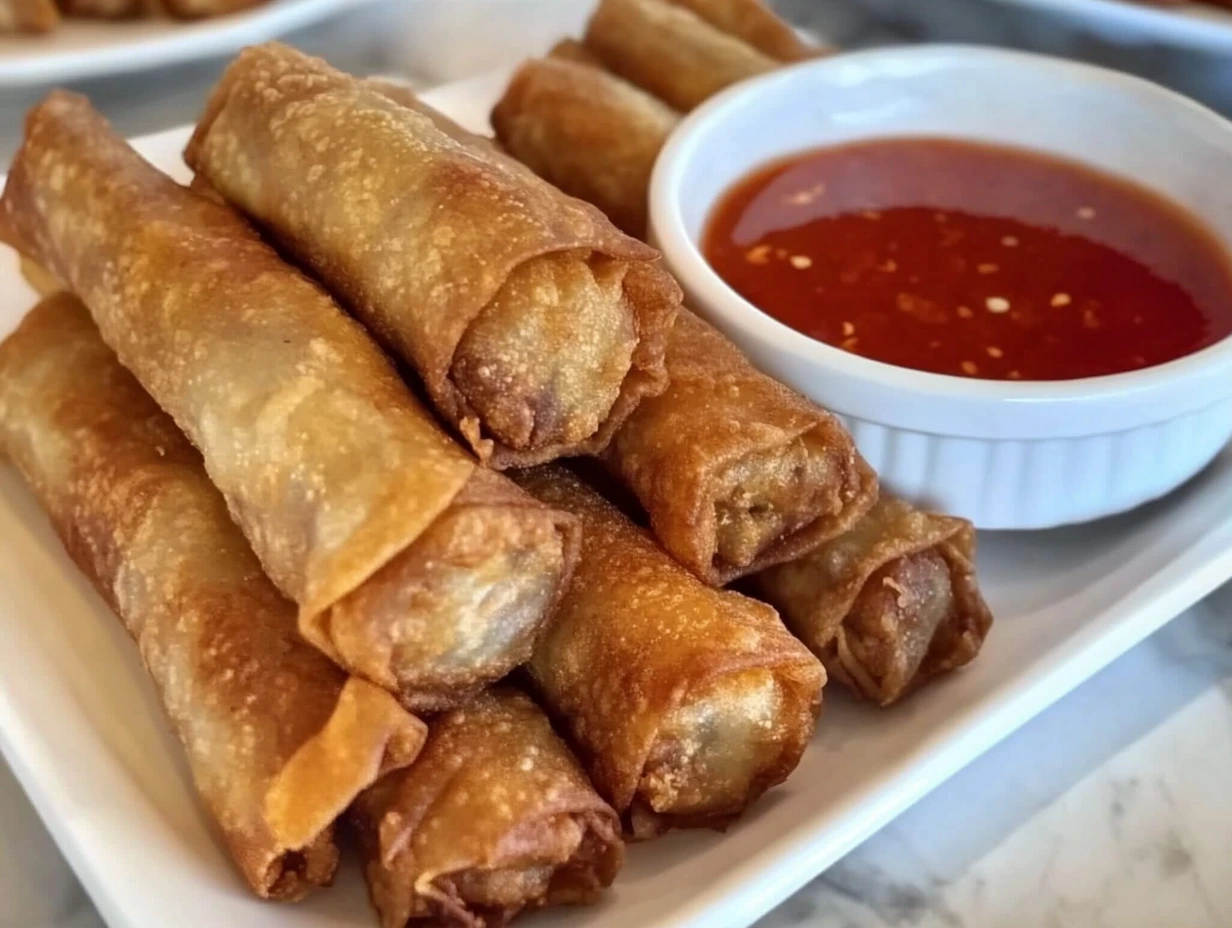
Now that you’ve rolled up all those delicious little bundles, it’s time for the moment we’ve all been waiting for—frying them to golden perfection. This step is what gives lumpia that satisfying crunch on the outside, while locking in all the savory goodness inside. Seriously, once you bite into one of these hot and crispy rolls, it’s game over. You’ll be hooked.
Whether you’re making these for your family or prepping them ahead for a party, I’ve got a few simple tips to help you get that restaurant-quality crispiness every single time. Let’s get into it.
STEP 3: Frying the Lumpia
Fill a deep frying pan with about 2 inches of oil and set it over medium-high heat. You want the oil to be hot enough to sizzle when you add the lumpia, but not so hot that it burns the wrappers before the insides heat through. A good test? Dip the edge of a wrapper into the oil—if it bubbles gently, you’re good to go.
Working in batches, gently place your rolled lumpia into the hot oil. Don’t overcrowd the pan or they’ll steam instead of fry. Turn them occasionally with tongs to make sure all sides cook evenly.
Fry each batch for about 4 to 5 minutes, or until they’re a deep golden brown and irresistibly crispy. Transfer them to a plate lined with paper towels to drain any excess oil. Let them cool slightly before serving—they’ll be piping hot inside!
Tips for Perfect Lumpia Every Time
1. Keep Your Wrappers Covered
While you’re rolling, keep your lumpia wrappers under a damp towel to prevent them from drying out. Dry wrappers tend to crack and tear, which can lead to messes when frying.
2. Don’t Overstuff
Less is more when it comes to lumpia filling. Overfilling makes them harder to roll and can cause them to burst open during frying.
3. Seal Well
Always use a dab of water on the top corner of the wrapper to seal the roll. If you don’t seal them properly, they’ll unravel in the oil.
4. Use the Right Oil Temperature
If the oil is too cold, your lumpia will soak up too much oil and turn greasy. If it’s too hot, they’ll burn on the outside before the filling heats through. Medium-high heat is your sweet spot. If you have a thermometer, aim for about 350°F (175°C).
5. Serve Immediately (Or Keep Them Warm in the Oven)
Lumpia is best when served fresh and hot. But if you’re making a large batch for a party, you can keep them warm by placing them in a 200°F oven on a baking sheet until ready to serve.
Make-Ahead and Freezer Friendly Tips
One of the best things about lumpia? You can make them ahead of time and store them in the freezer. This is such a game-changer for busy days or when you want to prep for a gathering in advance.

To Freeze:
Place the uncooked lumpia in a single layer on a parchment-lined baking sheet. Pop them in the freezer until solid (about an hour), then transfer them to an airtight container or zip-top freezer bag. You can layer them with parchment paper in between to keep them from sticking.
To Fry from Frozen:
No need to thaw! Just fry straight from frozen—add an extra minute or two to the cooking time and make sure the oil doesn’t cool down too much with the addition of cold rolls.
Crispy Filipino Lumpia: A Party-Perfect Snack You’ll Make Again and Again
At this point, you’ve got a beautiful batch of crispy, golden lumpia ready to devour. Whether you’re serving them as an appetizer, a potluck dish, or just treating yourself to a well-earned snack, there’s no denying these rolls are a hit every time. They’re simple, satisfying, and packed with savory flavor in every bite.
Before we wrap things up, let’s go over some of the most frequently asked questions about making Filipino lumpia. These quick answers will help you feel confident, whether you’re making lumpia for the first time or you’re just looking for a few extra tips.
FAQ: Your Filipino Lumpia Questions Answered
1. Can I use a different type of meat for the filling?
Absolutely! While ground beef is commonly used and super flavorful, you can also try ground pork, chicken, or even a plant-based meat alternative if you’re going for a vegetarian version. Just make sure to cook the filling thoroughly before rolling.
2. What’s the best type of wrapper to use?
You’ll want to look for thin egg roll or spring roll wrappers—often labeled “lumpia wrappers” at Asian grocery stores. These fry up crisp and delicate, giving you that signature crunch. Thicker wrappers will still work, but the texture will be more chewy than crisp.
3. Why did my lumpia wrappers tear while rolling?
This usually happens if the wrappers get too dry or you try to roll with hot filling. Always keep the wrappers covered with a damp towel while you work, and make sure your filling has cooled slightly before assembling.
4. Can I bake lumpia instead of frying?
Yes, you can bake them, but they won’t be quite as crispy. Brush each roll lightly with oil and bake at 400°F (200°C) for about 20–25 minutes, flipping once halfway through. It’s a healthier option, but for that ultra-crunchy texture, frying is still the way to go.
5. How long will cooked lumpia stay crispy?
Freshly fried lumpia are at their crispiest right out of the oil. If you’re not serving them right away, you can keep them warm and somewhat crisp in a 200°F oven for up to 30 minutes. Leftovers can be reheated in the oven or air fryer to bring back some of the crunch.
6. What’s the best dipping sauce for lumpia?
Sweet chili sauce is the classic pairing and adds just the right balance of tangy and spicy. Some folks also like vinegar with garlic and pepper, or even a banana ketchup-based sauce if you want to go full Filipino-style.
7. Can I make lumpia in advance for a party?
Yes! In fact, lumpia are perfect for prepping ahead. You can roll them the day before and keep them covered in the fridge, or freeze them uncooked for longer storage. Just fry them right before your guests arrive for the best results.
Final Thoughts: Why You’ll Keep Coming Back to This Lumpia Recipe
If you’ve made it this far, you’re officially ready to whip up a batch of classic Filipino lumpia. It’s one of those recipes that feels like a little celebration every time you make it. The crisp wrapper, the savory filling, and the way they just disappear from the plate—it’s all part of what makes this dish so loved.
One of my favorite things about lumpia is how versatile it is. You can switch up the filling, make it spicy, add veggies, or keep it super simple like we did here. Whether you’re new to Filipino cooking or grew up with lumpia on every special occasion table, this recipe is a keeper.
I’d love to hear how it turns out for you! Leave a comment below and let me know if you made any fun variations—or just how fast they disappeared at your party. Trust me, once you serve these, everyone’s going to be asking when you’re making them again.
Now go enjoy your crispy, golden reward—you’ve earned it.
Print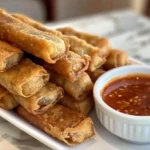
Filipino Lumpia
- Author: Andrew Recipes
Description
Crispy, savory, and incredibly addictive, Filipino Lumpia are a beloved snack and party favorite. These golden, deep-fried rolls are packed with a flavorful filling of ground beef, aromatic garlic and onions, and sweet shredded carrots. Served with a side of sweet chili sauce, they offer the perfect balance of crunchy and juicy in every bite.
Ingredients
1 pound ground beef
1 small onion, finely chopped
3 cloves garlic, minced
1 cup shredded carrots
1 tablespoon soy sauce
½ teaspoon salt and pepper, or to taste
25 egg roll wrappers (thin type)
Oil for frying
Instructions
In a skillet over medium heat, cook the ground beef with chopped onion and garlic, stirring frequently until the meat is browned and cooked through. Drain any excess grease from the pan.
Add the shredded carrots and soy sauce to the pan. Stir and cook for about 2 minutes until the carrots are slightly tender. Season with salt and pepper to taste, then remove from heat and let the mixture cool slightly.
Lay an egg roll wrapper on a clean, flat surface with one corner pointing toward you like a diamond shape. Place about 1½ tablespoons of the meat filling near the bottom corner of the wrapper.
Fold the bottom corner over the filling, then fold in the sides. Roll tightly toward the top corner, sealing the edge with a dab of water to close the lumpia securely.
Repeat the process with the remaining wrappers and filling. Keep the rolled lumpia covered with a damp towel to prevent drying out while you work.
Heat oil in a deep frying pan over medium-high heat. Once hot, carefully add the lumpia in batches, turning occasionally, until they are golden brown and crispy.
Drain the lumpia on paper towels and let cool slightly before serving.
Notes
Serve hot with sweet chili sauce for dipping. These lumpia freeze well before frying—just layer them between parchment paper and store in an airtight container. Fry straight from frozen when ready to enjoy, adding a minute or two to the cooking time.

