If there’s one thing I know for sure, it’s that comfort food never goes out of style. And when it comes to comfort, there’s nothing quite like a bubbling dish of creamy, cheesy baked macaroni and cheese coming out of the oven. Today I’m sharing a recipe that’s not just cheesy—it’s next-level cheesy. This Five Cheese Baked Macaroni and Cheese is what dreams are made of. We’re talking creamy sauce, a golden crust, and a bold, rich flavor from a mix of five delicious cheeses.
I first made this for a cozy Sunday dinner with my family, and let’s just say… there were no leftovers. The creamy texture, the crunchy topping, and that savory cheese pull? It was gone fast. So if you’re looking to impress at your next potluck, holiday gathering, or just want to treat yourself on a weeknight, this dish is a guaranteed hit.
Let’s get right into it!
Why You’ll Love This Five Cheese Mac and Cheese
This isn’t your typical stovetop mac and cheese. It’s oven-baked, which means you get that perfect contrast between creamy interior and crispy, golden topping. The five-cheese combo gives it a complex, rich flavor—sharp, buttery, melty, and a little nutty. Every bite is loaded with cheesy goodness. The Gruyère and Fontina melt beautifully, the cheddar brings that classic tang, the mozzarella adds stretch, and Parmesan? Well, it’s the finishing touch of umami that ties everything together.

Ingredients You’ll Need
Here’s everything you’ll want to gather before you start cooking:
12 ounces elbow macaroni
4 tablespoons unsalted butter
3 tablespoons all-purpose flour
2 cups whole milk, warmed
½ cup heavy cream
1 cup sharp cheddar cheese, grated
½ cup Gruyère cheese, grated
½ cup Fontina cheese, diced
½ cup mozzarella cheese, shredded
¼ cup freshly grated Parmesan cheese, plus extra for topping
½ teaspoon dry mustard
Salt and freshly ground black pepper, to taste
½ cup panko breadcrumbs
1 tablespoon melted butter
Fresh parsley, chopped (optional for garnish)
STEP 1: Boil the Macaroni
Bring a large pot of salted water to a boil. Add the elbow macaroni and cook it just until al dente—you don’t want it mushy, because it’ll continue cooking in the oven later. Drain the pasta and give it a quick toss with a bit of butter or oil to prevent sticking. Set it aside while you work on the sauce.
STEP 2: Make the Roux
In the same pot, melt 4 tablespoons of unsalted butter over medium heat. Once it’s melted, whisk in the flour. Cook this mixture for about 1-2 minutes, stirring constantly. It should look smooth and slightly golden—this is your roux, and it’s going to help thicken that dreamy cheese sauce.
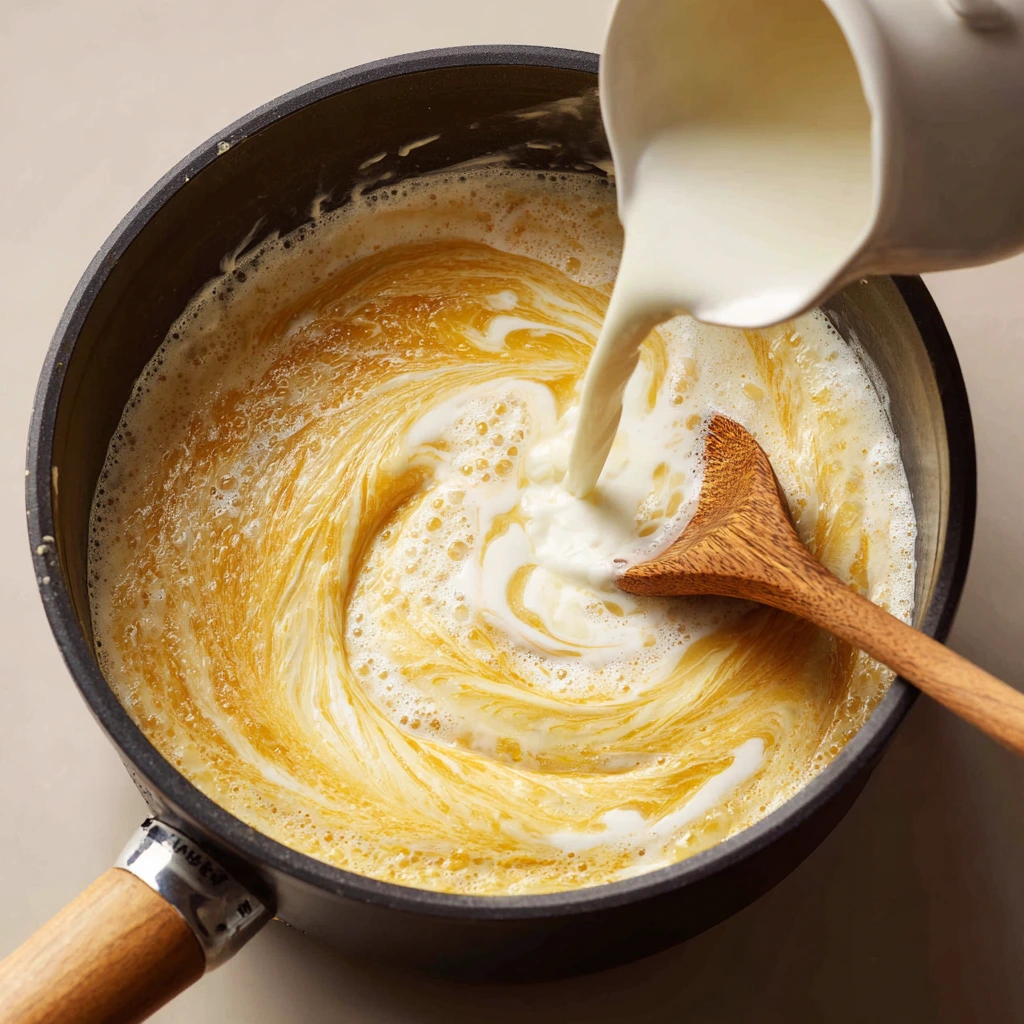
STEP 3: Add Milk and Cream
Gradually pour in the warmed milk and heavy cream, whisking continuously to avoid lumps. Let it cook for a few minutes until it thickens enough to coat the back of a spoon. This base is what turns into that creamy sauce everyone loves.
STEP 4: Add the Cheese
Now the best part: the cheese. Turn the heat down to low and stir in the sharp cheddar, Gruyère, Fontina, mozzarella, and Parmesan. Stir slowly until everything is melted and smooth. Add in the dry mustard, then season with salt and freshly ground black pepper to taste. Don’t skip the mustard—it adds a subtle depth that balances all that cheesy richness.
Five Cheese Baked Macaroni and Cheese
Welcome back! If your kitchen smells like melted cheese heaven right now, you’re not alone. We’ve already cooked the pasta and made the ultra-creamy, cheesy sauce. Now it’s time to bring it all together into one bubbling, golden dish of pure comfort. This part of the recipe is where that satisfying oven-baked magic happens.
Let’s pick up right where we left off and get that mac and cheese into the oven.
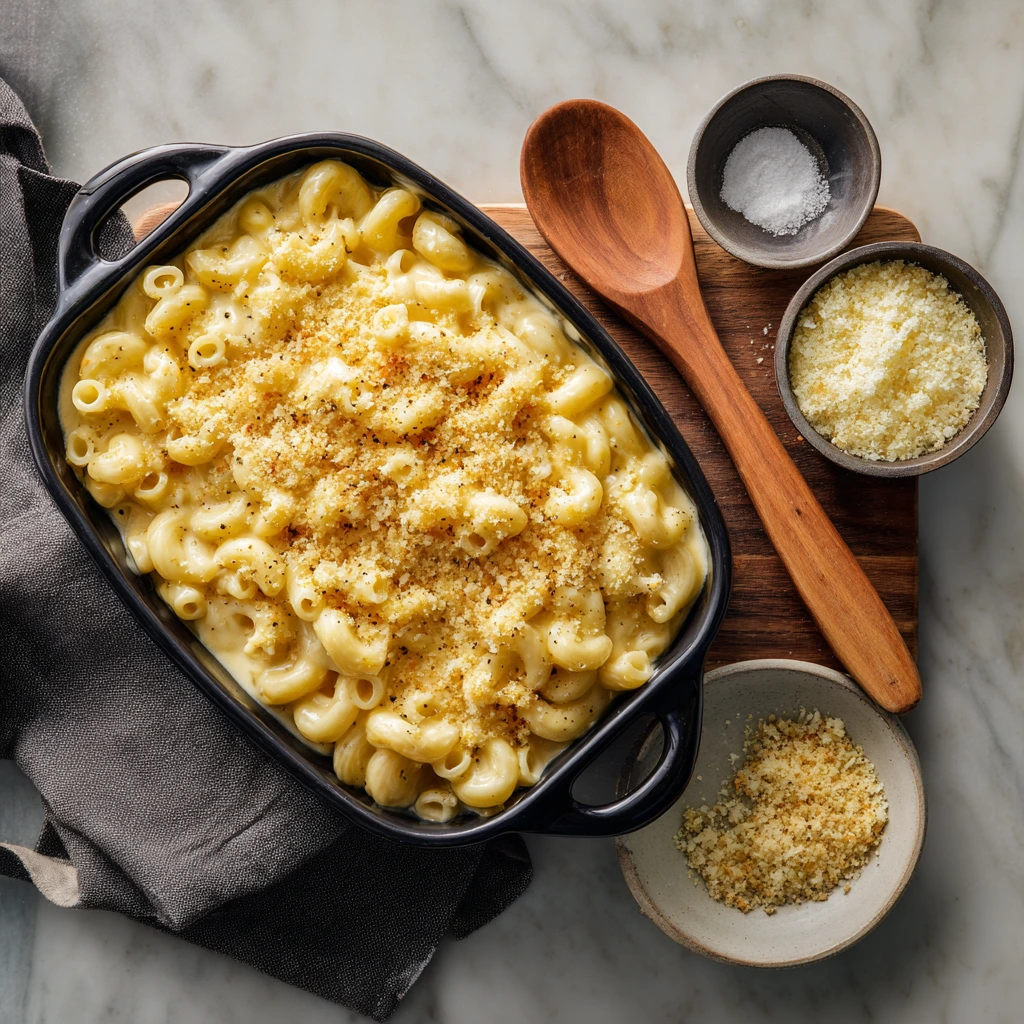
STEP 5: Combine the Pasta and Sauce
Now that your cheese sauce is silky and seasoned to perfection, it’s time to bring back the cooked elbow macaroni. Gently fold the pasta into the sauce, making sure every piece is thoroughly coated. Take your time here—you want that sauce to seep into every nook and cranny of those macaroni elbows. This is where that creamy texture really comes to life.
STEP 6: Transfer to a Baking Dish
Lightly grease a 9×13-inch baking dish with butter or a bit of oil. Pour the cheesy pasta mixture into the dish and spread it out evenly with a spatula. Smooth the top gently—it doesn’t have to be perfect, but this will help the topping stay nice and even when it bakes.
STEP 7: Make the Crispy Topping
In a small bowl, stir together the panko breadcrumbs, 1 tablespoon of melted butter, and a light sprinkle of grated Parmesan cheese. The butter helps the breadcrumbs brown beautifully, while the Parmesan gives the topping a salty, nutty edge.
Sprinkle this mixture evenly over the mac and cheese. Be generous! This is what gives that golden, bakery-style crunch on top that contrasts so perfectly with the creamy base.
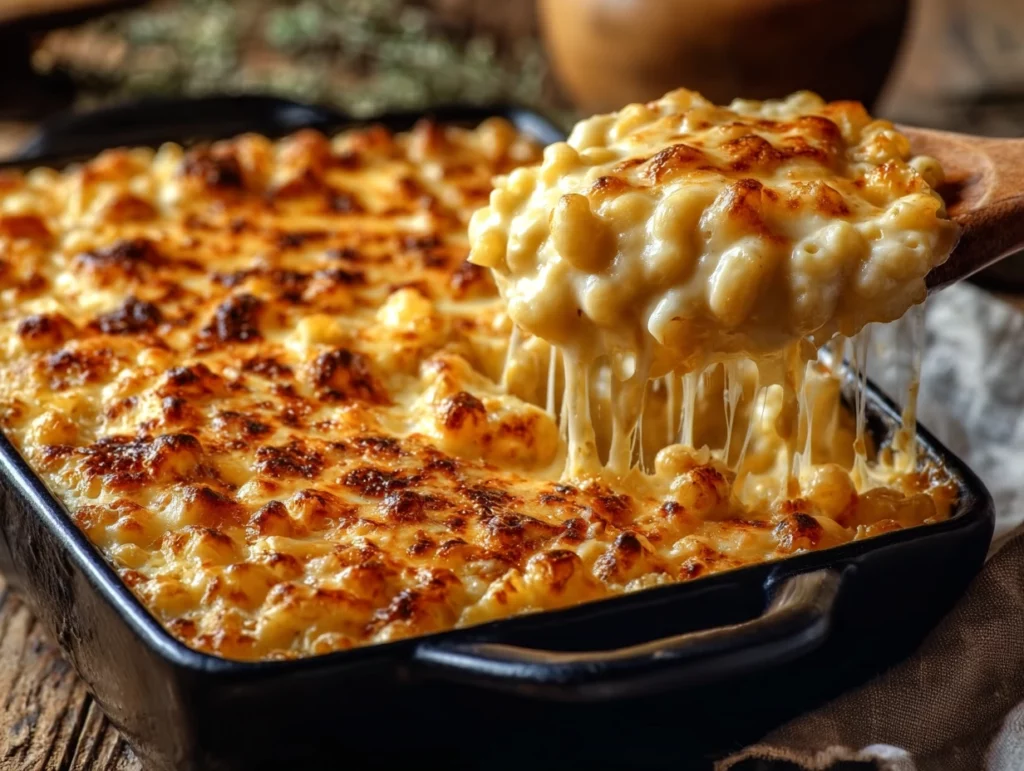
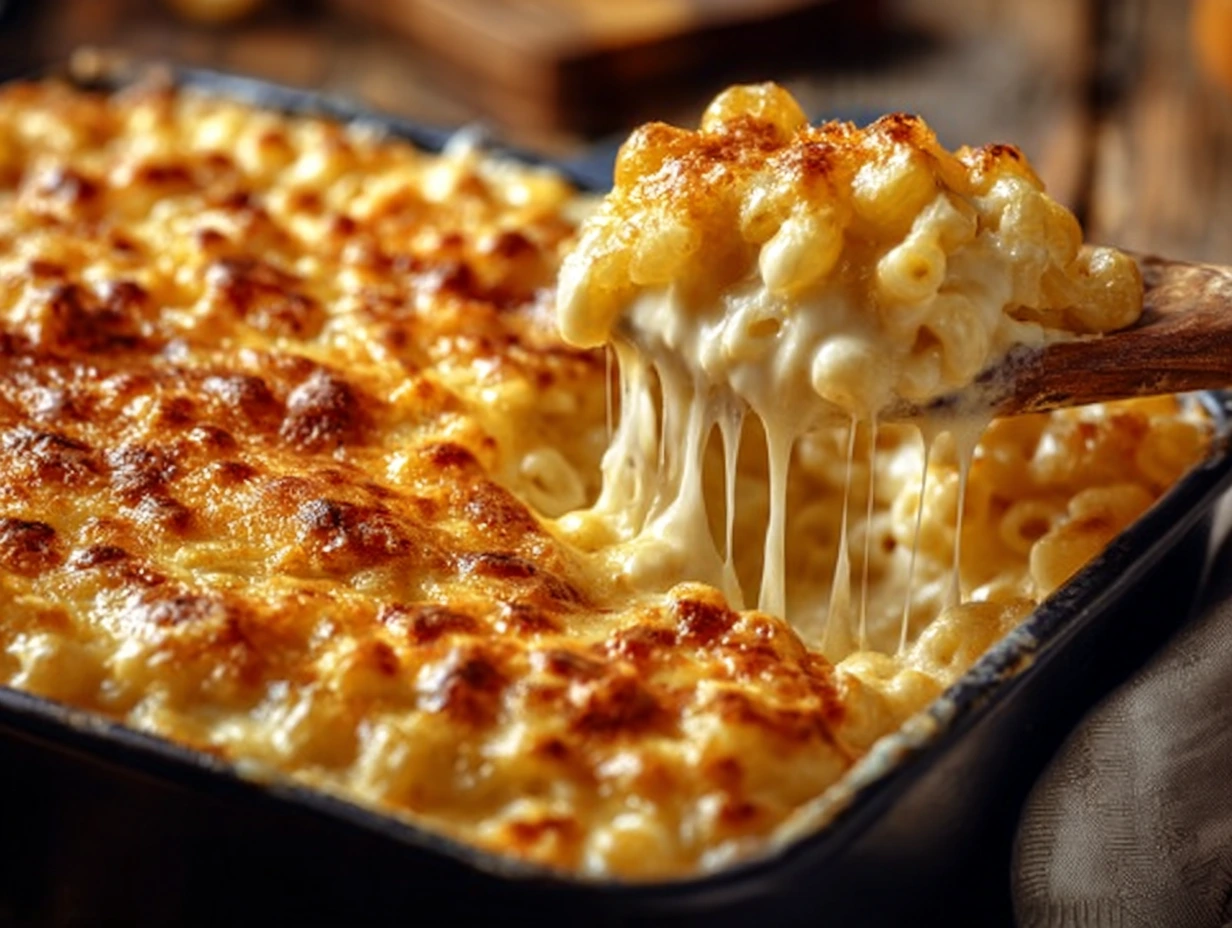
STEP 8: Bake Until Bubbly and Golden
Preheat your oven to 375°F (if you haven’t already). Place the baking dish on the center rack and bake for 20 to 25 minutes, or until the cheese is bubbling around the edges and the topping is golden brown.
You’ll know it’s ready when the corners are sizzling and the top has a beautiful crispy crust. Trust me, the wait is worth it.
STEP 9: Let It Rest
Here’s a little secret for the best texture: after baking, let the mac and cheese sit for about 5 minutes before digging in. This helps the sauce settle and thicken slightly, and it makes it easier to scoop clean portions without everything falling apart.
If you’re serving this at a gathering, it also gives you just enough time to sprinkle on some fresh parsley for color and freshness—totally optional, but highly recommended if you’re looking for a nice finishing touch.
Tips and Variations for the Best Baked Mac and Cheese
Want to make this recipe your own? Here are a few easy ways to customize it:
Swap in smoked Gouda: If you want a slightly smoky flavor, replace the Fontina with smoked Gouda. It melts beautifully and adds a deep, savory twist.
Add a dash of spice: Stir in a pinch of smoked paprika or cayenne pepper with the cheese for a bit of heat and color.
Make it ahead: Assemble the entire dish (up to the breadcrumb topping), cover it tightly, and refrigerate it for up to 24 hours. When you’re ready to bake, just add 5–10 extra minutes to the cooking time.
Add-ins: Crumbled bacon, caramelized onions, or even sautéed mushrooms make great mix-ins if you want to level up the flavor even more.
Use different pasta: Elbow macaroni is classic, but cavatappi or shells also work well—they hold onto the sauce beautifully.
Five Cheese Baked Macaroni and Cheese
You’re almost at the finish line! By now, your mac and cheese should be bubbling in the oven (or resting on the counter, teasing you with its irresistible smell). In this final part, we’re going to answer a few common questions that pop up when making baked mac and cheese, and then wrap things up with a few final thoughts to help you feel confident tackling this recipe anytime you’re craving serious comfort.
FAQ: Your Baked Mac and Cheese Questions, Answered
1. Can I use pre-shredded cheese instead of grating it myself?
Yes, but for best results, shred your own cheese. Pre-shredded cheese is often coated with anti-caking agents, which can make your sauce less smooth and creamy. It’s a little extra work, but totally worth it for the texture and melt.
2. What’s the best way to reheat leftovers?
To keep that creamy texture, reheat leftovers in the oven at 350°F, covered with foil, for about 15–20 minutes. You can also microwave smaller portions, but add a splash of milk or cream to help bring the sauce back to life.
3. Can I freeze this mac and cheese?
Absolutely. Assemble the dish without baking it, wrap tightly, and freeze for up to 2 months. When you’re ready to bake, let it thaw in the fridge overnight, then bake as directed (adding 5–10 minutes if it’s still a bit cold).
4. How can I make this recipe gluten-free?
Swap the elbow macaroni for your favorite gluten-free pasta and use a gluten-free flour blend for the roux. Make sure your breadcrumbs are gluten-free too, or skip them entirely for a crustless version.
5. Is it okay to substitute cheeses?
Definitely! While this five-cheese combo offers a nice balance, you can mix and match based on what you have. Just aim for a combination of sharp, melty, and creamy cheeses (like cheddar, mozzarella, and a nutty hard cheese like Gruyère or Parmesan).
6. Can I double this recipe for a crowd?
Yes—just use a larger baking dish or two 9×13-inch pans. You’ll also want to increase the baking time by about 10 minutes and keep an eye on the topping to prevent over-browning.
7. What proteins pair well with this mac and cheese?
Grilled chicken, crispy bacon, pulled pork, or even sautéed shrimp go wonderfully with it. It’s also hearty enough to be the main dish all on its own.
Final Thoughts: A Comfort Classic You’ll Come Back To
Whether you’re feeding a crowd, prepping for a holiday meal, or just in the mood for something warm and indulgent, this Five Cheese Baked Macaroni and Cheese is a recipe that always delivers. The combination of five cheeses creates a rich, multi-layered flavor that’s creamy, gooey, and golden on top. It’s everything you want in comfort food—plus a little extra.
I love making this dish ahead for busy nights, and it’s always one of the first things to disappear at potlucks. The leftovers (if you’re lucky enough to have any) reheat beautifully, and it’s easy to tweak the recipe based on your favorite cheeses or dietary needs.
Print
Five Cheese Baked Macaroni and Cheese
- Author: Andrew Recipes
Description
A hearty and flavorful dish featuring smoky kielbasa, tender pasta, and a creamy tomato sauce cooked together in a single pot for minimal cleanup and maximum taste.
Ingredients
12 ounces short pasta (penne or rotini)
1 pound kielbasa sausage, sliced into ½-inch rounds
1 tablespoon olive oil
1 small onion, diced
2 cloves garlic, minced
1 can (14.5 ounces) diced tomatoes, undrained
1½ cups chicken broth
½ cup heavy cream
1 teaspoon Italian seasoning
Salt and black pepper to taste
2 tablespoons chopped fresh parsley (optional)
Instructions
Heat olive oil in a large skillet or Dutch oven over medium heat. Add the sliced kielbasa and cook until lightly browned on both sides, about 4 minutes per side. Transfer kielbasa to a plate and set aside.
Add the diced onion to the same pot and sauté until softened, about 3 minutes. Stir in the minced garlic and cook until fragrant, about 30 seconds.
Pour in the diced tomatoes with their juices, chicken broth, heavy cream, and Italian seasoning. Season with salt and pepper, then bring the mixture to a gentle simmer.
Add the uncooked pasta to the pot, pressing it down so it is submerged in the sauce. Cover and cook, stirring occasionally, until the pasta is al dente and most of the liquid has been absorbed, about 12–14 minutes.
Return the browned kielbasa to the pot and stir to combine. Cook for 2–3 more minutes until the sausage is heated through and the sauce has thickened to your liking.
Remove from heat and let rest for 2 minutes before serving. Garnish with chopped parsley if desired.
Notes
Adjust the creaminess by using half-and-half instead of heavy cream, or add a splash of milk for a lighter sauce. For extra heat, stir in a pinch of red pepper flakes when adding the garlic. Leftovers keep well in the refrigerator for up to 3 days and can be reheated gently on the stovetop with a splash of broth or cream.
Prep Time: 10 minutes

