There are days when the only thing standing between me and an afternoon crash is a good snack. If you’re anything like me, you know the struggle of wanting something quick, filling, and actually good for you. That’s where these Healthy No-Bake Oatmeal Bars come in. No oven, no fuss—just a few simple ingredients and a little chill time.
These bars have quickly become a staple in my fridge. They’re chewy, lightly sweet, full of texture, and totally customizable depending on what you’ve got in your pantry. Plus, they’re the kind of snack that makes you feel like you’ve got your life together—even if you’re eating one on the go in yesterday’s sweatpants (no judgment here).
Let’s talk about why I love these bars so much. First off, they come together in about 10 minutes flat, which is always a win. You probably already have most of the ingredients on hand—oats, peanut butter, honey, and maybe some chocolate chips hiding in the back of the cupboard. Second, they’re naturally sweetened, which means no refined sugar crash later. And third? Zero baking involved. Just mix, press, chill, and you’re good to go.
Whether you’re prepping for a busy school week, trying to get ahead on meal planning, or just want something tasty to keep in the fridge, these bars are a great solution. They also happen to be freezer-friendly, making them an excellent option for batch prepping.
Alright, let’s jump right in!
Ingredients You’ll Need
Before we get started, here’s everything you’ll need to make these healthy no-bake bars:
2 cups old-fashioned rolled oats
1 cup natural peanut butter or almond butter
½ cup honey or maple syrup
½ cup chopped nuts (like almonds or walnuts)
⅓ cup mini chocolate chips or dried fruit
1 teaspoon vanilla extract
Pinch of salt
This ingredient list is super flexible. Don’t be afraid to make it your own! I’ll share some of my favorite variations later in the article.
STEP 1: Prep Your Pan
First things first, line an 8×8-inch baking pan with parchment paper. I like to leave some overhang on the sides so it’s easy to lift the bars out once they’re set. You don’t want any sticking—it makes cleanup way easier, too.
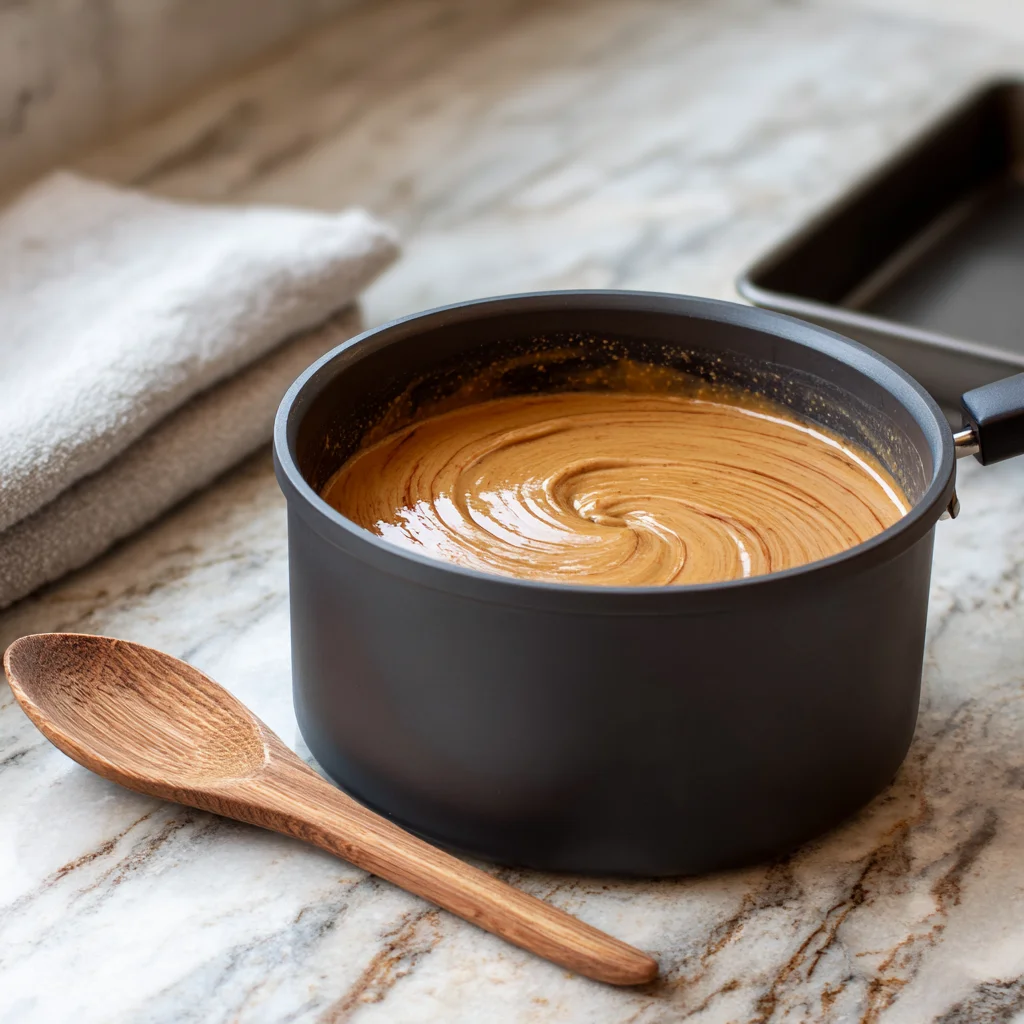
STEP 2: Melt the Peanut Butter and Honey
In a medium saucepan over low heat, add your peanut butter and honey. Stir the mixture constantly with a wooden spoon or silicone spatula until it’s fully combined, smooth, and slightly runny.
This step only takes a couple of minutes, and the low heat is key—you don’t want to scorch anything. If you’re using maple syrup instead of honey, the process is exactly the same.
Once the mixture is smooth, take it off the heat and stir in the vanilla extract and pinch of salt. It already smells amazing at this point!

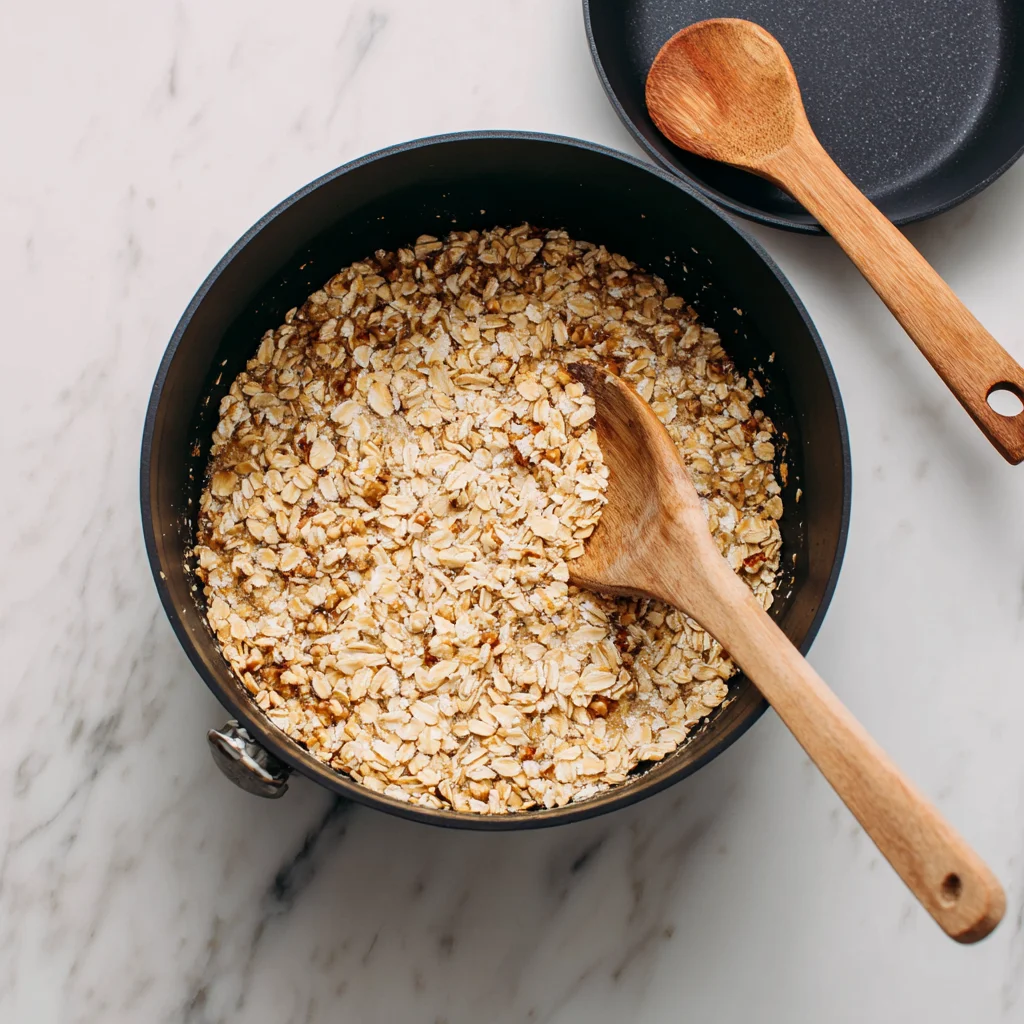
STEP 3: Add the Oats and Nuts
Now, pour in the rolled oats and chopped nuts, mixing until every oat is coated in that peanut butter-honey goodness. It might take a little elbow grease, but trust me, it’s worth it.
Make sure everything is well-distributed—you want each bite to have a nice balance of chewy oats and crunchy nuts.
STEP 4: Fold in Chocolate Chips or Dried Fruit
Let the mixture cool for a few minutes before adding the mini chocolate chips or dried fruit. If you add them too soon, the heat will melt the chocolate and you’ll end up with more of a chocolate swirl (which isn’t a bad thing, just different!).
Fold them in gently to keep the mix-ins intact.
Healthy No-Bake Oatmeal Bars: Easy to Make, Even Easier to Love
Welcome back! In Part 1, we mixed up our simple base using oats, nut butter, and a few other pantry staples. Now it’s time to finish things off, get those bars into the fridge, and talk about how to customize them to your taste. Because let’s be honest—one of the best things about a no-bake recipe like this is how easy it is to tweak it just the way you like it.
Whether you’re packing lunches, looking for a post-workout bite, or need a mid-afternoon pick-me-up, these bars are a total lifesaver. And once you’ve made them once, you’ll be able to do it with your eyes closed (well, almost).
Let’s finish what we started and get these bars ready to eat!
STEP 5: Press the Mixture into the Pan
Transfer your oat mixture into the prepared 8×8-inch pan. Now comes the important part—pressing it down firmly.
You can use the back of a spoon, a silicone spatula, or your hands (just make sure they’re clean or use parchment paper between your hand and the mix). The goal here is to compact everything tightly so the bars hold together once they’re chilled.
Don’t be shy about pressing hard—loose bars tend to fall apart. I usually spend a minute or two really making sure it’s packed in evenly.
STEP 6: Chill to Set
Pop the pan into the refrigerator for at least 1 to 2 hours. This is where the bars firm up and become sliceable.
If you’re in a hurry, you can place them in the freezer for about 30 minutes, but I find that the fridge gives a better texture—chewy, not too hard.
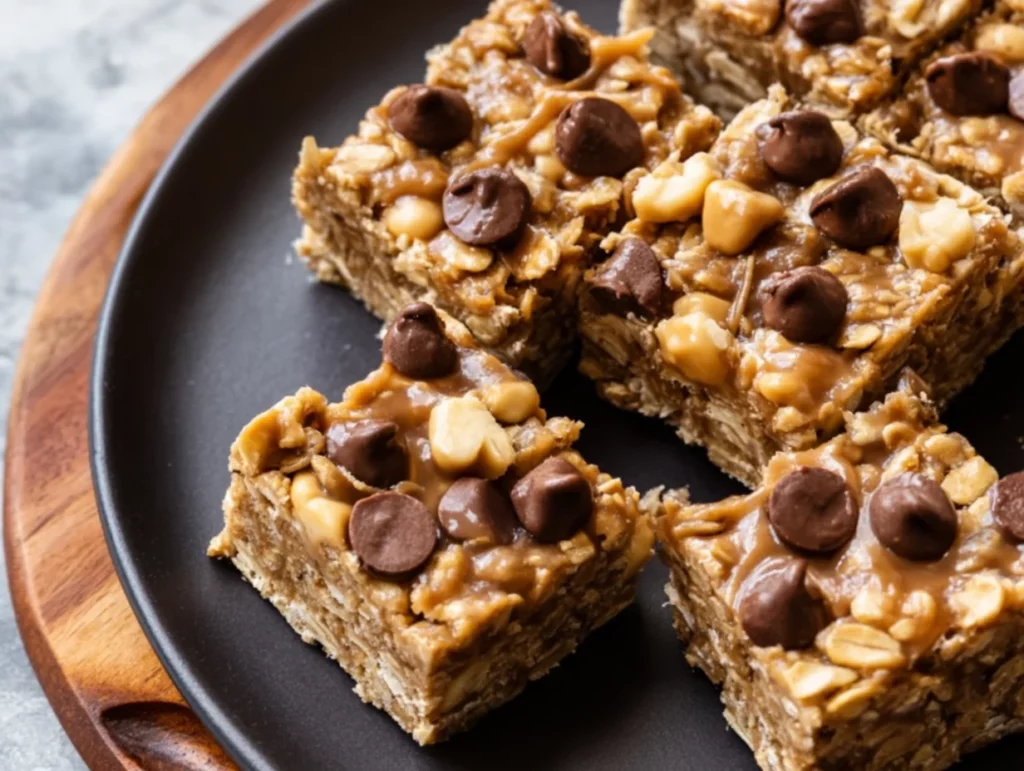
Once they’re set, lift the whole block out using the parchment overhang and place it on a cutting board. Use a sharp knife to cut into 10 bars or squares, depending on your size preference.
Tips and Tricks for the Best No-Bake Oatmeal Bars
Now that you know the basic method, here are a few of my favorite tips to make sure your bars turn out perfect every time—and how to switch them up if you’re feeling adventurous.
1. Use the Right Oats
Stick with old-fashioned rolled oats for the best texture. Instant oats tend to get mushy, and steel-cut oats are too tough unless cooked.
2. Don’t Skip the Chill Time
I know it’s tempting to dig in early, but the bars really need time to firm up. If you try cutting them too soon, they’ll fall apart.
3. Customize Your Add-Ins
The sky’s the limit when it comes to mix-ins. Try:
Chia seeds or flaxseed for added fiber and omega-3s
Unsweetened shredded coconut for a tropical twist
Cacao nibs instead of chocolate chips for a more intense cocoa flavor
Dried cranberries, apricots, or raisins for a fruit-forward version
You can even do a combo—just keep the total add-ins to about 1/3 to 1/2 cup to keep the bars from getting too crumbly.
4. Make It Nut-Free
Need a school-friendly version? Swap out peanut or almond butter for sunflower seed butter or soy nut butter. They work beautifully and still give that creamy, satisfying texture.
5. Store Them Right
These bars will keep in the fridge for up to one week, stored in an airtight container. For longer storage, place them in the freezer with parchment paper between layers to prevent sticking.
I like to wrap individual bars in parchment and keep a few in the freezer at all times. That way, I can just grab one when I need it and let it thaw for a few minutes.
Fun Flavor Ideas to Try
If you’re ready to move beyond the basic recipe, here are a few easy ways to level up the flavor:
Cinnamon Raisin: Add ½ teaspoon ground cinnamon and ⅓ cup raisins.
Coconut Chocolate Chip: Stir in ¼ cup shredded coconut and mini chips.
Trail Mix Style: Mix in sunflower seeds, pumpkin seeds, dried cherries, and dark chocolate chunks.
Apple Pie Bars: Add ½ teaspoon apple pie spice and diced dried apples.
Don’t be afraid to get creative! These bars are pretty forgiving, which makes them the perfect canvas for experimenting with flavors.
Healthy No-Bake Oatmeal Bars: FAQs and Final Thoughts
We’ve gone through how to make these wholesome, chewy, no-bake oatmeal bars from start to finish—and hopefully by now, your batch is chilling in the fridge (or already being enjoyed!). But before we wrap things up, I wanted to answer some of the most common questions I get about this recipe.
Whether you’re wondering about substitutions, storage, or how to avoid crumbly bars, I’ve got you covered.
Let’s dive into the FAQ section, and then I’ll share a few final thoughts before you head off to make your own batch!

Frequently Asked Questions
1. Can I make these bars vegan?
Absolutely. Just swap out the honey for maple syrup or agave nectar, and use vegan chocolate chips or dried fruit. Everything else in the recipe is naturally plant-based.
2. What can I use instead of peanut butter?
You can use almond butter, cashew butter, sunflower seed butter, or even soy nut butter if you need a nut-free option. Just make sure the butter is natural and drippy—not the thick, processed kind, which won’t mix as well.
3. Why are my bars falling apart?
This usually happens if the mixture wasn’t pressed down firmly enough or didn’t chill long enough. Make sure to really pack it into the pan tightly, and chill for at least 1 to 2 hours before cutting.
Also, keep your ratio of wet to dry ingredients balanced—adding too many dry mix-ins can make the bars crumbly.
4. Can I use quick oats or steel-cut oats?
Quick oats can be used in a pinch, but the texture will be much softer. Steel-cut oats are not recommended for this recipe because they don’t soften properly without cooking and will make the bars too tough and chewy.
5. How should I store these bars?
Store them in an airtight container in the refrigerator for up to one week. For longer storage, freeze them for up to 3 months, placing parchment paper between layers to prevent sticking.
6. Can I double the recipe?
Yes! Just use a 9×13-inch pan instead of an 8×8. Make sure to press the mixture down evenly and adjust the chilling time slightly (a little longer if needed).
7. Can I use flavored nut butters?
Yes, but keep in mind that some flavored nut butters come with added sugars, oils, or salt that might alter the final taste and texture. Always check the label and adjust the recipe accordingly if needed.
Final Thoughts: A Snack Worth Repeating
Healthy snacking doesn’t have to be complicated—or boring. These Healthy No-Bake Oatmeal Bars are proof that with just a handful of simple ingredients, you can whip up something that’s not only nourishing and filling, but genuinely delicious.
They’ve become a weekly ritual in my kitchen—whether I’m making a batch for my family’s lunchboxes or just to have on hand for those “what can I eat right now?” moments. And what I love most is how easy they are to adapt. One week it’s peanut butter and chocolate chips, the next it’s almond butter with coconut and dried apricots. You really can’t go wrong.
If you give these a try, I’d love to hear how they turned out! Feel free to leave a comment below with your favorite add-ins or any creative twists you tried. And if you’re prepping for the week ahead, go ahead and make a double batch—you won’t regret it.
Print
Healthy No-Bake Oatmeal Bars
- Author: Andrew Recipes
Description
Healthy No-Bake Oatmeal Bars are a quick, wholesome snack made with just a few pantry staples. These bars are naturally sweetened, packed with fiber, and require no oven time, making them perfect for busy mornings or afternoon energy boosts. With a soft, chewy texture and a nutty, slightly sweet flavor, they’re a satisfying alternative to store-bought bars.
Ingredients
2 cups old-fashioned rolled oats
1 cup natural peanut butter or almond butter
½ cup honey or maple syrup
½ cup chopped nuts, such as almonds or walnuts
⅓ cup mini chocolate chips or dried fruit
1 tsp vanilla extract
Pinch of salt
Instructions
1 Line an 8×8-inch baking pan with parchment paper. In a medium saucepan over low heat, combine peanut butter and honey. Stir constantly until the mixture is smooth and melted together.
2 Remove from heat and stir in vanilla extract and salt. Add the oats and chopped nuts, mixing until fully coated. Let the mixture cool slightly before folding in chocolate chips or dried fruit to avoid melting.
3 Transfer the mixture into the prepared pan. Press it down firmly into an even layer using the back of a spoon or your hands.
4 Chill in the refrigerator for at least 1 to 2 hours until firm. Once set, lift out of the pan and cut into bars or squares.
Notes
These bars can be stored in the refrigerator for up to one week or frozen for longer storage. Customize with add-ins like chia seeds, shredded coconut, or flaxseed for extra nutrition. Use certified gluten-free oats if needed, and swap nut butter for sunflower seed butter for a nut-free version.


I’m going to make this today. The recipe looks so delicious! About how many bars does it make,
Thanks!