
There’s just something about citrus desserts that instantly make you feel like summer has arrived. The tartness, the sweetness, that burst of bright, fresh flavor—it’s pure happiness in every bite. And today, I’m sharing one of my absolute favorite warm-weather treats: Lemonade Pie.
This pie has everything I love in a summer dessert: it’s light, creamy, cool, and best of all, ridiculously easy to make. Seriously, you don’t even need to turn on your oven for this one, which makes it a total lifesaver when the temperatures start to climb.
I actually stumbled across this recipe a few years ago while looking for an easy dessert to bring to a family barbecue. I needed something quick that didn’t require a ton of prep or baking. When I brought it to the party, it was gone in minutes, and everyone was asking for the recipe. Since then, it’s become one of my go-to desserts whenever I need something sweet, simple, and guaranteed to please a crowd.
Whether you’re planning a picnic, a backyard barbecue, or just craving a cool slice of pie on a warm afternoon, this Lemonade Pie is perfect. It’s creamy, it’s tangy, and it’s just sweet enough to keep you coming back for another slice.
Let’s dive right in and start whipping up this refreshing treat!
Ingredients You’ll Need
Here’s the short and simple ingredient list. I love that it only takes a handful of items—most of which you might already have on hand:
4 ounces cream cheese, softened to room temperature
14 ounce can sweetened condensed milk
6 ounces frozen lemonade concentrate, thawed
8 ounce tub whipped topping (Cool Whip), thawed
9 ounce premade graham cracker crust (the larger one that says 2 extra servings)
STEPS: Making the Creamy Lemonade Filling
Step 1: Whip the Cream Cheese Until Smooth
Start by placing your softened cream cheese into a large mixing bowl. Using an electric hand mixer, beat it until it’s completely smooth and creamy. This step is important because you want to eliminate any lumps, which helps the filling stay silky smooth later on.
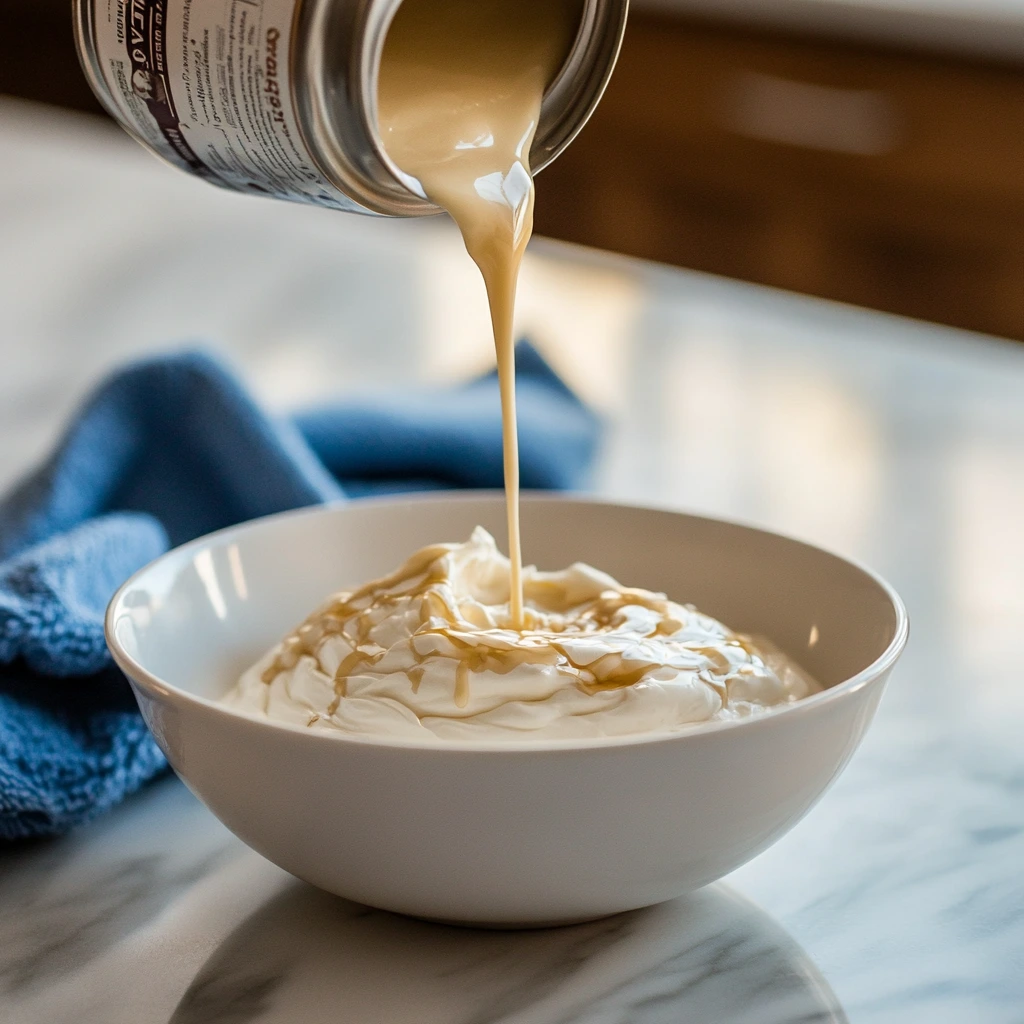
Step 2: Blend in the Sweetened Condensed Milk
Next, add the sweetened condensed milk to your whipped cream cheese. Continue mixing until the two are fully combined and the mixture is completely smooth. Be sure to scrape down the sides of your bowl occasionally to make sure everything is evenly incorporated. This helps ensure you won’t end up with any pockets of unmixed cream cheese in your final pie.

Step 3: Add the Lemonade Concentrate
Now comes the star of the show: the lemonade concentrate! Pour the thawed frozen lemonade concentrate into your mixture and beat until everything is fully incorporated. The filling should now have a beautifully smooth, slightly thick texture with that signature lemony aroma that makes this pie so irresistible.
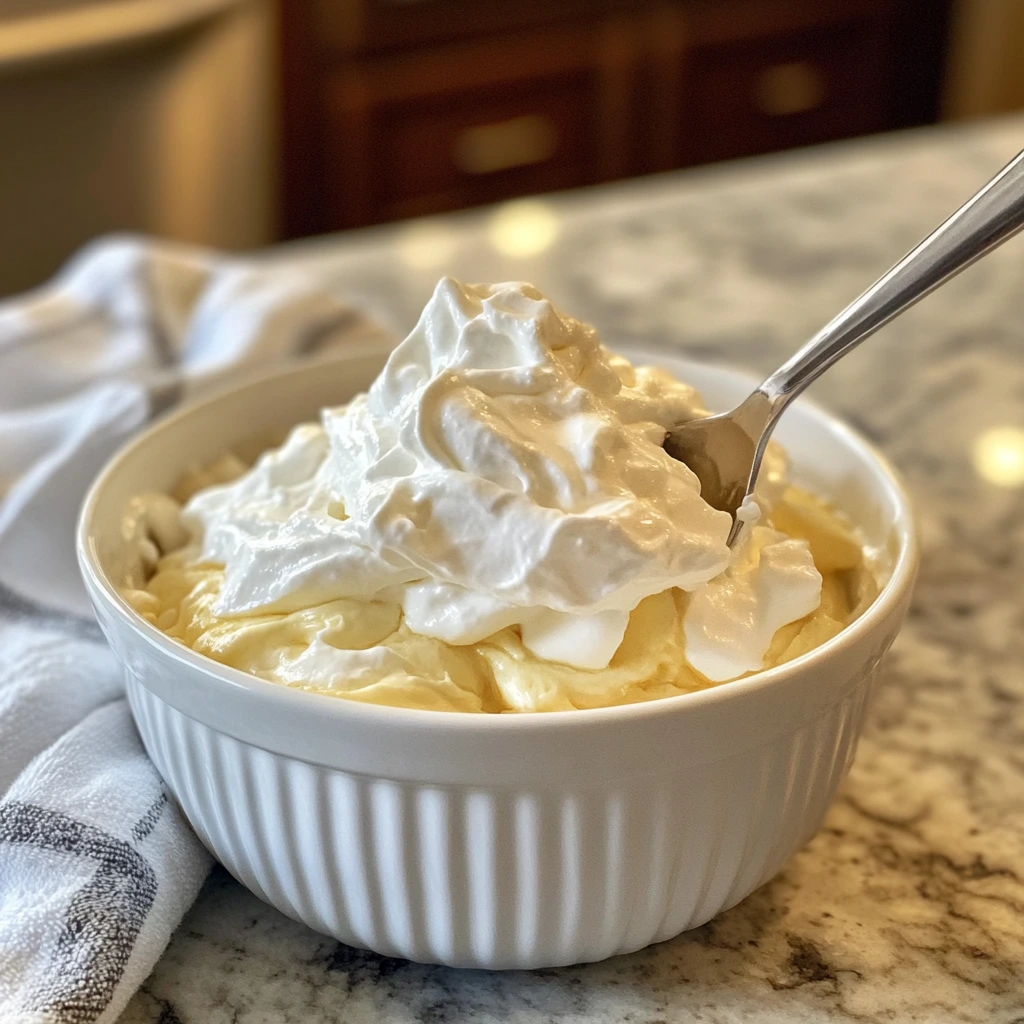
Step 4: Fold in the Whipped Topping
Finally, add the thawed whipped topping (Cool Whip) to the bowl. Gently fold it in and then beat on low speed just until everything is fully combined. You want to make sure there are no visible streaks of whipped topping left. This step gives the filling its light, airy texture that makes each bite feel like a little cloud of lemony goodness.
Finishing Your Lemonade Pie: Chill, Serve & Enjoy
Now that we’ve got our creamy, dreamy lemonade filling all ready to go, it’s time for the final steps. This part is honestly my favorite because it means we’re just hours away from digging into that cool, tangy slice of heaven. Plus, this pie is so simple to finish off that you’ll have it chilling in the fridge in no time at all.
STEPS: Assembling and Chilling the Pie
Step 5: Transfer Filling Into the Crust
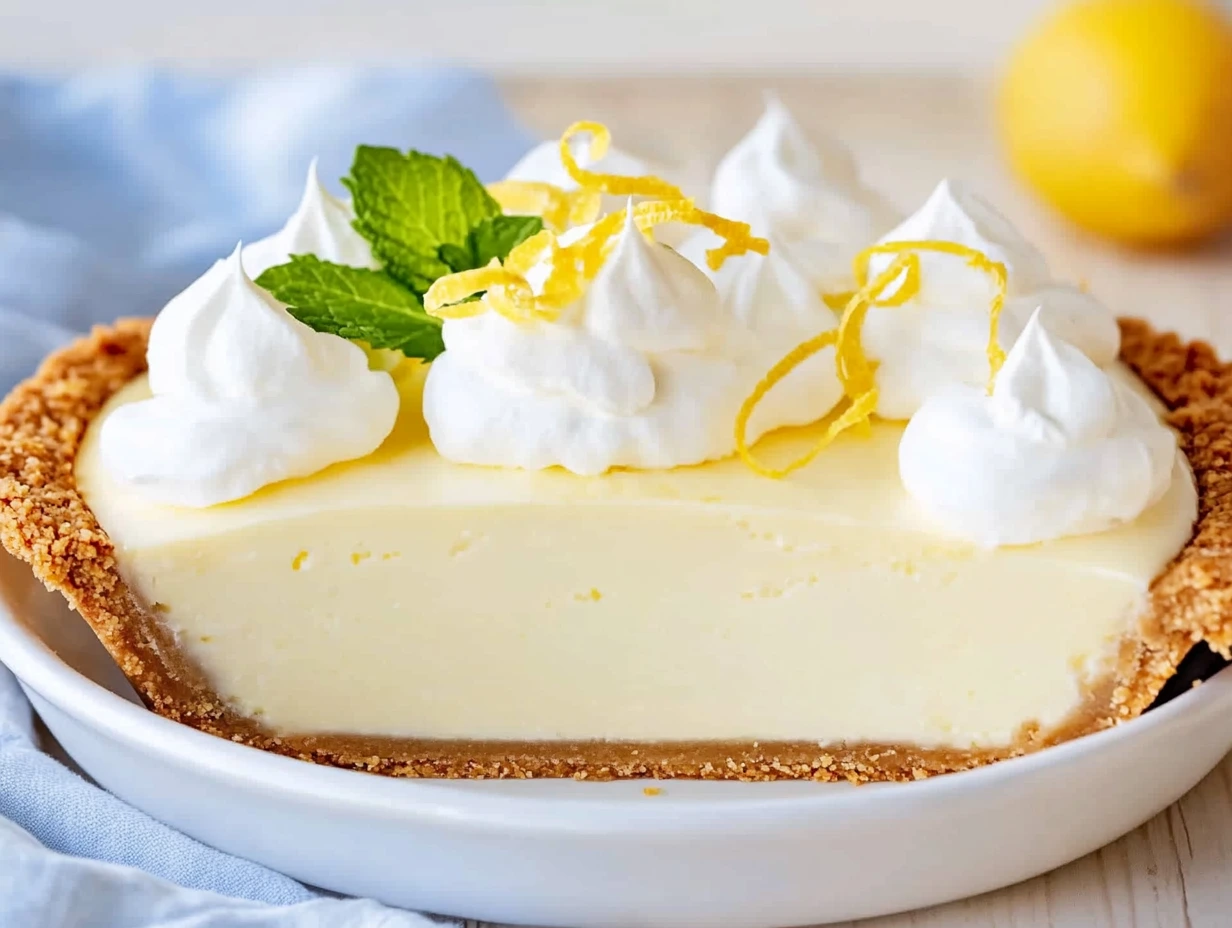
Grab your premade graham cracker crust. I like to use the 9-ounce size that says “2 extra servings” on the label because it perfectly fits all of this luscious filling. Carefully spoon the lemonade mixture into the crust, spreading it out evenly with a spatula or the back of a spoon. Smooth the top as best you can—it doesn’t have to be perfect, but a nice even surface makes it look extra pretty when you serve it.

Step 6: Cover and Refrigerate
Once your pie is assembled, cover it with the plastic lid that came with the graham cracker crust or use plastic wrap. Pop it into the refrigerator and let it chill for at least 8 hours. If you can, letting it sit overnight is even better. This resting time allows the flavors to meld beautifully and helps the pie set to that perfect creamy, sliceable consistency.
Step 7 (Optional): Freeze for a Firmer Texture
If you like your pie a little firmer (especially on a hot day), you can place it in the freezer for a few hours before serving. Just make sure to take it out and let it soften slightly at room temperature for about 10-15 minutes so it’s easy to slice and serve. The semi-frozen texture is honestly amazing—almost like a lemon icebox pie.
Serving Suggestions and Extra Touches
Now, while this Lemonade Pie is absolutely delightful all on its own, a few simple garnishes can really make it shine when you’re ready to serve:
Lemon Slices: Add a few thin lemon slices right on top for a beautiful, fresh look.
Whipped Cream: A little extra dollop of whipped cream on each slice never hurts.
Graham Cracker Crumbs: Sprinkle a few extra crumbs over the top for a lovely crunchy texture.
Fresh Berries: A handful of raspberries or blueberries adds a pop of color and an extra layer of flavor.
This pie is honestly so versatile that you can dress it up or keep it simple depending on the occasion. Whether I’m bringing it to a summer potluck or serving it at a casual family dinner, it always gets rave reviews.
Helpful Tips for Perfect Lemonade Pie
Since I’ve made this pie more times than I can count, here are a few little tips I’ve picked up along the way to help make sure yours turns out absolutely perfect:
Soften Your Cream Cheese: Make sure your cream cheese is truly softened before you start mixing. Cold cream cheese can leave little lumps that are hard to get out later.
Fully Thaw Your Ingredients: Both the lemonade concentrate and the whipped topping should be completely thawed to ensure everything mixes together smoothly.
Don’t Rush the Chill Time: I know it’s tempting to cut into your pie early, but giving it a full 8 hours (or overnight) really makes a difference in the texture.
Lemonade Pie FAQ: Your Questions Answered
Before you head to the kitchen and whip up your own Lemonade Pie, let’s go over a few of the most common questions I get. These little tips and tricks can help make sure your pie turns out absolutely perfect every single time.
Can I use fresh lemon juice instead of lemonade concentrate?
The lemonade concentrate gives this pie its signature sweet-tart balance and helps thicken the filling. Using fresh lemon juice alone won’t give the same consistency or level of sweetness. If you really want to use fresh juice, you would need to adjust both the amount of juice and sugar, but it may not set as well.
Can I make Lemonade Pie ahead of time?
Absolutely! In fact, this pie is perfect for making ahead. Since it needs at least 8 hours in the fridge to set, making it the day before you plan to serve it is ideal. It will stay fresh in the fridge for up to 3-4 days.
Can I freeze Lemonade Pie?
Yes! Freezing this pie works really well, especially if you like a firmer, almost ice cream-like texture. Just remember to let it sit out for 10-15 minutes before slicing so it’s easier to cut.
Is it okay to use a homemade graham cracker crust?
Of course! While the premade crust makes this recipe super quick and easy, a homemade graham cracker crust will work beautifully if you prefer to make your own. Just be sure to let the crust cool completely before filling.
What if I don’t have an electric hand mixer?
You can absolutely mix everything by hand using a sturdy whisk or a stand mixer. Just make sure to thoroughly beat the cream cheese until it’s completely smooth before adding the other ingredients. This helps ensure a lump-free filling.
Can I use a different flavor concentrate?
Definitely! This recipe works great with other frozen juice concentrates. Pink lemonade, limeade, or even orange concentrate can give you a fun twist on the original.
Why does my pie filling seem too runny?
If your pie isn’t setting up as firm as you’d like, double-check that you used the correct ingredient amounts and allowed enough chill time. Also, make sure the cream cheese and whipped topping were properly mixed in. If needed, popping the pie into the freezer for a bit can help it firm up before serving.
Conclusion: A Simple, Refreshing Dessert You’ll Make Again and Again
There’s just something special about a dessert that’s easy to make, requires no baking, and delivers such a big burst of flavor. This Lemonade Pie checks all those boxes and then some. Every time I serve it, whether at a summer barbecue, family gathering, or just a casual weeknight dinner, it always disappears fast with everyone asking for seconds.
What I love most is how forgiving and versatile it is. You don’t need to be an expert baker to pull this off, and you can easily switch things up with different concentrates or toppings to make it your own. Plus, with just a few simple ingredients, you can have a beautiful, refreshing pie chilling in your fridge in no time.
I hope you’ll give this Lemonade Pie a try and love it as much as my family does! If you do, be sure to leave a comment and let me know how it turned out—or if you made any fun variations. Happy no-baking!
Print
Lemonade Pie
- Author: Andrew Recipes
Description
This Lemonade Pie is a light, creamy, and refreshing dessert that’s perfect for warm weather or any time you crave something sweet and citrusy. With just a handful of simple ingredients and minimal prep, it comes together effortlessly and delivers a delicious balance of tart and sweet flavors.
Ingredients
4 ounces cream cheese, softened to room temperature
14 ounce can sweetened condensed milk
6 ounces frozen lemonade concentrate, thawed
8 ounce tub whipped topping, thawed (Cool Whip)
9 ounce premade graham cracker crust (the larger one that says 2 extra servings)
Instructions
In a large bowl, whip the cream cheese with an electric hand mixer until smooth and creamy, ensuring there are no lumps.
Add the sweetened condensed milk to the cream cheese and continue mixing until fully combined and smooth, scraping down the sides of the bowl as needed to ensure even blending.
Pour in the thawed frozen lemonade concentrate and mix until well incorporated, making sure the filling is smooth.
Fold in the thawed whipped topping and beat until the mixture is fully blended with no visible streaks remaining.
Transfer the prepared filling into the premade graham cracker crust, spreading it evenly.
Cover the pie and refrigerate for at least 8 hours or overnight to allow it to fully set and achieve the ideal creamy texture.
Notes
For the best flavor and texture, allow the pie to chill overnight. If you prefer a firmer consistency, you can place the pie in the freezer for a few hours before serving, but allow it to soften slightly before slicing. Garnish with lemon slices, whipped cream, or a sprinkle of graham cracker crumbs for an extra touch before serving. This no-bake dessert is ideal for potlucks, picnics, or simple family dinners when you want an easy, crowd-pleasing treat.

