If you’ve ever wanted to make a meal that feels elegant and comforting, but still comes together without a culinary degree—this Mushroom Stuffed Chicken Breast is going to be your new go-to. It’s juicy, flavorful, cheesy, and perfect for impressing guests or treating yourself to something special on a weeknight. Best of all? It’s way easier than it sounds.
I love recipes like this. You know, the ones that look like you put in a ton of effort (bonus points if someone actually thinks you did), but in reality, you just followed a few simple steps and let the oven do most of the work. This dish is exactly that.
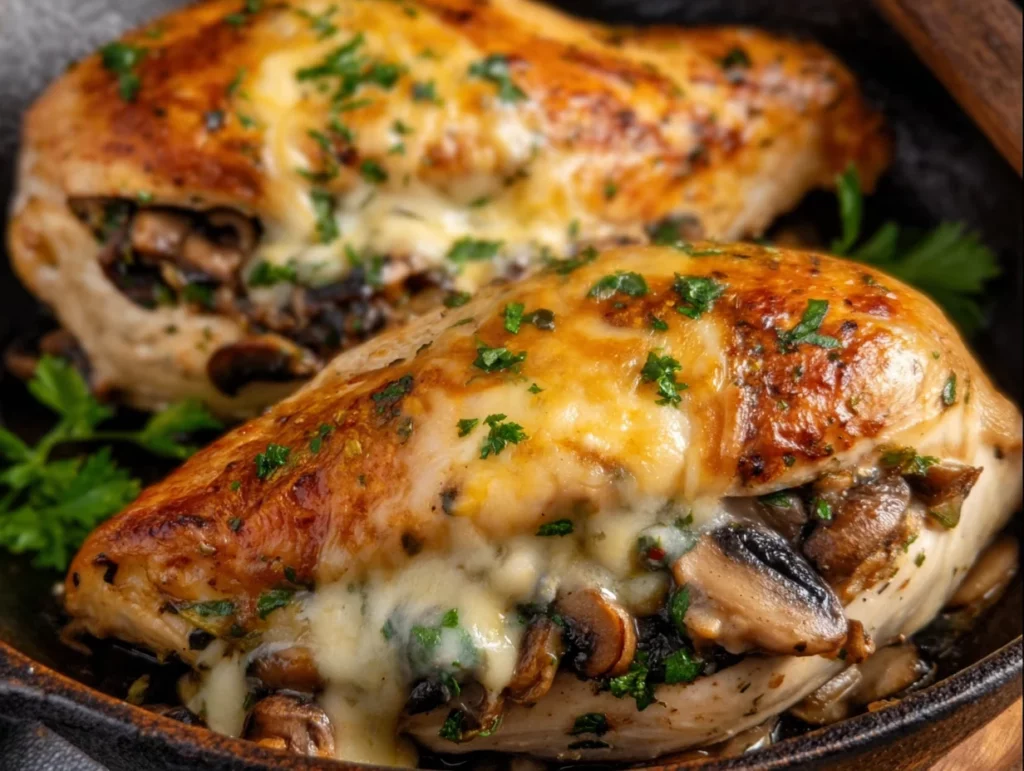
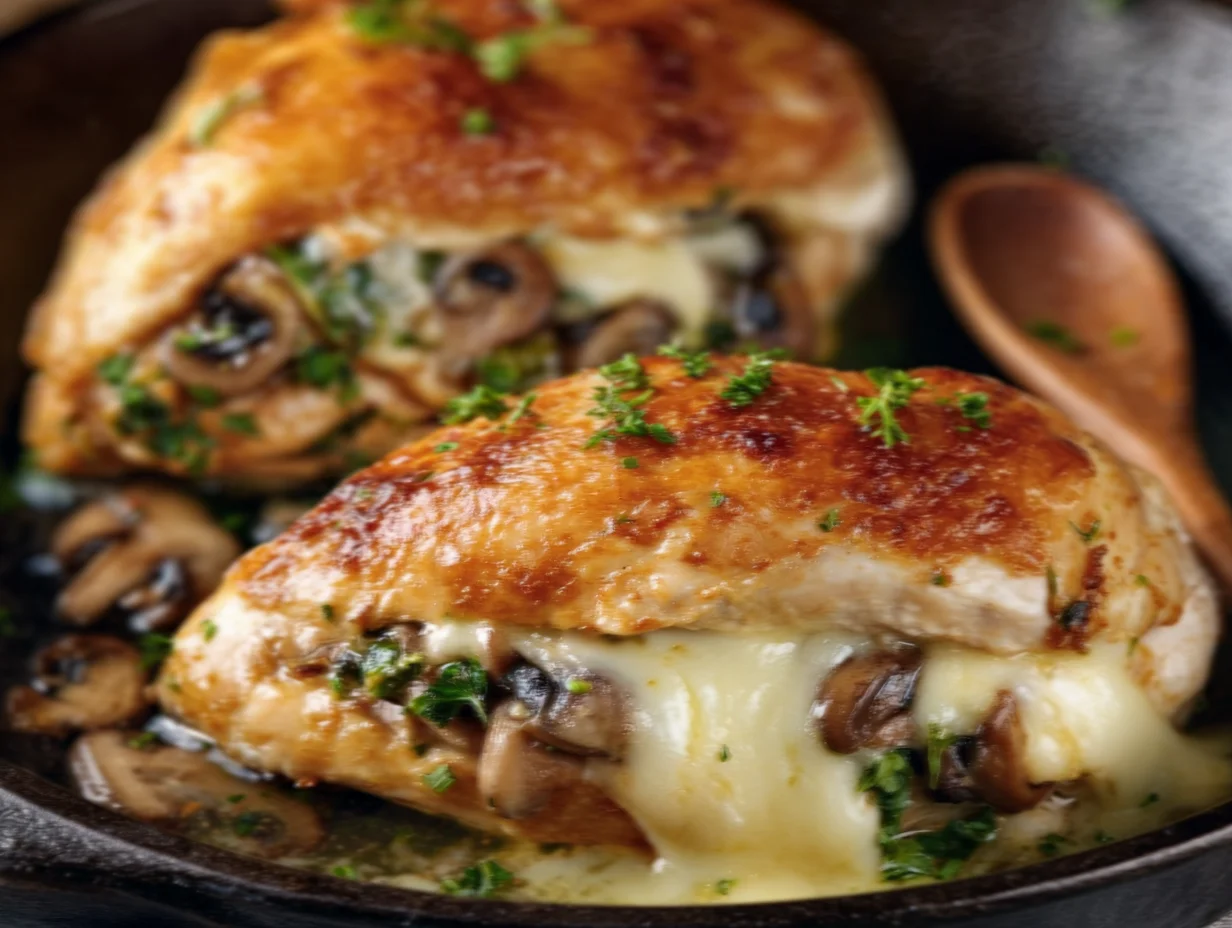
It starts with two plump chicken breasts, gets filled with a garlicky mushroom and herb mixture, then sealed up with melty cheese and cooked until golden and irresistible. Pair it with some roasted veggies or a crisp salad, and you’ve got a complete meal that’s comforting but classy.
Let’s get right into it, because once you see how easy this is, you’re going to want to make it tonight.
Why You’ll Love This Mushroom Stuffed Chicken
Before we dive into the steps, here’s why this dish is worth bookmarking:
Simple ingredients: Nothing fancy here—just pantry staples and fresh ingredients you probably already have.
Quick prep: It only takes about 15 minutes to get everything ready.
Restaurant flavor at home: Rich, savory, cheesy, and perfectly herby.
Versatile: Add-ins like spinach, sun-dried tomatoes, or even a splash of white wine can take it to the next level.
Now, let’s make it happen.
Ingredients You’ll Need
2 large boneless, skinless chicken breasts
2 tbsp olive oil
8 oz mushrooms, finely chopped
3 garlic cloves, minced
1 tbsp fresh parsley, chopped
½ tsp dried thyme
½ tsp salt
½ tsp black pepper
¾ cup shredded mozzarella or Swiss cheese
Toothpicks or kitchen twine for securing
STEP 1: Preheat and Prep the Chicken
Start by preheating your oven to 375°F. You’ll want your oven hot and ready once the chicken is seared.
Then, butterfly the chicken breasts. That means slicing them horizontally—but don’t cut all the way through. Open them up like a book. If this feels a little intimidating, just go slow and keep your knife level. The goal is to create a nice pocket for all that flavorful filling.
Once the chicken is butterflied, season both the inside and outside with salt and black pepper. This step helps infuse the chicken with flavor from the inside out.

STEP 2: Make the Mushroom Filling
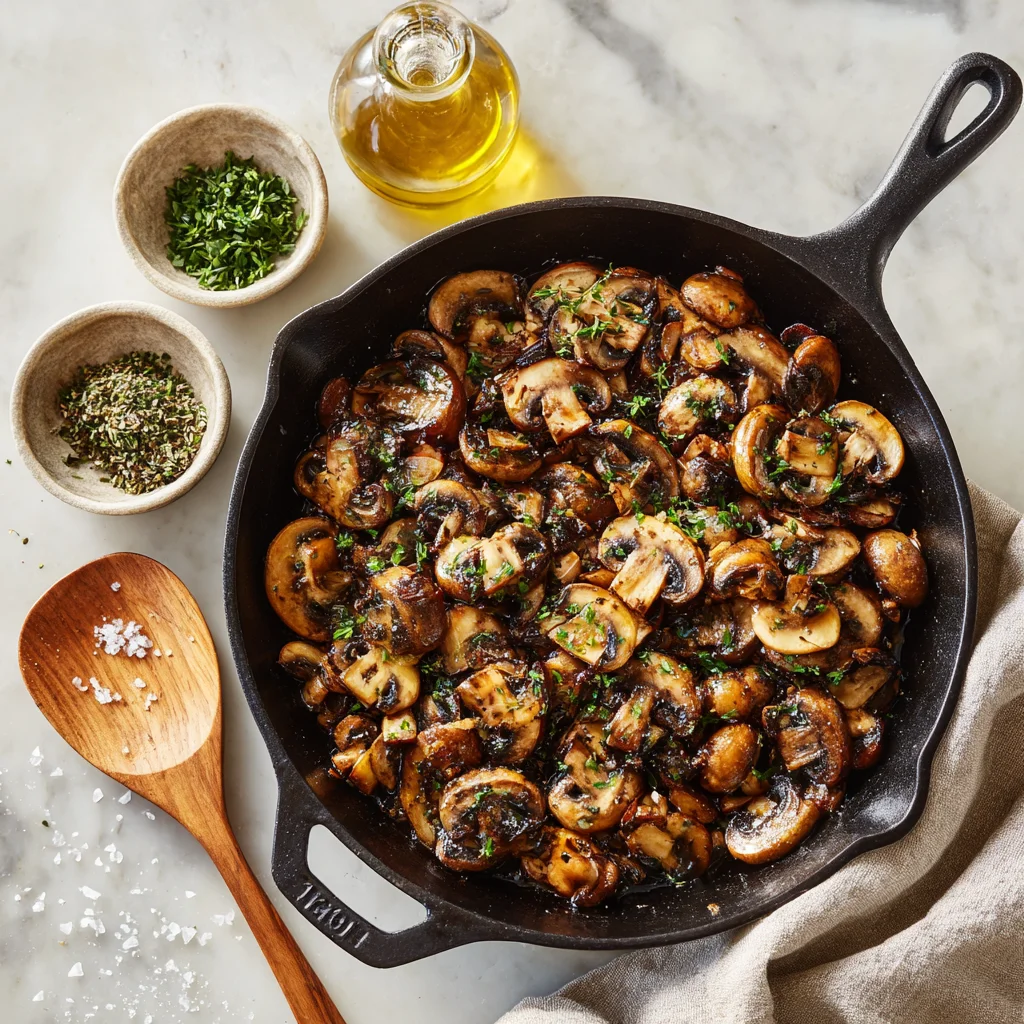
In a skillet over medium heat, add 1 tablespoon of olive oil and let it warm up. Toss in your finely chopped mushrooms and sauté them until they release their moisture and start to brown. This should take about 6 to 8 minutes.
Pro tip: Don’t stir too often. Let the mushrooms sit for a bit so they get those nice golden edges—it adds depth of flavor.
Once they’re looking good, stir in the minced garlic, thyme, and parsley, and cook everything together for another minute. The kitchen is going to smell amazing at this point.
Remove the skillet from the heat and let the mixture cool for a few minutes. You want it warm but not hot when you add the cheese, so it doesn’t melt too early.
STEP 3: Add the Cheese and Stuff the Chicken
Now that your mushroom mixture has cooled a bit, stir in the shredded mozzarella or Swiss cheese. I’ve used both, and honestly, either one works beautifully—just depends on whether you’re going for a gooier or nuttier flavor.
Take your butterflied and seasoned chicken breasts and spoon the filling onto one side of each. Try to keep the mixture evenly distributed, and don’t overfill—it’ll make sealing them up tricky.
Fold the other side of the chicken over the filling and secure it shut with toothpicks or kitchen twine. You don’t need to go overboard here—just enough to keep things together while it cooks.
How to Cook Mushroom Stuffed Chicken Breast to Golden, Juicy Perfection
Alright, now that your chicken breasts are all stuffed, secured, and ready to go, it’s time for the real magic to happen—the sear and bake. This two-step cooking method gives you the best of both worlds: a golden, crispy outside and a juicy, tender inside. And trust me, once you try this method, you’ll never want to go back to plain baked chicken again.
This part comes together quickly, so make sure you have everything ready before you heat the pan. Let’s jump back in and finish off this delicious dish!
STEP 4: Sear the Stuffed Chicken
Heat the remaining 1 tablespoon of olive oil in an oven-safe skillet over medium-high heat. Cast iron is perfect for this, but any pan that can go from stove to oven will work just fine.
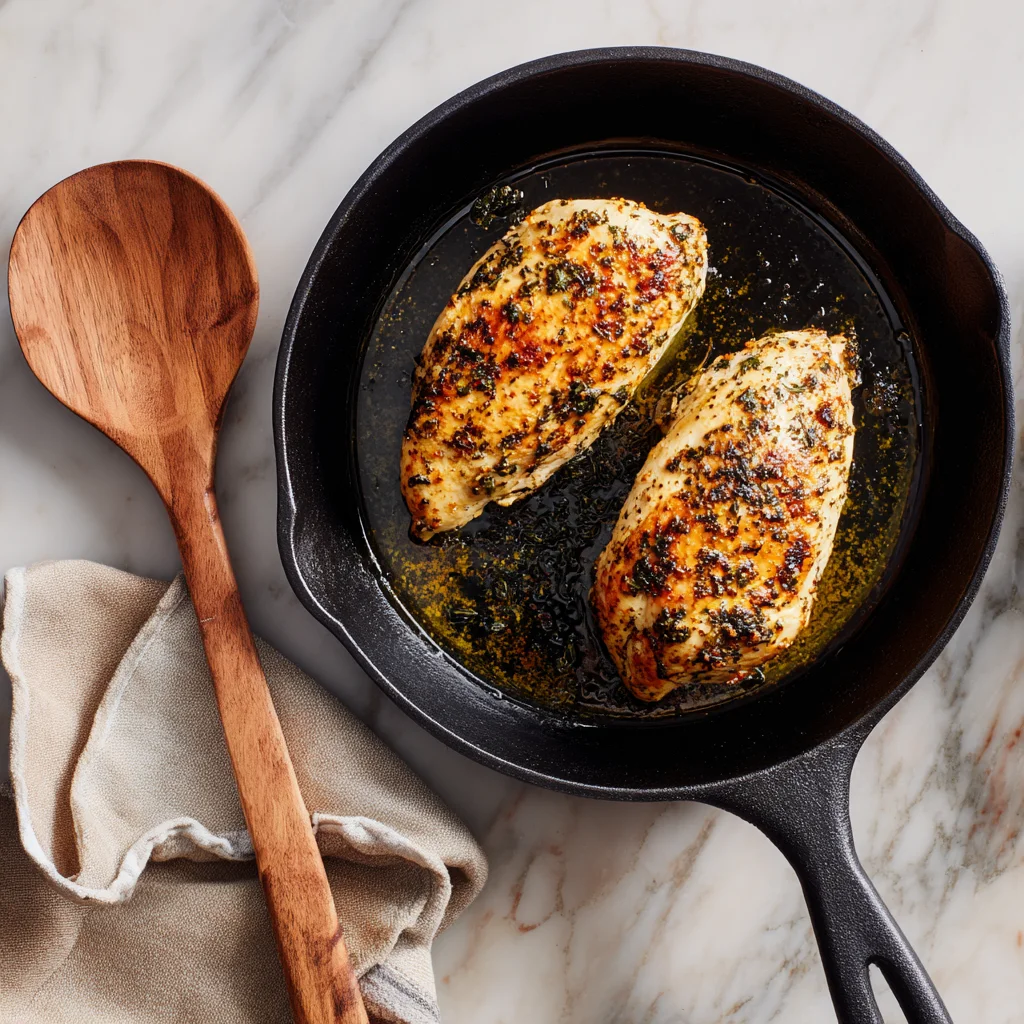
Once the oil is shimmering, gently place your stuffed chicken breasts into the pan. Let them sear for about 3 to 4 minutes on each side until they’re golden brown. This step locks in the juices and gives you that beautiful color on the outside.
Tip: Be gentle when flipping. Use tongs and turn them carefully to keep all that stuffing where it belongs.
At this point, your kitchen will smell like something straight out of a cozy French bistro—herbs, garlic, mushrooms, and that golden sear all coming together. It’s heavenly.
STEP 5: Bake Until Perfectly Cooked
After both sides are seared, it’s time to finish the chicken in the oven. Slide the whole skillet into your preheated 375°F oven and bake for 15 to 20 minutes. You’re looking for the chicken to be fully cooked through—an internal temperature of 165°F is the safe zone.
Don’t have an oven-safe skillet? No worries! Just transfer the seared chicken to a baking dish before popping it in the oven.
Optional Flavor Boost: If you want to level up the flavor even more, you can deglaze the pan with a splash of white wine before putting it in the oven. Just pour a couple of tablespoons into the hot skillet after searing the chicken and let it bubble for a minute. The wine lifts all the tasty browned bits from the pan, adding richness to every bite.
STEP 6: Let It Rest, Then Slice and Serve
This step is easy to skip, but don’t do it—resting your chicken is what keeps it juicy. After pulling the chicken from the oven, transfer it to a plate or cutting board and let it rest for about 5 minutes. This allows the juices to redistribute instead of running out all over your cutting board.
Before serving, remove the toothpicks or twine. You’ll be left with perfectly sealed, juicy chicken packed with melty cheese and that earthy, garlicky mushroom goodness inside.
Serving Suggestions: Make It a Meal
Now that you’ve got your main dish looking restaurant-worthy, let’s talk about what to serve with it. This Mushroom Stuffed Chicken Breast is super versatile, so you can go as fancy or as simple as you like.
Here are a few of my favorite pairings:
Roasted Veggies – Carrots, green beans, or Brussels sprouts are all great options.
Creamy Mashed Potatoes – Perfect for soaking up any juices or sauce.
Side Salad – A crisp arugula or spinach salad with a light vinaigrette adds a fresh contrast.
Cauliflower Rice or Zoodles – If you’re keeping it low-carb, these pair perfectly without stealing the spotlight.
Simple Variations to Try
Once you’ve made this once, you’ll probably want to try it again with a twist. Here are a few easy ideas to keep things interesting:
Add Spinach: Sauté a handful of fresh spinach with the mushrooms for a nutrient boost.
Try Sun-Dried Tomatoes: They add a tangy, slightly sweet contrast that pairs beautifully with mushrooms and cheese.
Switch Up the Cheese: Mozzarella is mild and melty, but Swiss, Gruyère, or even goat cheese can give a whole new flavor profile.
Add a Sauce: A light white wine cream sauce or a balsamic reduction drizzled over the top can elevate this dish even more.
FAQs About Mushroom Stuffed Chicken Breast
If you’re planning to make this dish for the first time (or even the fifth), you might have a few questions pop up along the way. Here are some of the most common ones I hear, along with straightforward answers to help you feel confident in the kitchen.
Can I prep this ahead of time?
Absolutely! You can assemble the stuffed chicken breasts—complete with the filling and secured with toothpicks—up to 24 hours in advance. Just store them covered in the fridge and bring them to room temperature for about 20 minutes before searing and baking.
What mushrooms work best for the filling?
White button mushrooms or cremini (baby bella) mushrooms are the easiest to find and work great here. They’re mild, cook down well, and have a rich, earthy flavor. If you’re feeling fancy, try mixing in a few chopped shiitake mushrooms for added depth.
Can I freeze this stuffed chicken?
Yes, you can freeze the assembled, uncooked stuffed chicken breasts. Wrap each one tightly in plastic wrap, then foil, and freeze for up to 2 months. When ready to cook, thaw in the refrigerator overnight before searing and baking as usual.
What can I use instead of toothpicks or twine?
Toothpicks and kitchen twine are the most effective at holding everything together, but if you’re in a pinch, you can try using uncooked spaghetti noodles as a makeshift “toothpick” to pin the sides together. Just make sure you remove them before serving.
How do I know when the chicken is fully cooked?
Use a meat thermometer to check the thickest part of the chicken. When it reaches 165°F, you’re good to go. If you don’t have a thermometer, make a small slice in the thickest part—if the juices run clear and there’s no pink, it’s ready.
Can I make this recipe low-carb or keto-friendly?
Yes! This recipe is naturally low in carbs—just avoid serving it with carb-heavy sides like mashed potatoes or bread. Stick to roasted vegetables or a green salad, and you’ve got a perfectly keto-friendly meal.
Can I cook this entirely on the stovetop?
You could, but the oven method ensures even cooking and helps prevent the outside from over-browning before the inside is done. If you must stay on the stove, cover the pan after searing and reduce the heat to medium-low, cooking for an additional 15–20 minutes. Be sure to check the internal temperature.
Final Thoughts: This Chicken Recipe is a Keeper
There’s just something about this Mushroom Stuffed Chicken Breast that makes it feel like a special occasion—whether you’re serving it on a Tuesday night or at your next dinner party. It’s flavorful, filling, and really does have that wow factor. But the best part? It’s deceptively simple to make.
I’ve made this recipe more times than I can count, and every single time it gets rave reviews. It’s the kind of dish that makes people stop mid-bite and say, “Wait, you made this?”
Whether you keep it classic or switch it up with your own twist (spinach, sun-dried tomatoes, goat cheese… you name it), it’s a dish that’s super flexible and always delicious.
Let’s Recap What Makes It Great:
Juicy, perfectly cooked chicken
A rich, garlicky mushroom and herb filling
Melty cheese in every bite
Simple ingredients with big flavor
Easy enough for a weeknight, impressive enough for guests
If you give it a try, I’d love to hear how it turned out! Leave a comment below with any tweaks you made, or just let me know if your family loved it as much as mine does. And if you’re looking for more weeknight-friendly recipes that still feel a little special, be sure to check out my other stuffed chicken and skillet dinner favorites.
Print
Mushroom Stuffed Chicken Breast
- Author: Andrew Recipes
Description
Mushroom Stuffed Chicken Breast is a savory, elegant dish that’s surprisingly simple to prepare. Juicy chicken breasts are filled with a flavorful blend of sautéed mushrooms, garlic, herbs, and melty cheese, then seared to perfection and finished in the oven. This recipe delivers restaurant-style flavor in a comforting, weeknight-friendly form.
Ingredients
2 large boneless, skinless chicken breasts
2 tbsp olive oil
8 oz mushrooms, finely chopped
3 garlic cloves, minced
1 tbsp fresh parsley, chopped
½ tsp dried thyme
½ tsp salt
½ tsp black pepper
¾ cup shredded mozzarella or Swiss cheese
Toothpicks or kitchen twine for securing
Instructions
1 Preheat the oven to 375°F. Butterfly each chicken breast by slicing it horizontally, being careful not to cut all the way through. Open the breasts like a book and season both sides with salt and pepper.
2 Heat 1 tablespoon of olive oil in a skillet over medium heat. Add chopped mushrooms and sauté until they release their moisture and begin to brown, about 6 to 8 minutes. Add garlic, thyme, and parsley, and cook for another minute. Remove from heat and let the mixture cool slightly.
3 Stir shredded cheese into the cooled mushroom mixture. Spoon the filling evenly onto one side of each butterflied chicken breast, then fold the other side over the top. Secure with toothpicks or tie with kitchen twine.
4 Heat the remaining tablespoon of olive oil in an oven-safe skillet over medium-high heat. Sear the stuffed chicken breasts for 3 to 4 minutes on each side until golden brown.
5 Transfer the skillet to the preheated oven and bake for 15 to 20 minutes, or until the internal temperature of the chicken reaches 165°F.
6 Let the chicken rest for 5 minutes before slicing. Remove toothpicks or twine before serving.
Notes
For extra flavor, add a splash of white wine to deglaze the mushroom mixture before adding the cheese. Spinach or sun-dried tomatoes can also be mixed into the filling for variation. Serve alongside roasted vegetables, mashed potatoes, or a light salad for a balanced meal.

