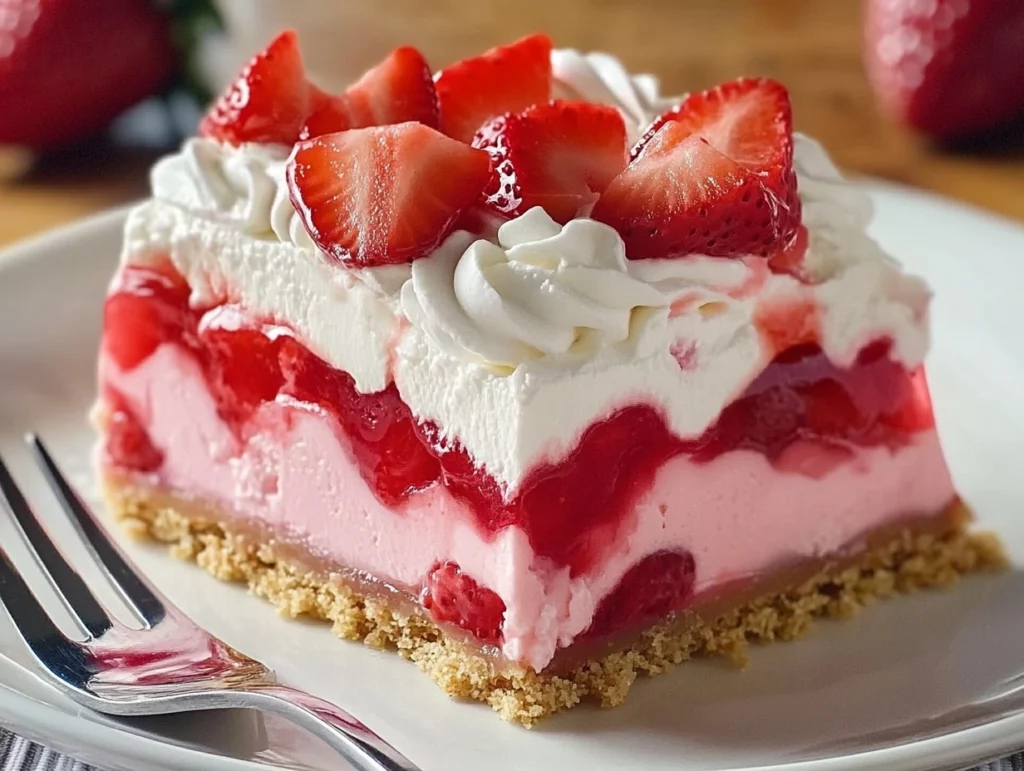
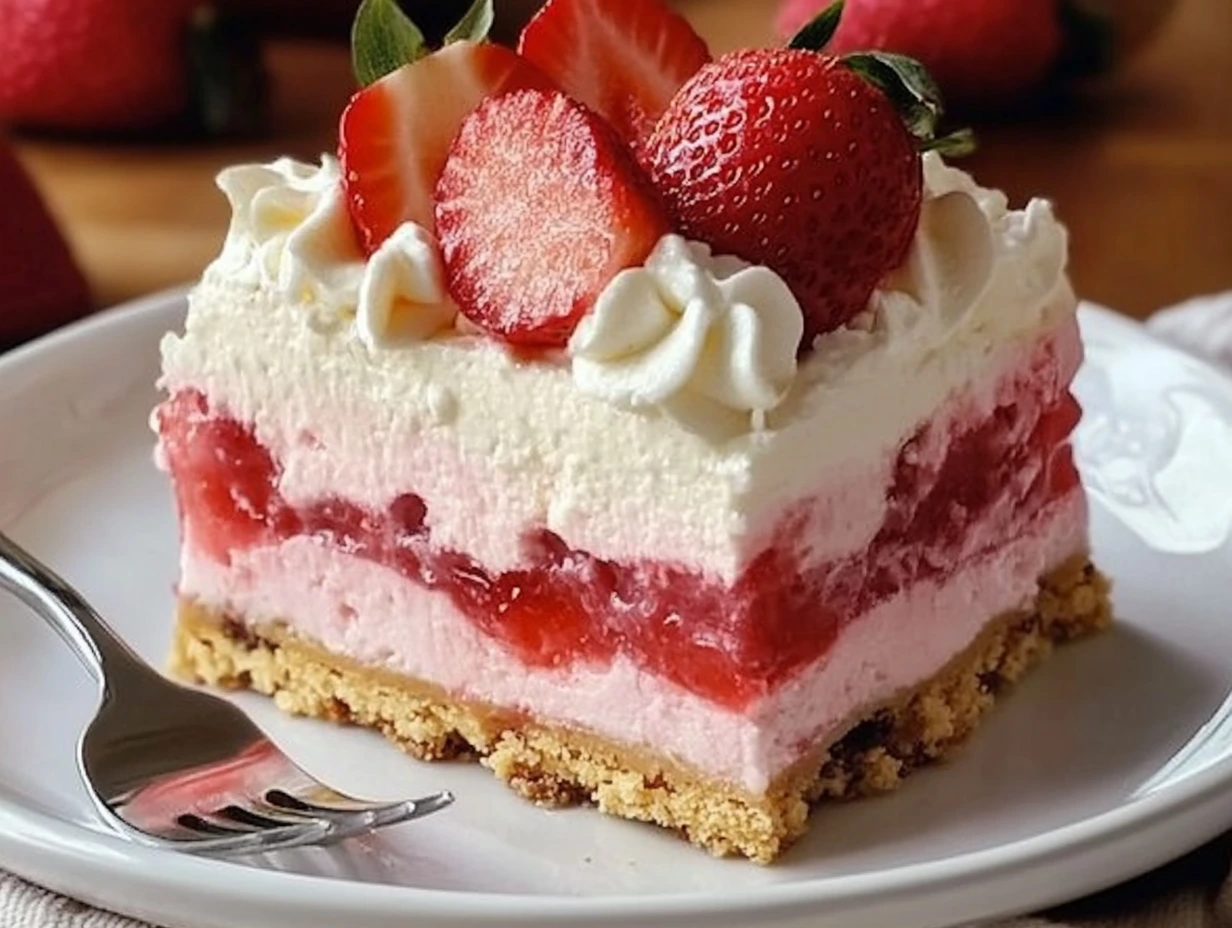
If you’re looking for a dessert that’s as beautiful as it is delicious, you’re in for a treat! This No-Bake Strawberry Jello Lasagna is a dreamy layered dessert that combines a crunchy Oreo crust, a creamy cheesecake filling, fresh strawberries, and a wobbly, sweet Jello layer—all topped with a fluffy whipped cream cloud.
The best part? No oven needed! Whether it’s a hot summer day or you just want an easy-to-make treat, this no-bake recipe is a total winner. Plus, it’s always a showstopper at gatherings, picnics, and potlucks.
Let’s dive in and start creating this refreshing, berry-filled masterpiece!
Why You’ll Love This Recipe
- No baking required – Perfect for when you don’t want to heat up the kitchen.
- Easy to make – Simple ingredients and straightforward steps.
- Perfect for summer – Cool, light, and refreshing with fresh strawberries.
- Beautiful presentation – The layers make it look impressive with minimal effort!
Step 1: Make the Oreo Crust
The first layer of this no-bake lasagna is a classic: an Oreo crust! It adds a delicious crunch that perfectly balances the soft and creamy layers above.

Ingredients for the Crust
- 2 cups Oreo crumbs (about 20-22 cookies, crushed)
- ¼ cup unsalted butter, melted
How to Make It
1️⃣ Crush the Oreos – You can use a food processor or place the cookies in a ziplock bag and crush them with a rolling pin. You want fine crumbs so the crust holds together well.
2️⃣ Mix with Butter – In a medium bowl, combine the Oreo crumbs with melted butter and stir until evenly mixed.
3️⃣ Press into the Dish – Transfer the mixture into a 9×13-inch dish and press it down firmly using the back of a spoon or a flat-bottomed cup.
4️⃣ Chill – Pop it into the fridge while you prepare the next layer. This step helps the crust firm up and makes it easier to spread the cheesecake layer on top.
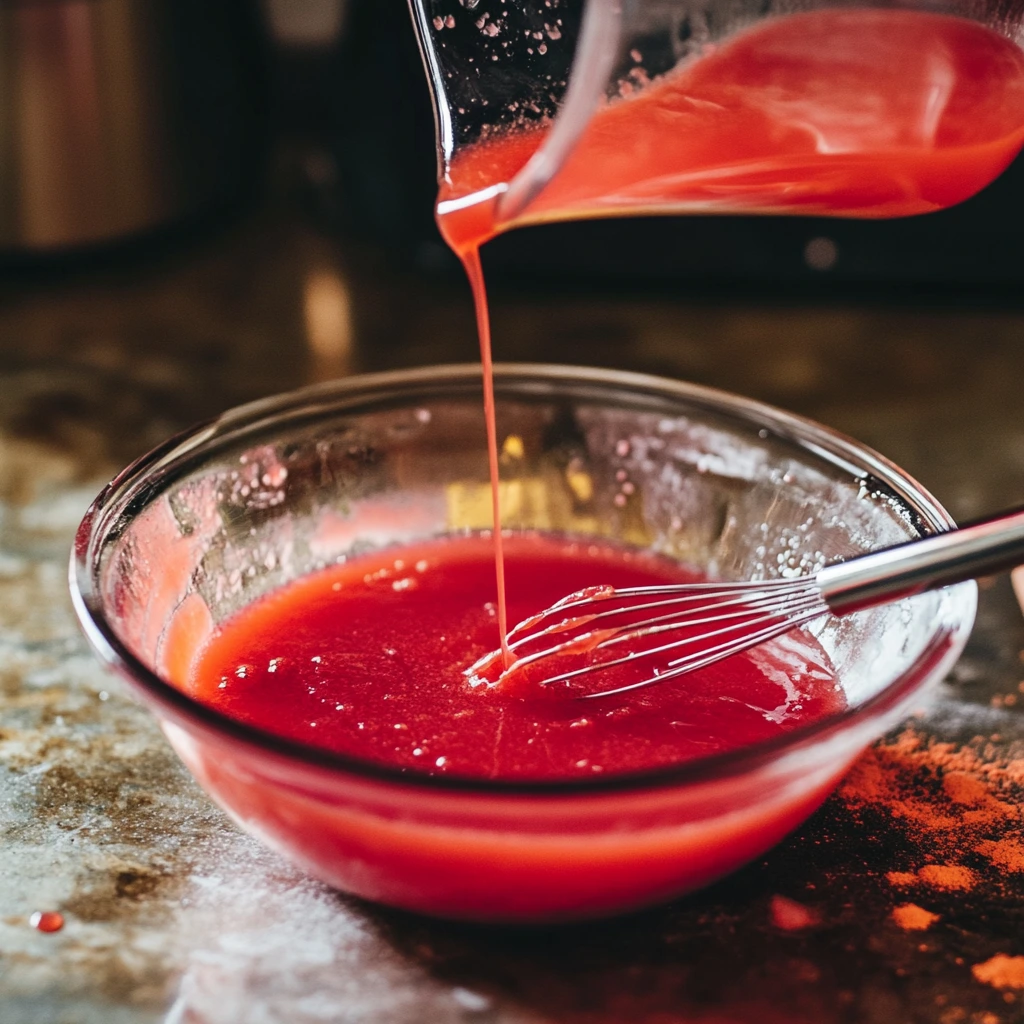
Step 2: Prepare the Strawberry Jello Layer
This layer adds a fun, wiggly texture and enhances the fresh strawberry flavor of the dessert.
Ingredients for the Jello Layer
- 1 package (3 oz) Strawberry Jello
- ½ cup boiling water
- 1 cup cold water
How to Make It
1️⃣ Dissolve the Jello – In a heatproof bowl, mix the Strawberry Jello powder with ½ cup boiling water. Stir well until the Jello is completely dissolved.
2️⃣ Add Cold Water – Pour in 1 cup of cold water and mix.
3️⃣ Let It Thicken – Place the bowl in the fridge for about 15-20 minutes, just until it starts to thicken slightly. You want it to be a thickened liquid, not fully set.
Pro Tip: If you pour the Jello when it’s still too runny, it might seep into the cheesecake layer. Letting it thicken slightly first will help create that distinct, beautiful layer!
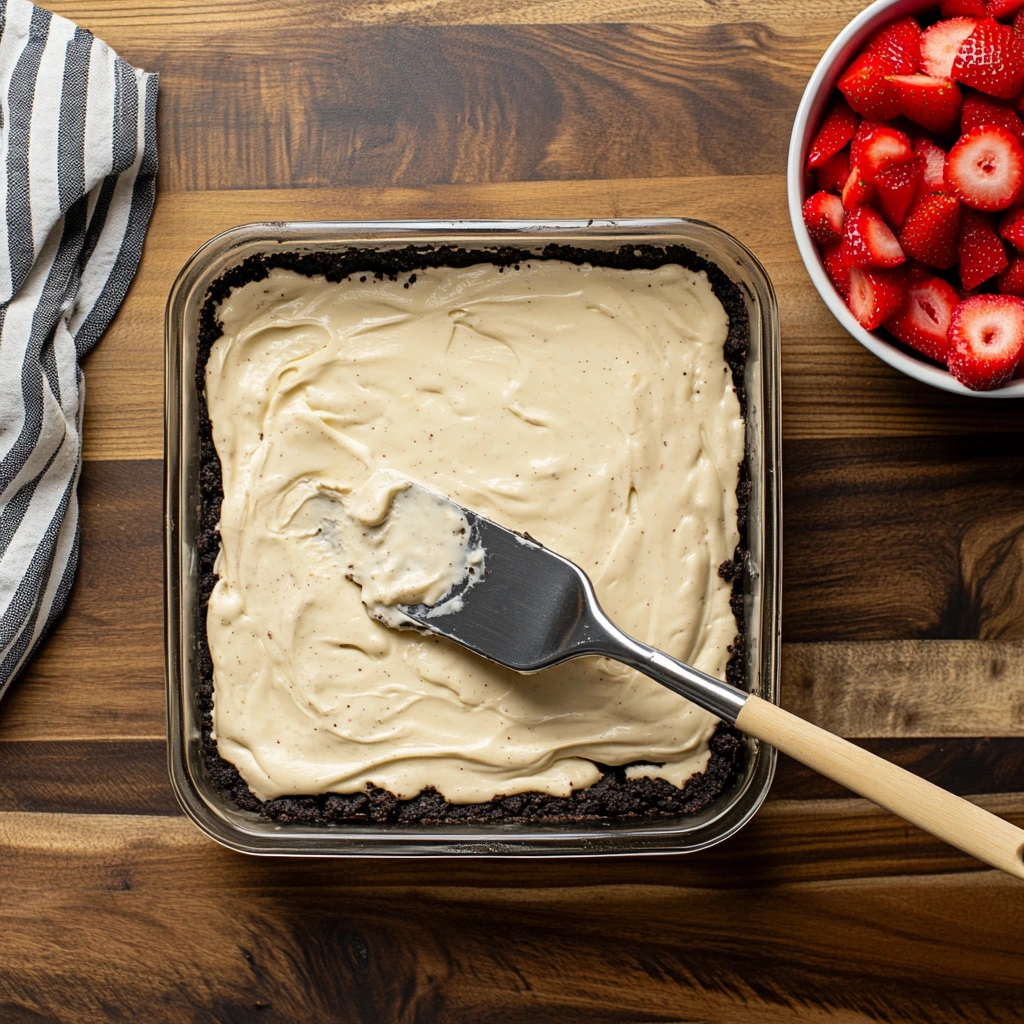
Step 3: Make the Creamy Cheesecake Layer
This layer is where the magic happens! It’s light, fluffy, and pairs beautifully with the Jello and Oreo crust.
Ingredients for the Cheesecake Layer
- 8 oz cream cheese, softened
- ⅓ cup powdered sugar
- 1 teaspoon vanilla extract
- 2 cups whipped cream (store-bought or homemade)
How to Make It
1️⃣ Beat the Cream Cheese – In a large mixing bowl, beat the softened cream cheese with powdered sugar and vanilla extract until smooth and creamy.
2️⃣ Fold in the Whipped Cream – Gently fold in 1 cup of whipped cream until the mixture is light and fluffy. Be careful not to overmix!
3️⃣ Spread Over the Oreo Crust – Take your chilled Oreo crust out of the fridge and spread half of the cheesecake mixture evenly over the top.
Pro Tip: Use a spatula to spread the cheesecake mixture gently, ensuring an even layer without disturbing the crust.
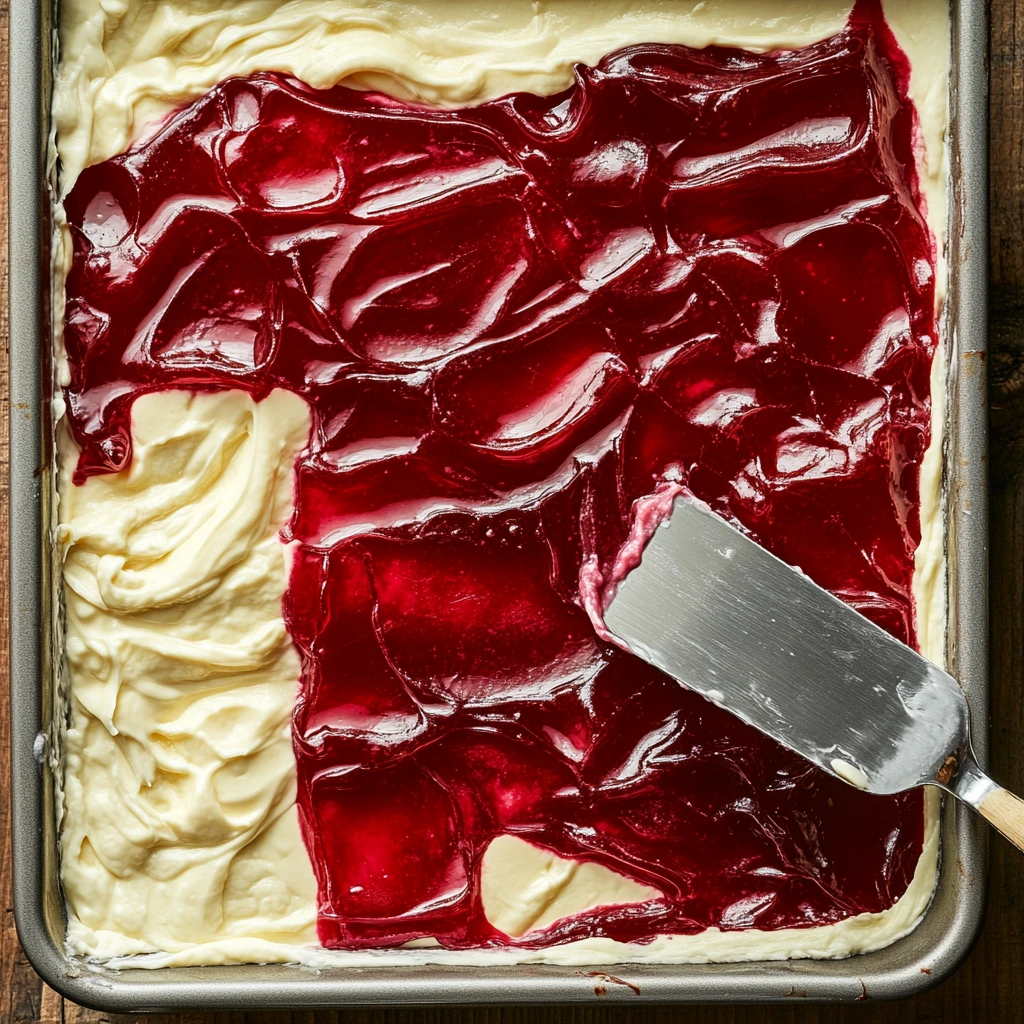
Step 4: Add the Fresh Strawberries & Jello
Now it’s time to bring in the fresh strawberry goodness!
How to Assemble This Layer
1️⃣ Layer the Strawberries – Sprinkle chopped strawberries evenly over the cheesecake layer.
2️⃣ Pour the Jello – Slowly pour the slightly thickened Jello over the strawberries, making sure it covers the entire surface.
3️⃣ Chill Until Set – Place the dish back in the fridge and let it chill for about 1 hour, or until the Jello layer is completely firm.
Patience is key! This step ensures that your Jello layer stays intact when you add the final cheesecake layer.
Finishing Your No-Bake Strawberry Jello Lasagna & Pro Tips
Now that we’ve got our delicious Oreo crust, creamy cheesecake layer, and fresh strawberries set in a sweet Jello layer, it’s time to add the finishing touches! This next step will make your dessert extra dreamy and absolutely irresistible.
Step 5: Add the Final Cheesecake Layer
Once the Jello has completely set (this is super important!), it’s time to add the last layer of creamy goodness.
How to Do It:
1️⃣ Spread the Remaining Cheesecake Mixture – Take the dish out of the fridge and gently spread the rest of the cream cheese mixture over the firm Jello layer.
2️⃣ Smooth It Out – Use a spatula to even out the layer. Try to cover the entire surface so you get a beautiful, uniform look.
3️⃣ Chill Again – Place the dish back in the fridge for another 30 minutes to let the layers firm up before adding the final toppings.
Pro Tip: If you want super clean layers, use an offset spatula or the back of a spoon to spread the cheesecake mixture smoothly.
Step 6: Garnish & Serve!
Now comes the best part—the final decorative touches! A dessert this gorgeous deserves to be dressed up before serving.
Topping Ideas:
- Whipped Cream: Pipe or spread extra whipped cream on top for a fluffy, cloud-like finish.
- Fresh Strawberries: Slice or halve some fresh strawberries and arrange them over the whipped cream.
- Oreo Crumbs: Sprinkle crushed Oreo crumbs on top for a little extra crunch.
- White Chocolate Shavings: A light dusting of white chocolate curls adds a fancy touch.
How to Slice & Serve:
1️⃣ Use a sharp knife and clean it between each slice for perfect layers.
2️⃣ Serve chilled so the layers hold their shape beautifully.
3️⃣ Store leftovers in the fridge—if there are any left! 😉
Helpful Tips for the Perfect No-Bake Strawberry Jello Lasagna
Making this dessert is easy, but a few little tricks will make sure it turns out flawless!
✔️ Chill, Chill, Chill! – Each layer needs to be fully set before adding the next one. This keeps the layers distinct and prevents a runny mess.
✔️ Use Full-Fat Cream Cheese – For the creamiest texture, avoid low-fat cream cheese.
✔️ Don’t Pour Hot Jello Over the Cheesecake Layer – Make sure the Jello has thickened before adding it on top. If it’s too warm, it may seep into the cheesecake layer and ruin the look.
✔️ Make It a Day Ahead – This dessert tastes even better after sitting in the fridge overnight because the flavors meld together beautifully!
Fun Variations to Try!
Want to customize your No-Bake Strawberry Jello Lasagna? Here are some fun ways to switch things up!
🍫 Chocolate Strawberry Twist – Use chocolate whipped cream instead of regular for a chocolate-covered strawberry vibe.
🍑 Peach Jello Version – Swap the strawberries and Strawberry Jello for peach slices and peach-flavored Jello.
🍋 Lemon Berry Delight – Try lemon-flavored Jello with raspberries for a refreshing citrusy twist!
🎂 Birthday Cake Inspired – Add rainbow sprinkles on top and use Golden Oreos instead of chocolate ones.
FAQs & Final Thoughts on No-Bake Strawberry Jello Lasagna 🍓🍰
Now that your No-Bake Strawberry Jello Lasagna is chilled, layered, and ready to impress, let’s dive into some frequently asked questions. Whether it’s your first time making this dessert or you’re looking for tips to perfect it, these answers will help ensure sweet success!
Frequently Asked Questions (FAQs)
1. Can I Make This Dessert in Advance?
Yes! This dessert is actually better when made a day ahead because it gives the layers more time to set and the flavors to meld together. Simply cover it with plastic wrap and store it in the fridge until you’re ready to serve.
2. How Do I Keep the Jello Layer From Mixing Into the Cheesecake?
The key is to let the Jello thicken before pouring it over the cream cheese layer. If it’s still too runny, it will seep into the cheesecake and create a marbled effect instead of clean layers. Let the Jello chill for about 15-20 minutes until it’s slightly thickened but still pourable.
3. Can I Use a Different Type of Crust?
Absolutely! If you’re not a fan of Oreos, you can swap them out for:
- Graham cracker crumbs (for a classic cheesecake-style crust)
- Golden Oreos (for a lighter vanilla flavor)
- Shortbread cookies (for a buttery, crumbly base)
4. What’s the Best Way to Slice This Dessert Neatly?
For perfect slices:
✔️ Use a sharp knife and clean it between each cut.
✔️ Run the knife under warm water before slicing.
✔️ Make sure the lasagna is fully chilled before cutting.
5. How Long Does This Dessert Last in the Fridge?
Stored properly in an airtight container, this dessert will stay fresh for 3-4 days in the fridge. After that, the Jello may start to release liquid, making the layers a bit soft.
6. Can I Freeze No-Bake Strawberry Jello Lasagna?
Technically, yes, but it’s not recommended. The texture of the Jello and whipped cream may change after freezing, becoming slightly grainy or watery. If you do freeze it, wrap it tightly and let it thaw in the fridge before serving.
7. Can I Use Cool Whip Instead of Homemade Whipped Cream?
Yes! Cool Whip works great as a substitute for homemade whipped cream and will save you some time. Just make sure to use the same measurement—about 2 cups total.
Print
No-Bake Strawberry Jello Lasagna
- Author: Andrew Recipes
- Total Time: 2 hours 20 minutes
Description
This light and refreshing dessert features layers of crunchy Oreo crust, creamy cheesecake filling, fresh strawberries, and sweet strawberry Jello, all topped with fluffy whipped cream. A perfect no-bake summer treat that’s easy to make and absolutely delicious!
Ingredients
- 2 cups Oreo crumbs (about 20–22 cookies, crushed)
- ¼ cup unsalted butter, melted
- 1 cup strawberries, chopped
- 1 package (3 oz) Strawberry Jello
- ½ cup boiling water
- 1 cup cold water
- 2 cups whipped cream (store-bought or homemade)
- 8 oz cream cheese, softened
- ⅓ cup powdered sugar
- 1 teaspoon vanilla extract
- Additional strawberries and whipped cream for garnish
Instructions
1️⃣ Make the crust: In a bowl, mix Oreo crumbs with melted butter. Press firmly into the bottom of a 9×13-inch dish to form a crust. Chill in the fridge while preparing the next layer.
2️⃣ Prepare the Jello layer: Dissolve Strawberry Jello in ½ cup boiling water. Stir until fully dissolved, then add 1 cup cold water and mix well. Place in the fridge until it starts to thicken (about 15-20 minutes).
3️⃣ Make the cheesecake filling: In a large bowl, beat cream cheese, powdered sugar, and vanilla extract until smooth and creamy. Gently fold in 1 cup of whipped cream until fully combined.
4️⃣ Assemble the layers:
- Spread half of the cream cheese mixture evenly over the Oreo crust.
- Add a layer of chopped strawberries over the cream cheese.
- Pour the slightly thickened Jello over the strawberries. Chill until the Jello is fully set (about 1 hour).
5️⃣ Add the final layer: Spread the remaining cream cheese mixture over the set Jello layer. Smooth it out evenly.
6️⃣ Garnish & serve: Top with extra whipped cream and fresh strawberries before serving. Slice and enjoy!
Notes
- Make it extra creamy by adding ½ cup of sour cream to the cheesecake mixture.
- Want a crunchier crust? Freeze the Oreo crust for 15 minutes before adding the filling.
- For a chocolate twist, use chocolate Jello instead of strawberry.
- Use different fruits! Try raspberries, blueberries, or mixed berries for variety.
- Make it ahead: This dessert is best when chilled for at least 4 hours or overnight for perfect layers.
- Prep Time: 20 minutes
- Cook Time: 2 hours
Nutrition
- Serving Size: 12

