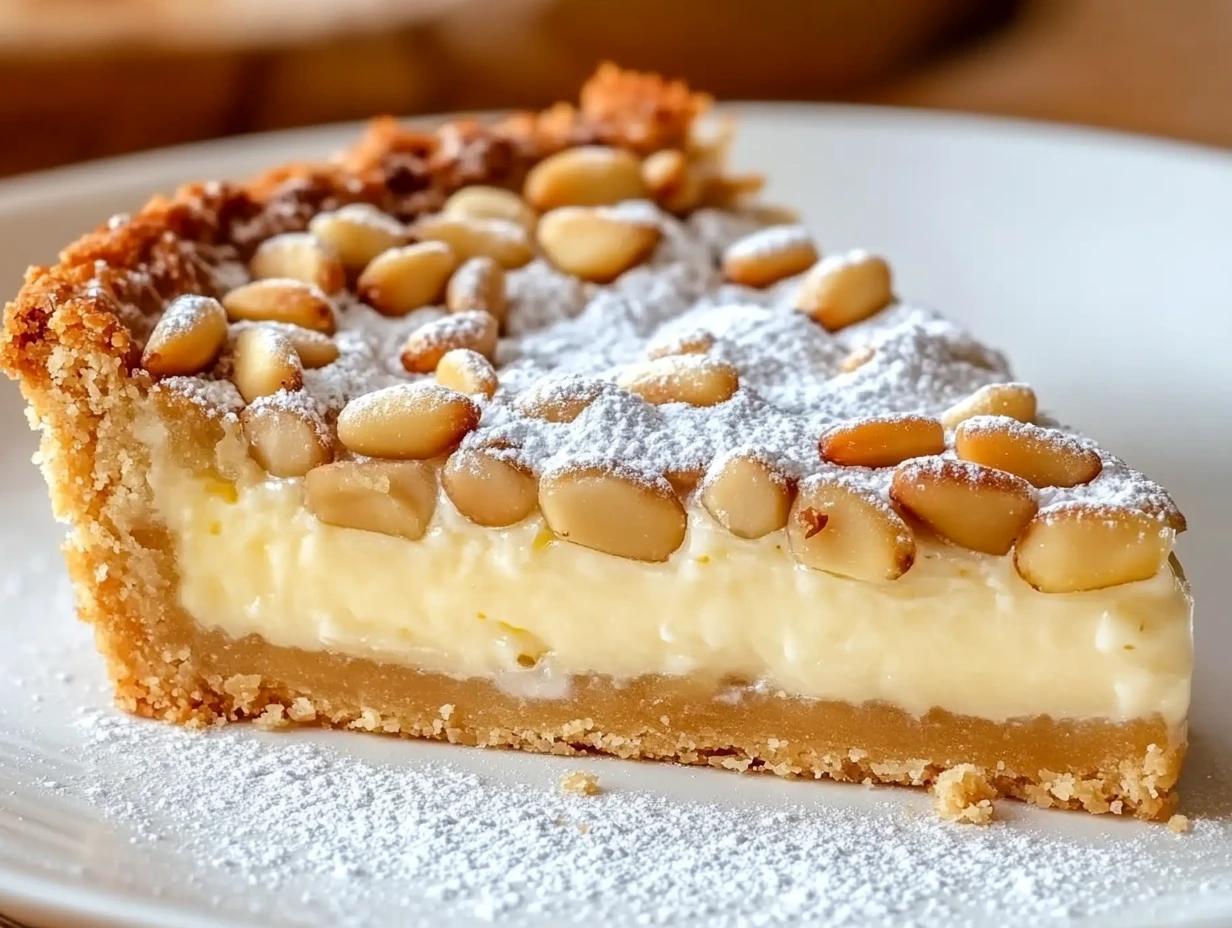
There’s just something so incredibly comforting about a recipe passed down through generations. For me, Torta della Nonna is that perfect nostalgic dessert that tastes like a warm hug from Nonna herself. With its tender, buttery pastry, silky smooth vanilla custard, and that irresistible sprinkle of toasted pine nuts, this tart is everything I love about traditional Italian baking—simple, soulful, and absolutely unforgettable.
I remember the first time I made this tart for a Sunday dinner. It was a chilly autumn afternoon, and the smell of vanilla custard and buttery crust wafting through the kitchen made it feel like home. It’s the kind of dessert that invites people to linger at the table just a little longer. And the best part? It’s easier to make than you might think.
Let’s dive into the first steps of this beautiful recipe so you can bring a little slice of Italy into your own kitchen.
What is Torta della Nonna?
In case this is your first time hearing about this gem, Torta della Nonna literally translates to “Grandmother’s Cake” in Italian. It’s a beloved Tuscan tart made with a crisp pastry shell filled with rich vanilla custard, then topped with pine nuts and powdered sugar. It’s humble, elegant, and perfect for everything from dinner parties to weekend baking projects.
The texture balance is what really gets me—flaky crust, creamy center, and a delicate crunch on top. Whether you’re serving it after a hearty pasta dinner or sneaking a slice with your morning coffee, this tart never disappoints.
Ingredients You’ll Need
This recipe makes one 9-inch tart, perfect for 6–8 servings.
For the pastry dough:
2 cups all-purpose flour
1/2 cup granulated sugar
1/2 teaspoon salt
14 tablespoons unsalted butter, cold and cubed
1 large egg, lightly beaten
1 teaspoon vanilla extract
2–3 tablespoons cold water (as needed)
For the custard filling:
2 cups whole milk
1 vanilla bean (or 1 teaspoon vanilla extract)
3 large egg yolks
1/2 cup granulated sugar
3 tablespoons cornstarch
2 tablespoons unsalted butter
For topping:
1/4 cup pine nuts
Powdered sugar, for dusting
STEP 1: Make the Pastry Dough
In a large mixing bowl, whisk together your flour, sugar, and salt. Add the cold, cubed butter and use your fingers or a pastry cutter to work it into the dry ingredients. You’re aiming for a texture that looks like coarse crumbs. Don’t overwork it—small chunks of butter are okay here.
Now, stir in the lightly beaten egg and vanilla extract. Start mixing it all together, adding the cold water one tablespoon at a time until your dough begins to come together. It should hold its shape but not be sticky. Divide the dough into two discs, wrap them in plastic wrap, and chill for 30 minutes.

STEP 2: Prepare the Custard Filling
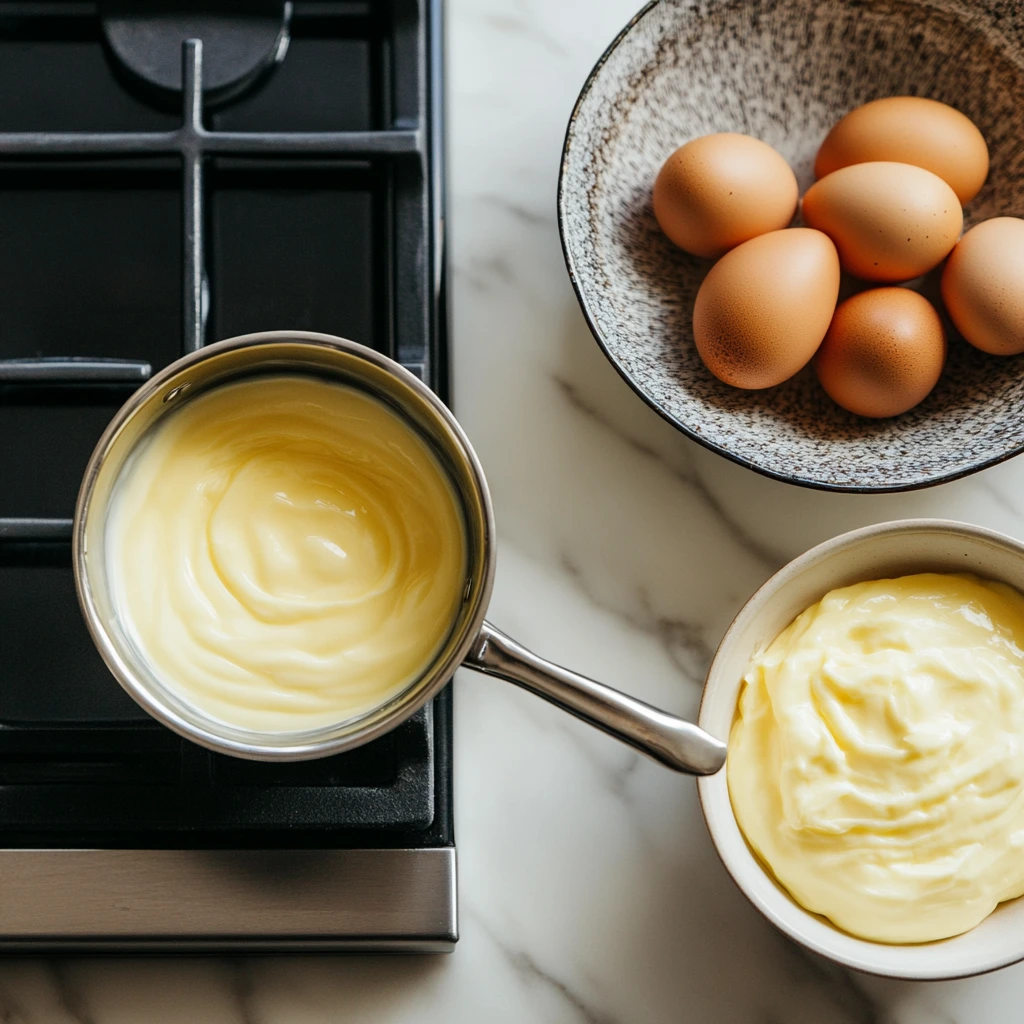
In a medium saucepan, heat the milk over medium-low heat. If you’re using a vanilla bean, split it and scrape the seeds into the milk, then toss in the whole pod too. Once the milk starts to steam (don’t boil it!), take it off the heat and let it steep for about 10 minutes.
Meanwhile, whisk the egg yolks, sugar, and cornstarch in a separate bowl until pale and creamy. Remove the vanilla pod (if used) and gradually whisk the warm milk into the egg yolk mixture—this step is key to tempering the eggs so you don’t end up with scrambled custard.
STEP 3: Cook the Custard
Pour the custard mixture back into your saucepan and cook it over medium heat, stirring constantly. It’ll start to thicken after 5–7 minutes—don’t walk away! You’ll know it’s done when it reaches a smooth, pudding-like consistency and starts to bubble.
Take it off the heat and stir in the butter until it’s completely melted and silky. Transfer the custard to a bowl and press a piece of plastic wrap directly onto the surface (this prevents a skin from forming). Let it cool to room temperature, then chill until ready to use.
STEP 4: Assemble the Tart Base
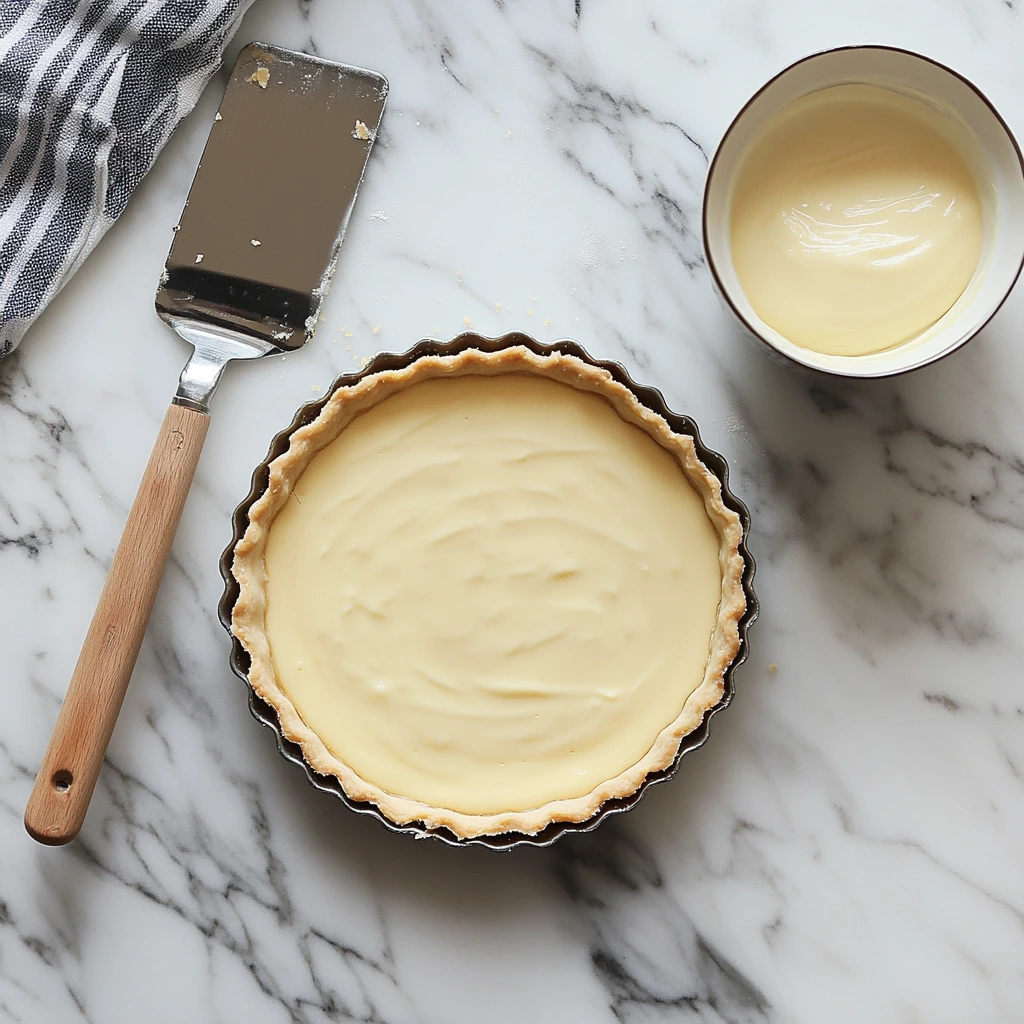
Now it’s time to preheat your oven to 350°F (175°C) and lightly grease your 9-inch tart pan with a removable bottom. Roll out one of your chilled dough discs on a lightly floured surface. Gently press it into the tart pan, trimming the edges as needed. Use a fork to prick the base all over—this helps prevent bubbling in the oven.
Spoon the cooled custard into the crust and spread it evenly with a spatula. It should look smooth and glossy, like a little custard lake waiting to be tucked under its top crust.
STEP 5: Add the Top Crust and Bake
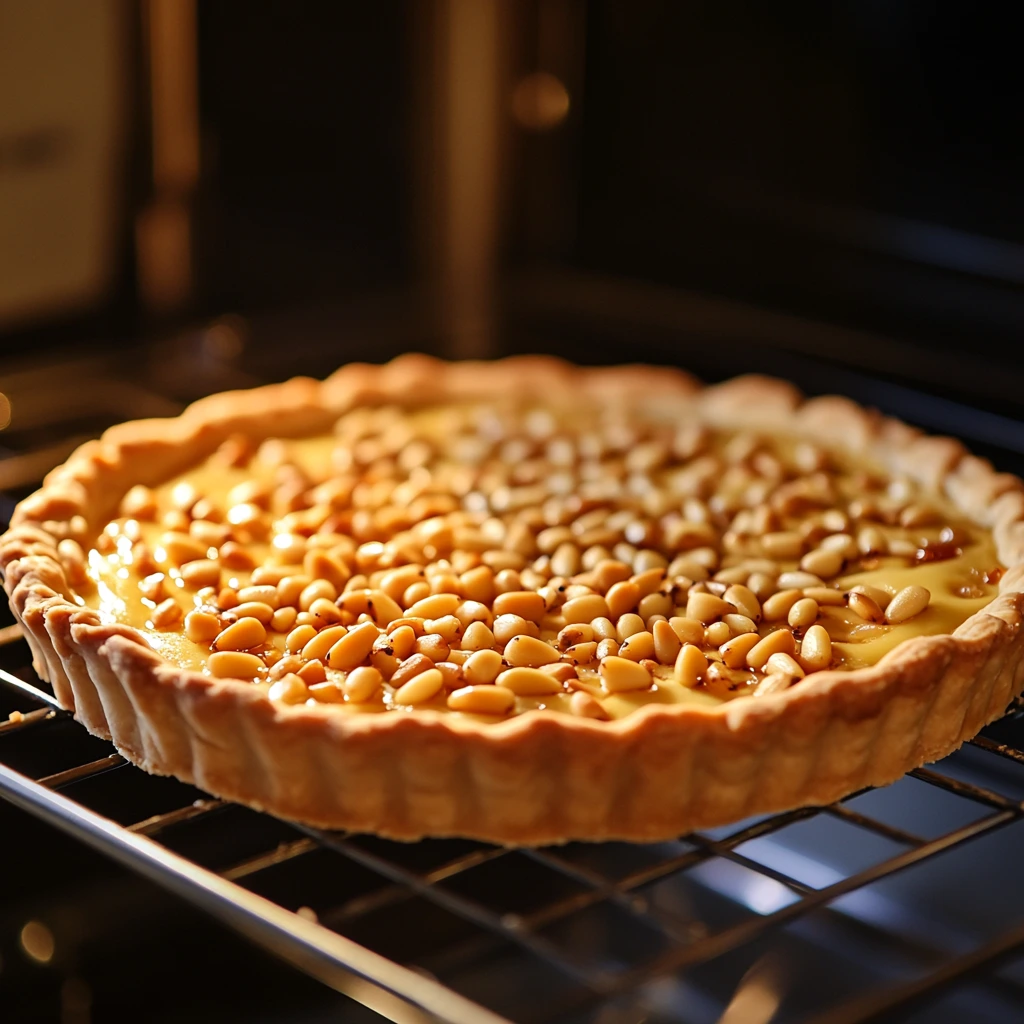
Roll out the second dough disc and lay it gently over the custard. Seal the edges by pressing them together with your fingers, and trim any extra. Cut a few small slits in the top to allow steam to escape.
Brush the top crust with a bit of beaten egg or milk, and then sprinkle those glorious pine nuts evenly over the surface. Bake the tart for 35–40 minutes or until golden brown and the filling is set.
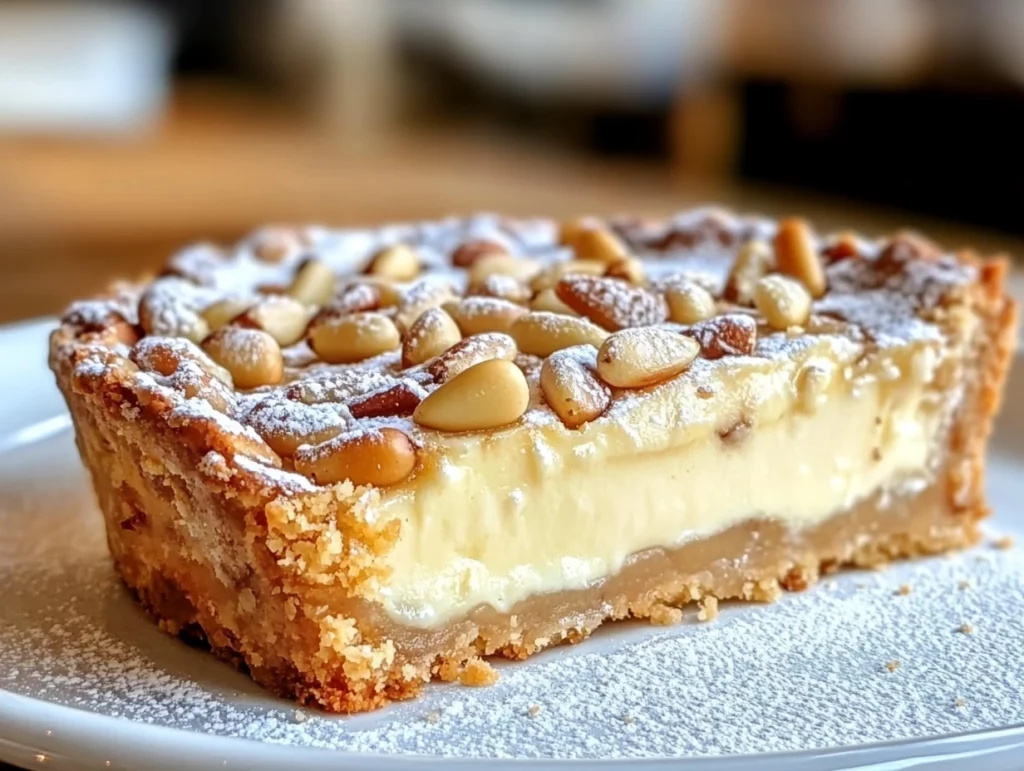
Let it cool completely in the pan before moving it or slicing. And don’t forget that final dusting of powdered sugar right before serving—it’s the finishing touch that makes this tart feel like it came straight from a Nonna’s kitchen in Tuscany.
Torta della Nonna Recipe: Baking, Tips, and Helpful Variations
Welcome back! Now that we’ve built the rich custard and flaky crust layers of our Torta della Nonna, it’s time to finish baking and share a few helpful tips that will take your tart from good to absolutely unforgettable.
In this section, we’ll walk through finishing touches, how to serve this classic Italian dessert, and a few fun ways you can customize it. Whether you’re serving this for a special dinner or just because you want to treat yourself, these next steps will ensure your tart comes out bakery-perfect every single time.
STEP 6: Cool the Tart and Add the Finishing Touch
Once the tart has baked to a beautiful golden color—usually after about 35 to 40 minutes—remove it from the oven and let it cool completely in the tart pan. This is an important step, so don’t rush it. The custard needs time to set up fully, and cooling it in the pan helps maintain that perfect shape.
When it’s cooled to room temperature, dust the top generously with powdered sugar. That snowy layer not only looks stunning against the golden crust and toasted pine nuts but also adds a delicate sweetness that balances the rich custard below.
STEP 7: Slice and Serve
Once it’s cooled and dressed with powdered sugar, your Torta della Nonna is ready to shine. Carefully lift it out of the tart pan (that removable bottom makes all the difference!) and transfer to a serving plate. Slice it using a sharp knife—it’s rich, so modest wedges are perfect.
This tart is traditionally served at room temperature, and honestly, I think that’s when it’s at its best. The custard settles just enough to hold its shape, but it’s still velvety and soft with every bite.
Helpful Tips for Perfect Results
Making a tart from scratch might feel intimidating, but with just a few helpful reminders, you’ll feel like a pro in no time. Here’s what I’ve learned after making this dessert more times than I can count:
Keep your butter cold. This helps the crust stay tender and flaky. If your dough starts to feel too soft while you’re rolling it, pop it back in the fridge for a few minutes.
Don’t skip chilling the dough. Letting the dough rest in the fridge helps it relax, which means fewer cracks when you roll it out—and better structure while baking.
Use a tart pan with a removable bottom. It makes it so much easier to remove the tart cleanly once it’s cooled.
To prevent soggy crust: If your custard is warm when you add it to the crust, it can make the base soggy. Make sure your custard is fully cooled before assembling.
Toast your pine nuts before baking (optional). While they will toast a little in the oven, lightly toasting them ahead of time in a dry skillet enhances their flavor even more.
Tasty Variations You Can Try
One of the great things about Torta della Nonna is how flexible it can be. Once you’ve mastered the classic version, try one of these fun variations to mix things up:
Lemon Torta della Nonna: Add lemon zest to both the dough and the custard for a fresh, citrusy twist. You can even add a tablespoon of lemon juice to the filling for extra zing.
Chocolate Custard Version: Swap out half of the vanilla custard for chocolate custard to create a marble effect—or go full chocolate if you’re a cocoa fan.
Almond Topping: If you can’t find pine nuts or want a milder topping, slivered almonds are a great alternative. They toast beautifully and add a nice crunch.
Mini Tartlets: Use the same recipe to make smaller tartlets for individual servings. Just reduce the baking time slightly and keep an eye on them in the oven.
Dust with cinnamon sugar instead of powdered sugar. It adds a subtle warmth and spice that’s especially cozy in cooler months.
How to Store Your Torta della Nonna
One of the best things about this tart is that it actually gets better after it rests. The custard thickens, the flavors meld, and the texture firms up just enough to slice cleanly.
Storage: Cover and refrigerate leftovers for up to 3 days. You can store it directly in the tart pan or transfer slices to an airtight container.
Serving from the fridge: Let the tart sit at room temperature for about 30 minutes before serving. This brings back that creamy, dreamy texture without compromising food safety.
Freezing: I wouldn’t recommend freezing this one. Custard tends to separate once thawed, which can affect both the texture and taste.
Torta della Nonna: Your Questions Answered + Final Thoughts
We’ve walked through every step of making this classic Torta della Nonna—from flaky crust to silky custard and that signature pine nut topping. And if you’ve been nodding along thinking, “This looks amazing, but what if I mess something up?”—don’t worry. That’s where this last part comes in.
In this section, I’m answering some of the most common questions about this recipe. Whether it’s your first time baking a tart or you’re just looking to troubleshoot a few things, I’ve got you covered. After the FAQ, I’ll wrap things up with some final thoughts and encouragement to help you bring this beautiful dessert to life.
FAQ: Common Questions About Torta della Nonna
1. Can I make the tart dough ahead of time?
Yes, absolutely. You can make the dough up to 2 days in advance. Just keep it tightly wrapped in plastic and stored in the fridge until you’re ready to roll it out. You can also freeze the dough for up to 2 months.
2. What can I use instead of pine nuts?
If you don’t have pine nuts or want a different flavor, slivered almonds or chopped hazelnuts are great alternatives. Just make sure to toast them slightly before using, so they have a nice crunch and nutty flavor.
3. Can I make this recipe gluten-free?
Yes, but you’ll need to use a gluten-free flour blend that is designed for baking (one that includes xanthan gum works best). Be gentle with the dough, as it can be more fragile than traditional pastry.
4. My custard turned out lumpy—what went wrong?
Lumpy custard usually happens when the eggs cook too quickly. Make sure to temper the eggs slowly with warm milk and stir constantly over medium heat. If you do end up with lumps, you can often save the custard by pressing it through a fine mesh sieve while it’s still warm.
5. Can I use store-bought pie crust?
In a pinch, yes. While homemade pastry has a richer flavor and texture, a good-quality store-bought crust can work. Just make sure it’s rolled out thin enough and fits your tart pan properly.
6. Do I have to use a tart pan with a removable bottom?
It’s highly recommended because it makes it much easier to remove the tart cleanly. If you don’t have one, you can use a regular pie pan, but you’ll want to serve it directly from the dish.
7. Is this tart best served warm or cold?
Room temperature is ideal. It allows the custard to firm up but stay silky smooth. If you refrigerate it, let it sit out for 30 minutes before serving for the best texture.
Final Thoughts: Why You’ll Fall in Love with Torta della Nonna
Torta della Nonna isn’t just another dessert—it’s a celebration of Italian heritage, comfort, and simplicity. It’s the kind of recipe that brings people together, encourages lingering conversations, and sparks that “Wow, you made this?!” reaction every time it hits the table.
What I love most is how forgiving and adaptable this recipe is. Don’t worry if your crust isn’t perfect or if your pine nuts aren’t perfectly arranged. That rustic charm is part of what makes it so special. The flavors will still shine—creamy custard, buttery pastry, and that sweet nutty finish.
Whether you’re new to baking or a seasoned pro, this tart is a must-try. It’s perfect for birthdays, brunches, dinner parties, or just a cozy weekend project. And once you make it, I guarantee it’ll become one of those recipes you’ll come back to time and time again.
Print
Torta della Nonna
- Author: Andrew Recipes
Description
Torta della Nonna is a traditional Italian dessert that beautifully combines a tender pastry crust with a silky vanilla custard filling, topped with crunchy pine nuts and a dusting of powdered sugar. This elegant tart is as comforting as its name suggests—“Grandmother’s Cake”—offering a nostalgic sweetness that makes it a timeless treat for any occasion.
Ingredients
For the pastry dough:
2 cups all-purpose flour
1/2 cup granulated sugar
1/2 tsp salt
14 tbsp unsalted butter, cold and cubed
1 large egg, lightly beaten
1 tsp vanilla extract
2–3 tbsp cold water (as needed)
For the custard filling:
2 cups whole milk
1 vanilla bean (or 1 tsp vanilla extract)
3 large egg yolks
1/2 cup granulated sugar
3 tbsp cornstarch
2 tbsp unsalted butter
For topping:
1/4 cup pine nuts
Powdered sugar, for dusting
Instructions
In a mixing bowl, combine the flour, sugar, and salt. Add the cold, cubed butter and use a pastry cutter or your fingers to work it into the flour until the mixture resembles coarse crumbs. Beat the egg with the vanilla extract and add it to the dough. Mix until it begins to come together, adding cold water 1 tablespoon at a time if needed. Divide into two discs, wrap in plastic, and chill for 30 minutes.
In a saucepan, heat the milk over medium-low heat. If using a vanilla bean, split it and add both seeds and pod. Heat until steaming, then remove and let steep for 10 minutes. In a bowl, whisk the egg yolks, sugar, and cornstarch until pale and thick. Gradually whisk in the warm milk (remove the pod if used). Return the mixture to the saucepan and cook over medium heat, stirring constantly until it thickens and boils, about 5–7 minutes. Remove from heat, stir in the butter until smooth, then cover with plastic wrap pressed directly onto the surface. Let cool completely.
Preheat the oven to 350°F (175°C). Lightly grease a 9-inch tart pan with a removable bottom. Roll out one chilled dough disc and press it into the tart pan, trimming any excess. Prick the base with a fork. Spread the cooled custard evenly over the crust. Roll out the second dough disc and place it over the filling. Seal and trim the edges, and cut small slits in the top for ventilation.
Brush the top with beaten egg or milk. Sprinkle the pine nuts evenly across the surface. Bake for 35–40 minutes or until golden brown and the filling is set.
Allow the tart to cool completely in the pan. Dust with powdered sugar just before serving.
Notes
This tart is best enjoyed at room temperature and can be made a day in advance. The custard thickens as it rests, allowing the flavors to meld beautifully. Store leftovers covered in the refrigerator for up to 3 days.

