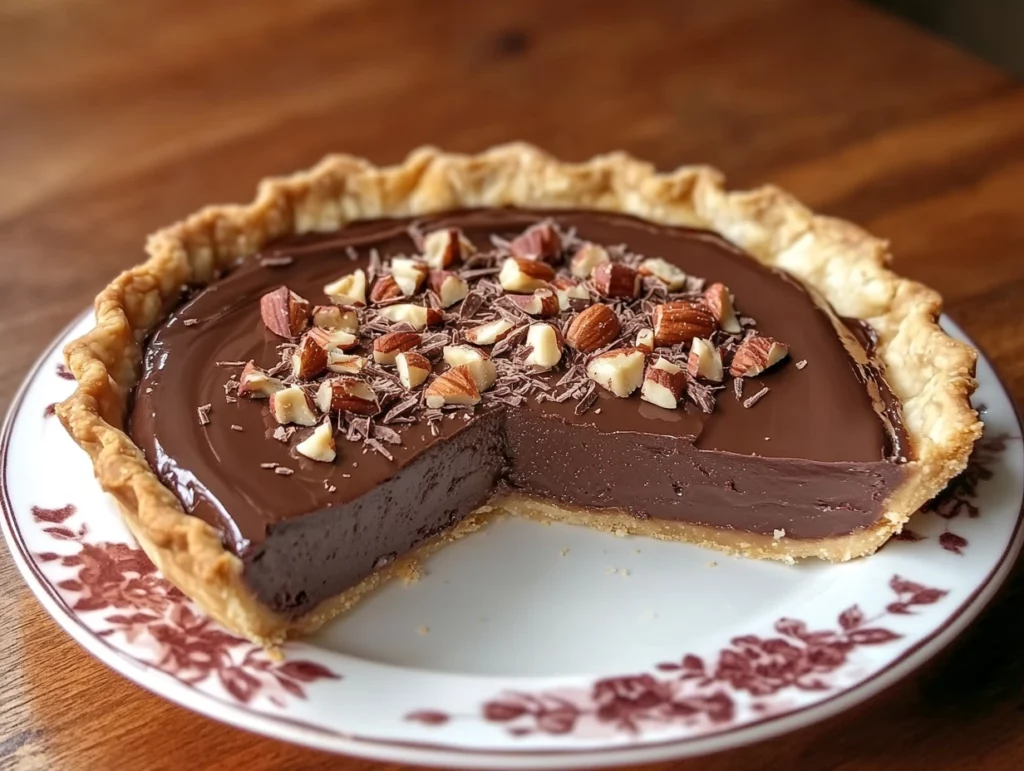
If you’ve ever had one of those days where all you wanted was something rich, chocolatey, and just a little indulgent, then Tricia’s Fantastic Fudge Pie is about to become your new best friend. This recipe is the definition of comfort in dessert form—simple ingredients, easy prep, and that gooey, fudgy texture that makes every bite feel like a little celebration.
The first time I made this pie, it was for a last-minute family gathering. I needed something quick, but still impressive, and oh boy—this pie delivered. The crust came out golden and flaky, the center stayed luxuriously soft, and everyone at the table went in for seconds (some went for thirds, but no judgment here). It’s one of those tried-and-true Southern recipes that feels nostalgic and comforting, yet decadent enough for a dinner party dessert table.
Whether you’re baking this for the holidays, a potluck, or just because chocolate cravings hit hard, this fudge pie is ready to make you look like a dessert pro with minimal effort. It’s versatile, customizable, and basically impossible to mess up—which, let’s be honest, is always a plus when you’re juggling ten other things in the kitchen.
Let’s dive in and get baking!
Ingredients You’ll Need
1 (9-inch) unbaked pie crust
1 cup granulated sugar
1/2 cup all-purpose flour
3 tablespoons unsweetened cocoa powder
2 large eggs, lightly beaten
1/2 cup melted butter (or coconut oil for a dairy-free option)
1 teaspoon vanilla extract
1/2 cup chopped pecans or walnuts (optional)
Pinch of salt
Optional Toppings:
Whipped cream
Chocolate shavings
Caramel drizzle
Toasted nuts
STEP 1: Preheat Your Oven and Prep the Crust
Go ahead and preheat your oven to 350°F (175°C). This way, it’ll be ready to go once your filling is done.
Place your unbaked 9-inch pie crust into a pie dish. You can use store-bought (no shame in that game) or homemade if you’re feeling extra fancy. Crimp the edges however you like—rustic or polished, either works fine. Set the crust aside for now.

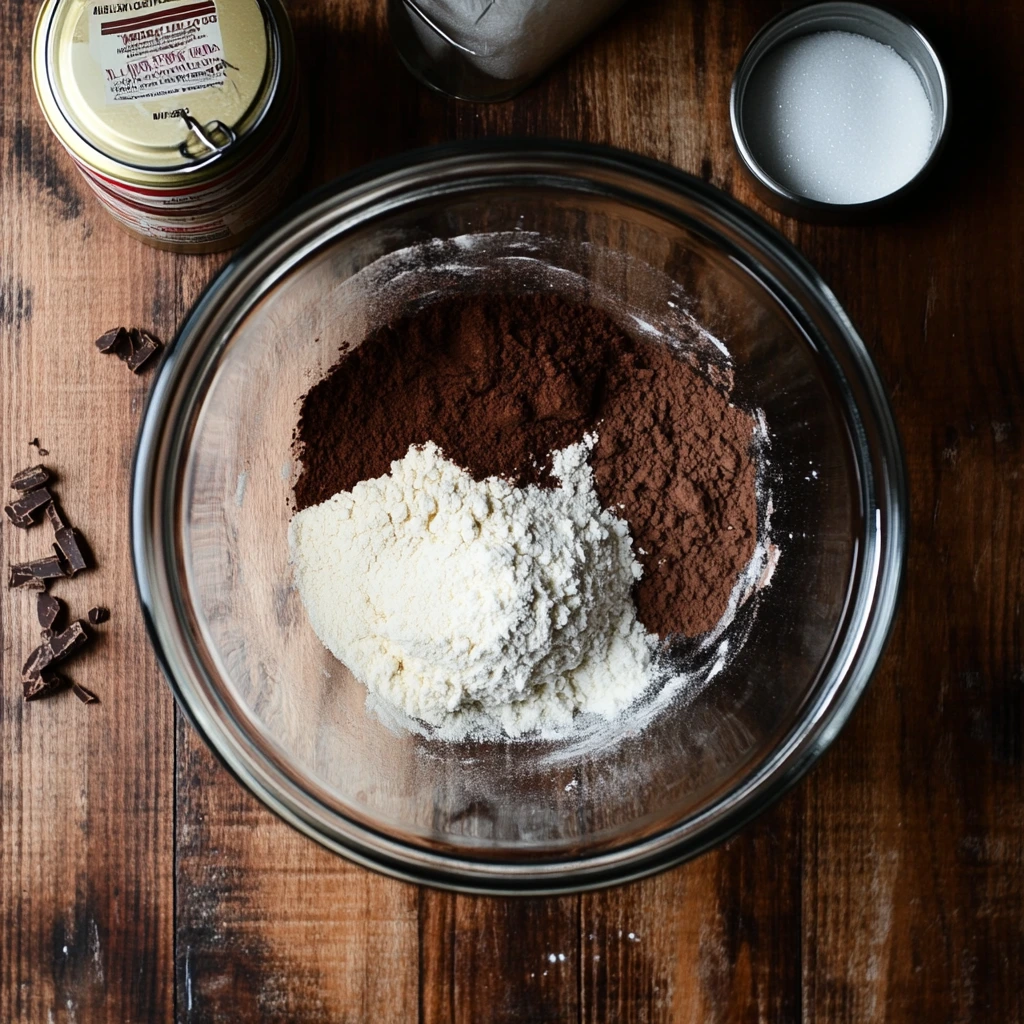
STEP 2: Mix the Dry Ingredients
Grab a large mixing bowl and whisk together your dry ingredients: 1 cup sugar, 1/2 cup flour, 3 tablespoons cocoa powder, and a pinch of salt. This step helps evenly distribute everything so you don’t end up with clumps of flour or cocoa later.
Pro tip: If you want a deeper, richer chocolate flavor, go for a high-quality cocoa powder. It really does make a difference.
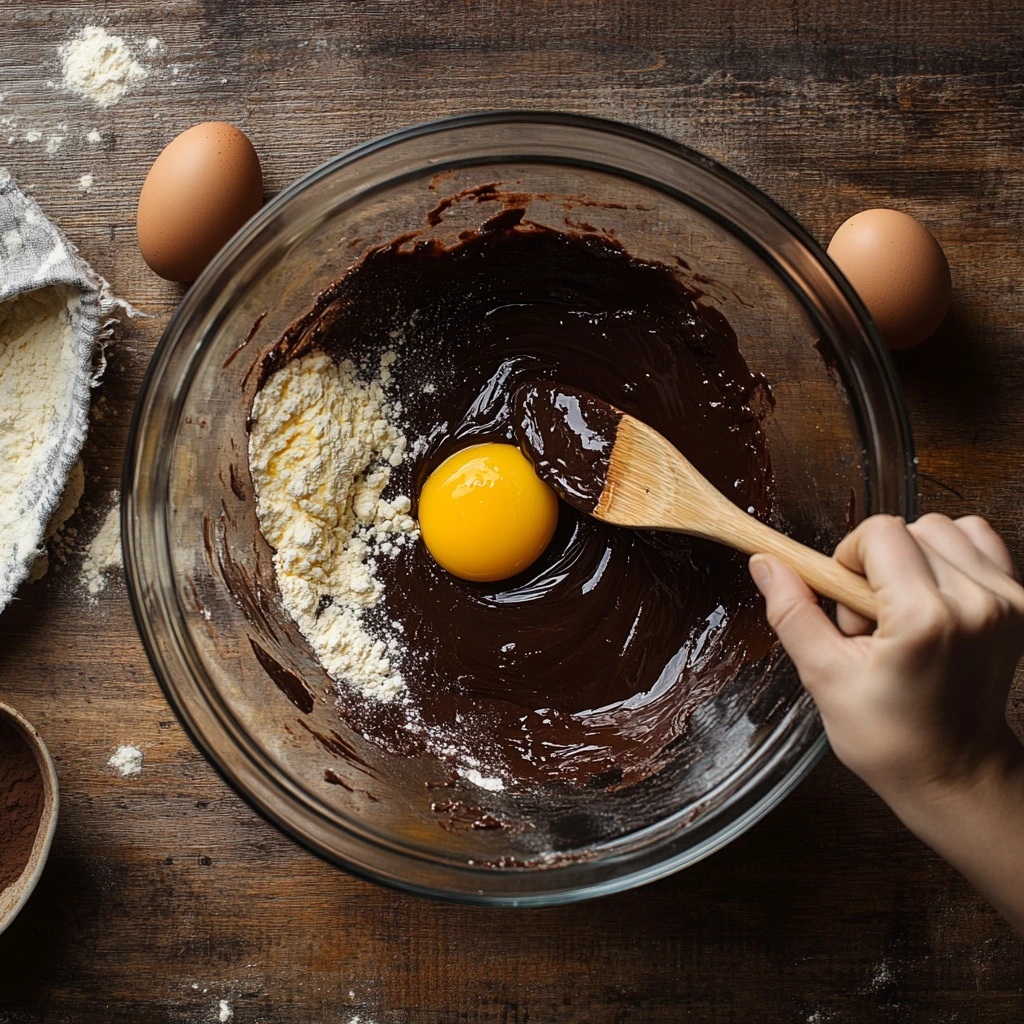
STEP 3: Add the Wet Ingredients
To your dry mixture, add in the 2 lightly beaten eggs, 1/2 cup of melted butter (or coconut oil if you’re going dairy-free), and 1 teaspoon of vanilla extract.
Now stir everything together until smooth and glossy. The batter will be thick, but still pourable—kind of like brownie batter. That’s exactly what you want.
STEP 4: Fold in the Nuts (Optional)
If you’re a nut lover, gently fold in 1/2 cup of chopped pecans or walnuts. I usually go with pecans because they add that warm, buttery crunch that pairs so perfectly with the rich chocolate. But if you’re not a fan, feel free to skip this step. The pie is just as amazing without them.
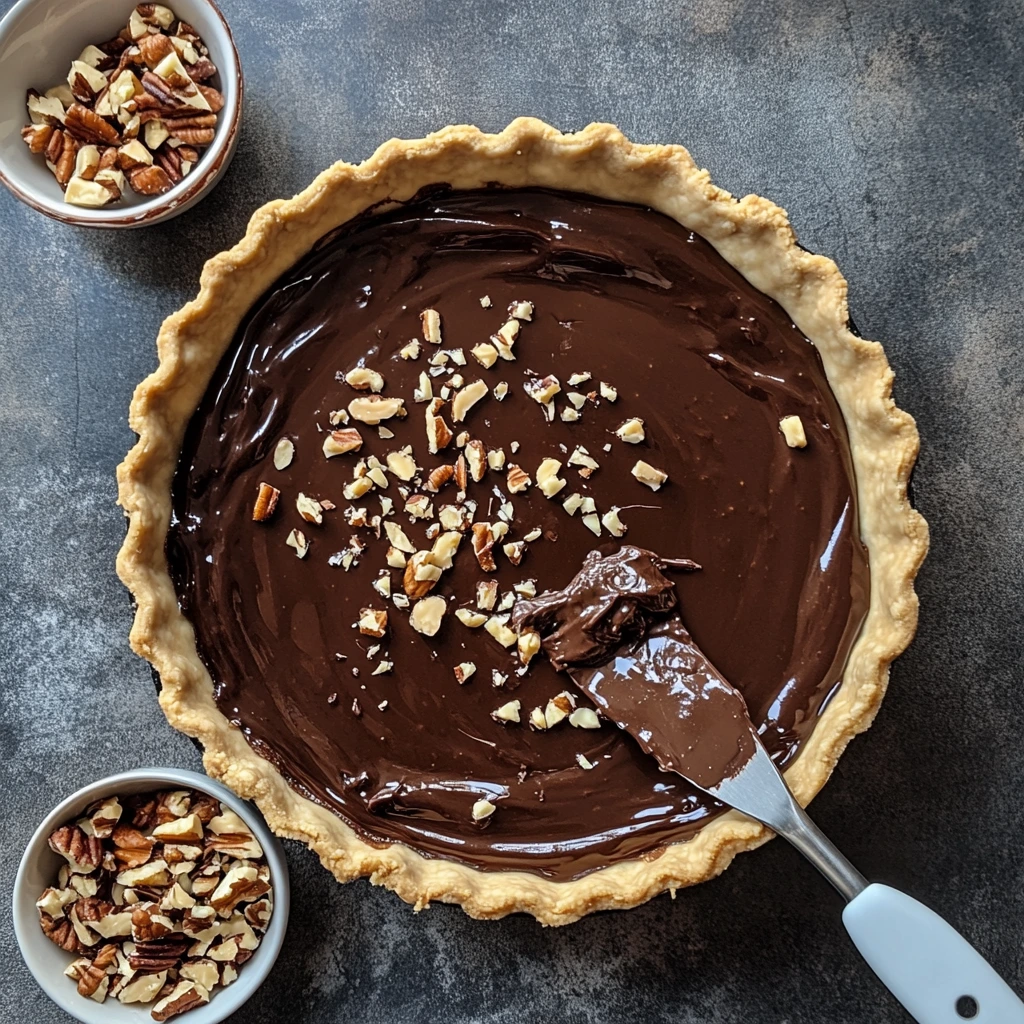
STEP 5: Pour the Filling into the Crust
Pour your chocolatey goodness into the prepared pie crust. Use a spatula to spread it out evenly so that it bakes uniformly. It’s already looking good, right?
Tricia’s Fantastic Fudge Pie: Baking and Tips for Perfect Results
Now that your pie crust is filled with that rich, chocolatey goodness, it’s time to bring everything together in the oven. This is where the magic really happens—when that fudgy filling sets just enough to hold together, but still stays gloriously soft and melty in the middle. It’s the sweet spot between a brownie and a custard, and once you get that perfect texture, you’ll understand why this dessert gets rave reviews every time.
In this part, I’ll walk you through the final baking steps, how to tell when your pie is done (spoiler: it’s okay if it jiggles a bit), and some of my favorite tips to elevate this already-delicious pie. Whether you’re going classic or adding toppings galore, you’re in for a real treat.
STEP 6: Bake the Pie
With your oven preheated to 350°F (175°C), carefully place your filled pie into the oven.
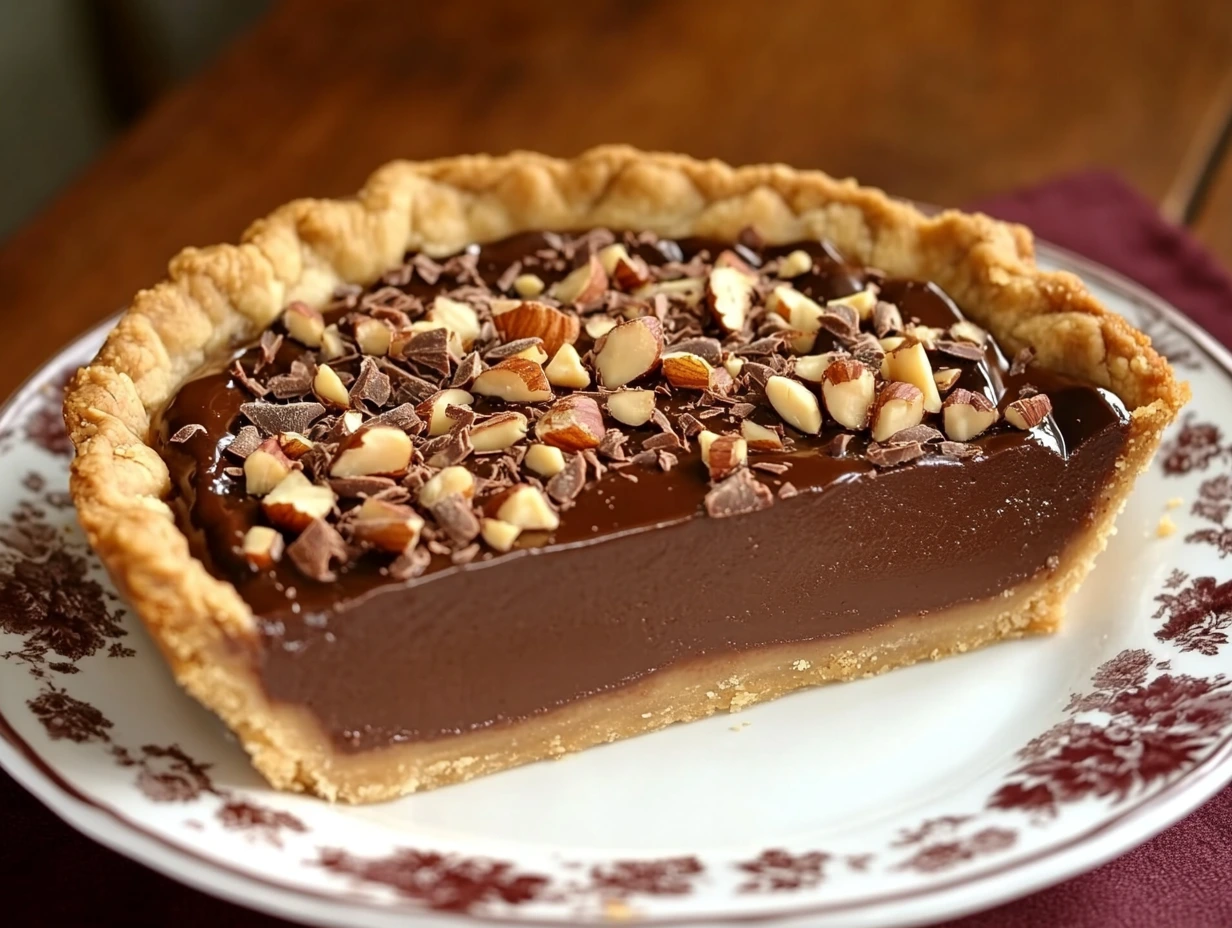
Bake for 30 to 35 minutes, but start checking around the 30-minute mark. You’re looking for a center that’s just set but still slightly jiggly—kind of like a cheesecake. Don’t worry if it seems a little underdone in the very center. It will continue to set as it cools, and that’s how you get that luscious, melt-in-your-mouth texture.
Tip: If the edges of your crust are browning too quickly, lightly cover them with foil or use a pie shield to prevent burning. That way, the filling can finish baking without the crust getting too dark.
STEP 7: Cool Completely
This is the hardest part—waiting.
Once the pie is out of the oven, let it cool completely on a wire rack for at least 2 hours. That cooling time is crucial. If you slice into it too early, the filling might not have had time to fully set, and you’ll lose that lovely fudgy texture.
If you’re planning to serve it warm (which is totally a vibe), wait at least an hour so it’s not too runny. For a firmer slice that holds together beautifully, go the full two hours—or chill it in the fridge after cooling.
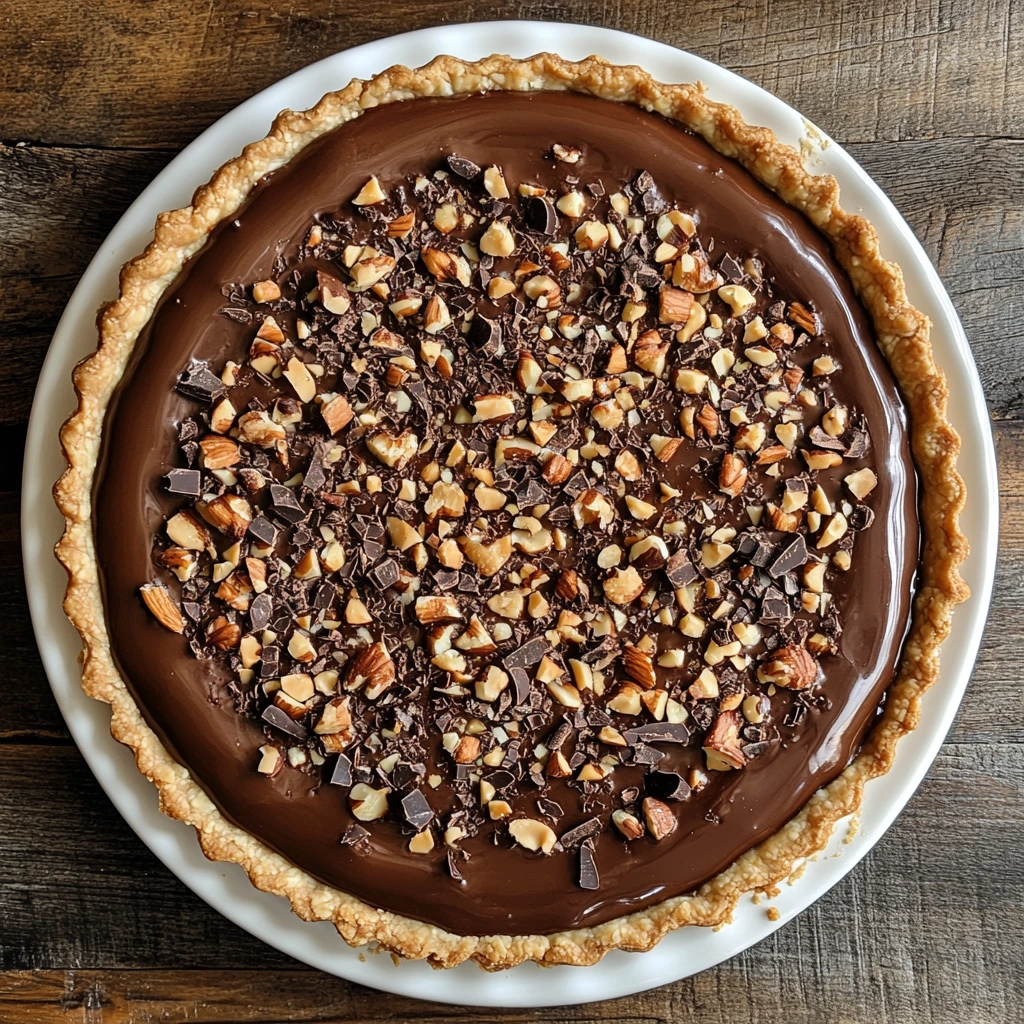
STEP 8: Time to Top (Optional but Highly Recommended)
Here’s where you can get creative. This pie is delicious all on its own, but toppings can really take it to another level.
Whipped cream: A dollop of whipped cream cuts through the richness and adds a soft, creamy contrast.
Caramel drizzle: Sweet, buttery caramel pairs perfectly with the chocolate filling.
Chocolate shavings or chips: Add some texture and even more chocolate flavor.
Toasted nuts: If you skipped the nuts in the filling, this is a great way to add crunch without changing the interior texture.
Feel free to mix and match, or go all out with a little bit of everything!
Make-Ahead and Storage Tips
This pie is a dream for make-ahead desserts. You can bake it a day in advance and store it in the refrigerator. In fact, chilling the pie makes the texture even fudgier and more intense. Just be sure to cover it well to keep it from drying out.
When it comes to leftovers (if you’re lucky enough to have any), store them in the fridge for up to three days. You can serve cold slices straight from the fridge or pop a slice in the microwave for about 10-15 seconds to bring back that just-baked warmth.
Variation Ideas to Keep Things Interesting
While Tricia’s original recipe is pretty much perfect as is, here are a few fun ways to change things up if you’re in the mood to experiment:
Add espresso powder: Just 1/2 teaspoon mixed in with the dry ingredients deepens the chocolate flavor.
Try a graham cracker crust: It’s not traditional, but the sweetness of graham crackers adds a great contrast to the rich filling.
Mix in chocolate chips: For extra gooey pockets of chocolate, stir in a handful of semi-sweet or dark chocolate chips before baking.
Tricia’s Fantastic Fudge Pie: FAQ and Final Thoughts
By now, your kitchen is probably filled with the sweet, chocolatey aroma of freshly baked pie, and if you’ve managed not to cut into it yet—well, kudos to your self-control. Before we wrap things up, let’s take a moment to go over some common questions readers have about Tricia’s Fantastic Fudge Pie. Whether you’re baking it for the first time or adding it to your holiday recipe rotation, these tips can help ensure perfect results every single time.
Frequently Asked Questions
1. Can I use a homemade pie crust instead of store-bought?
Absolutely! A homemade crust will elevate the final product even more. Just make sure to blind bake if your crust recipe calls for it, although in this recipe, it’s baked with the filling, so pre-baking isn’t necessary.
2. What’s the best way to tell when the pie is done?
Look for edges that are firm and a center that’s slightly jiggly but not wet. The pie will continue to set as it cools. Overbaking can lead to a dry center, so start checking at the 30-minute mark.
3. Can I make this pie dairy-free?
Yes! Simply swap out the butter for melted coconut oil. Just note that coconut oil may add a subtle coconut flavor, which some people really enjoy with chocolate.
4. How do I keep the crust from burning?
If the edges start to brown too quickly, loosely cover them with aluminum foil or use a pie crust shield. This lets the filling continue baking without overcooking the crust.
5. Can I freeze this pie?
You sure can. Once it’s fully cooled, wrap it tightly in plastic wrap and then foil. Freeze for up to 2 months. Thaw overnight in the fridge before serving.
6. Do I need to refrigerate the pie after baking?
While it’s safe to leave out at room temperature for a few hours, it’s best to store leftovers in the fridge. It keeps the texture firm and fudgy, and it will last up to three days.
7. Can I double the recipe?
This pie is rich, so one pie usually goes a long way. But if you’re feeding a crowd, you can absolutely make two pies at once. Just make sure they bake evenly—rotate them halfway through baking if you place them on different oven racks.
Final Thoughts: Your New Go-To Dessert
There’s just something timeless about a fudge pie. It’s the kind of dessert that feels homey and luxurious all at once—rich in flavor, simple in preparation, and endlessly satisfying. Tricia’s Fantastic Fudge Pie nails that balance perfectly. The smooth, chocolatey center with its delicate crust is a classic combination that works for just about any occasion.
What I love most is how forgiving and flexible this recipe is. You don’t need a mixer or any fancy equipment, and most of the ingredients are probably already in your pantry. Whether you serve it warm with a dollop of whipped cream or chilled straight from the fridge, this pie hits the spot every single time.
If you try this recipe, I’d love to hear how it turned out! Did you add toppings? Try it with coconut oil? Make it for a special occasion? Leave a comment and let me know how you made it your own.
Trust me, once you make Tricia’s Fantastic Fudge Pie, it’ll become a regular request from friends and family. It’s just that good. So go ahead—preheat that oven and get baking. You’ve got dessert covered.
Print
Tricia’s Fantastic Fudge Pie
- Author: Andrew Recipes
Description
Rich, chocolatey, and irresistibly smooth, Tricia’s Fantastic Fudge Pie is a crowd-pleaser that comes together with minimal effort. This classic Southern-style dessert boasts a fudgy center and a crisp, buttery crust, making it perfect for holidays, dinner parties, or anytime you need a decadent treat. The optional chopped nuts add a delightful crunch, while toppings like whipped cream and caramel take it over the top.
Ingredients
1 (9-inch) unbaked pie crust
1 cup granulated sugar
1/2 cup all-purpose flour
3 tablespoons unsweetened cocoa powder
2 large eggs, lightly beaten
1/2 cup melted butter (or coconut oil for a dairy-free option)
1 teaspoon vanilla extract
1/2 cup chopped pecans or walnuts (optional)
Pinch of salt
Optional Toppings:
Whipped cream
Chocolate shavings
Caramel drizzle
Toasted nuts
Instructions
Preheat the oven to 350°F (175°C). Place the unbaked pie crust in a 9-inch pie dish and crimp the edges as desired. Set it aside.
In a large bowl, whisk together the sugar, flour, cocoa powder, and salt until everything is evenly combined. Add in the eggs, melted butter, and vanilla extract. Stir until the mixture becomes smooth and glossy. It should be thick but pourable. Gently fold in the chopped nuts if using.
Pour the filling into the prepared pie crust, spreading it evenly with a spatula. Bake for 30 to 35 minutes, or until the center is set but still slightly jiggly—it will continue to set as it cools. If the crust edges start to brown too fast, cover them with foil or use a pie shield.
Let the pie cool completely on a wire rack for at least 2 hours. This cooling time allows the fudge filling to set perfectly.
Slice and serve as is, or top with whipped cream, chocolate shavings, caramel drizzle, or toasted nuts for extra flair.
Notes
This pie is delicious served warm or chilled. For a deeper chocolate flavor, use high-quality cocoa powder. The recipe works well with a store-bought crust, but a homemade pie shell elevates it further. Store leftovers in the fridge for up to three days.

