
When it comes to quick, crowd-pleasing snacks, it’s hard to beat the magic of a good cheese ball. And when you add a healthy dose of broccoli to the mix, you’ve got yourself a snack that’s not only delicious but also packs a nutritional punch! These Baked Broccoli Cheese Balls are perfect for game nights, potlucks, or just a fun, easy-to-make treat for the family.
Let me tell you why this recipe is about to become your favorite. It’s simple, it’s cheesy, and it’s baked—so you can feel just a little less guilty about reaching for seconds (or thirds). Whether you serve them as an appetizer with your favorite dipping sauce or sneak them straight off the tray (guilty!), these little bites of heaven are bound to be a hit.
Why You’ll Fall in Love with This Recipe
Before diving into the nitty-gritty, let’s talk about why this recipe is worth your time. First, these cheese balls are baked instead of fried, making them a lighter option without sacrificing that golden, crispy exterior. Second, they’re a fantastic way to sneak veggies into a snack that even picky eaters will adore. And last but not least—they’re ridiculously easy to make. Seriously, you’ll be rolling and baking in no time.
Getting Started: The Ingredients You’ll Need
Let’s gather the essentials. You’ll need:
- 2 cups broccoli florets: Fresh or frozen, steamed to perfection.
- 1 cup breadcrumbs: These help bind the cheese balls and add a touch of crunch.
- 1 ½ cups shredded cheddar cheese: The star of the show!
- ⅓ cup grated Parmesan cheese: Adds a nutty, salty kick.
- 2 eggs: Essential for binding.
- 2 tbsp all-purpose flour: Another binding hero.
- ½ tsp garlic powder & ½ tsp onion powder: For a burst of flavor.
- Salt and pepper: To taste.
- Cooking spray: Keeps things non-stick and fuss-free.
Step 1: Steam the Broccoli
Preheat your oven to 400°F (200°C) and get your broccoli ready. Steam the florets until they’re tender-crisp, which should only take about 3–5 minutes. You want them to retain a bit of their bite, so they don’t turn to mush in the mixing bowl.
Once steamed, let the broccoli cool for a few minutes. Then, chop it finely. The smaller the pieces, the easier it will be to form compact, sturdy cheese balls.
Pro Tip: A food processor works wonders if you want to save some chopping time. Just pulse a few times until you achieve a coarse texture.
Step 2: Mixing the Magic
Now comes the fun part! In a large mixing bowl, combine your chopped broccoli, breadcrumbs, cheddar cheese, Parmesan cheese, eggs, and flour. Sprinkle in the garlic powder, onion powder, salt, and pepper.
Using a wooden spoon—or your hands if you don’t mind getting messy—mix everything thoroughly. You’re aiming for a texture that’s firm enough to hold its shape when rolled into a ball.
Quick Check: If the mixture feels too wet, sprinkle in a bit more breadcrumbs. If it’s too dry, add a splash of water or another egg to bring it together.

Step 3: Roll It Up
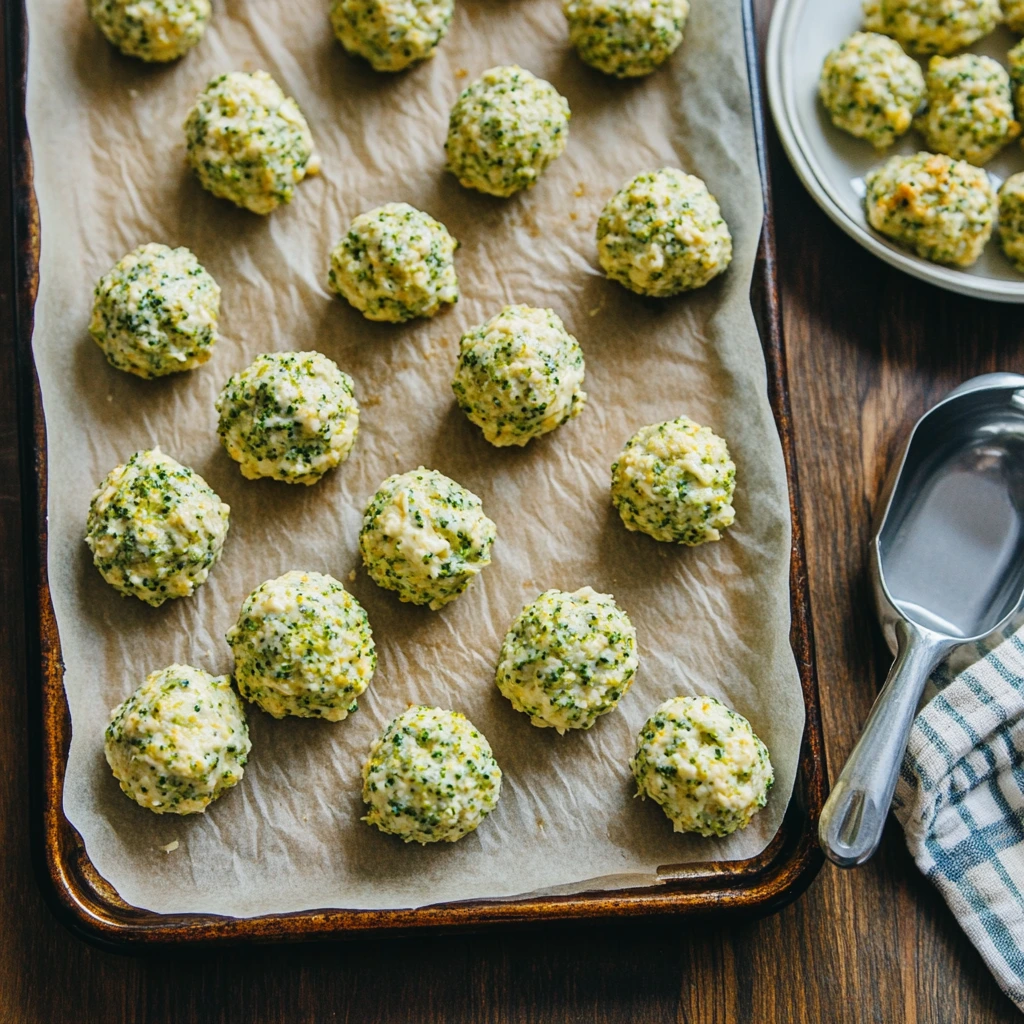
Here’s where the cheese balls start to come to life. Using your hands or a small cookie scoop, grab portions of the mixture and roll them into 1-inch balls. Don’t worry if they’re not perfect—rustic charm is part of the appeal!
Place the rolled balls onto a baking sheet lined with parchment paper or lightly sprayed with cooking spray. Make sure to leave a bit of space between each ball for even baking.
Pro Tip: To make rolling easier, lightly grease your hands with a bit of oil or cooking spray. This prevents the mixture from sticking.
Step 4: Bake Until Golden
Pop the tray into your preheated oven and bake for 20–25 minutes. You’ll know they’re ready when the tops are golden brown and slightly crispy. If you’re craving extra crunch, switch to the broil setting for the last 1–2 minutes—but keep a close eye to prevent burning.
As the cheesy aroma wafts through your kitchen, you’ll know you’re in for a treat.
Baked Broccoli Cheese Balls: Tips, Variations, and Finishing Touches
Now that your kitchen smells like a dream and your Baked Broccoli Cheese Balls are golden and crispy, let’s dive into some expert tips, delicious variations, and the ultimate dipping sauces to take this snack to the next level.
Step 5: Let Them Cool and Serve
Once your broccoli cheese balls are beautifully baked, remove them from the oven and let them cool slightly on the tray. This resting time allows them to firm up a bit, making them easier to handle and serve.
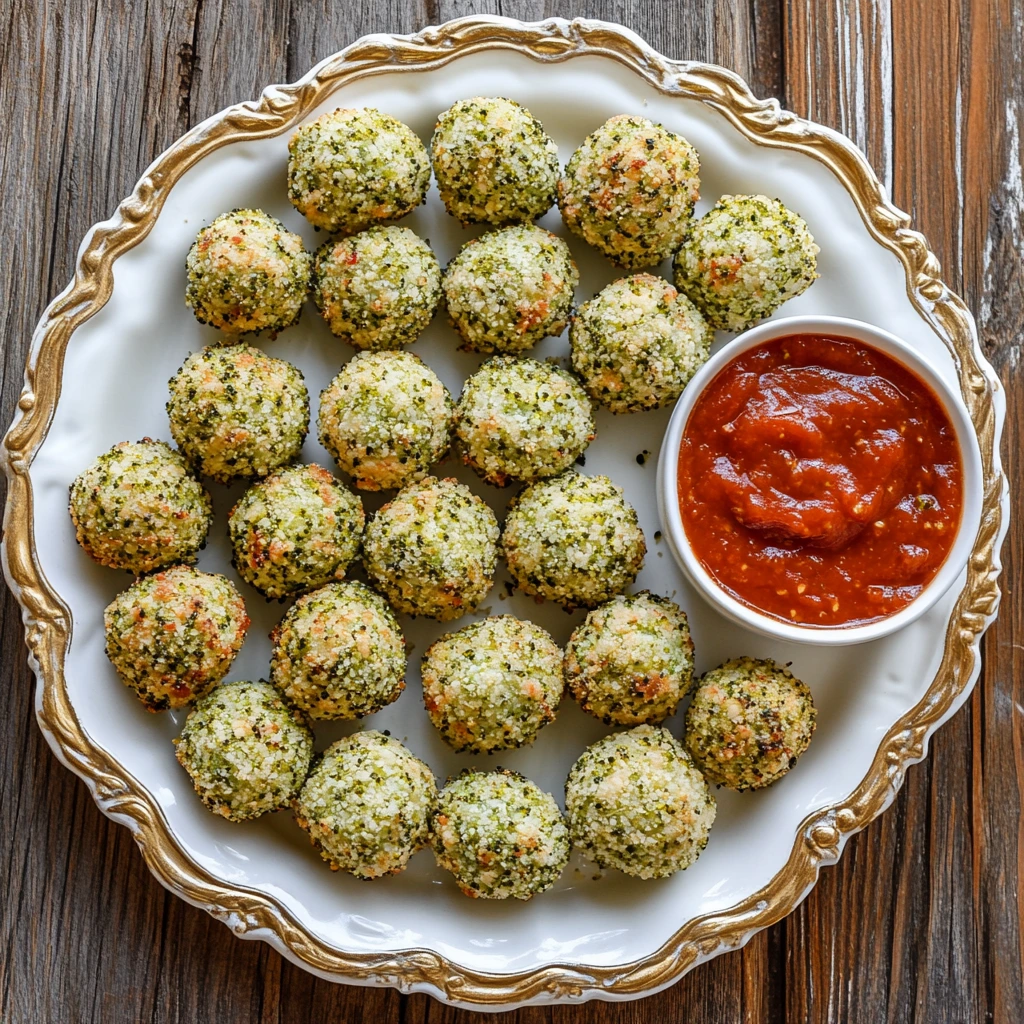
These bites are best enjoyed warm, when the cheddar cheese inside is still gooey and the outer layer has that perfect crunch. Serve them as-is or alongside your favorite dipping sauces for an extra burst of flavor.
Perfect Pairings: Dipping Sauce Ideas
The right sauce can elevate your Broccoli Cheese Balls from great to unforgettable. Here are a few options that pair wonderfully:
- Marinara Sauce: For an Italian-inspired twist, the tangy tomato sauce complements the cheesy goodness.
- Ranch Dressing: A creamy classic that’s always a hit with kids and adults alike.
- Spicy Aioli: Add a kick with a blend of mayo, garlic, and a splash of Sriracha.
- Honey Mustard: The sweet and tangy combo works beautifully with the savory flavors.
- Greek Yogurt Dip: Mix plain yogurt with dill, garlic, and lemon juice for a light and refreshing option.
Pro Tips for the Perfect Cheese Balls
Even though these cheese balls are straightforward to make, a few extra tips can ensure they turn out flawless every time:
- Keep the Size Consistent: Use a small cookie scoop to portion out the mixture. This ensures even cooking and prevents some balls from being over or underdone.
- Don’t Skip the Parchment Paper: It keeps the cheese balls from sticking to the tray and makes cleanup a breeze.
- Preheat the Oven Properly: A hot oven ensures the cheese balls get that lovely golden crust without drying out.
- Test Seasoning Before Baking: Take a small portion of the mixture and cook it in a skillet to check the flavor. Adjust salt, pepper, or spices if needed.

Variations to Try
One of the best things about this recipe is how adaptable it is. Here are a few fun twists to make these Baked Broccoli Cheese Balls your own:
- Add Protein: Toss in cooked and crumbled bacon or shredded chicken for a heartier version.
- Switch Up the Cheese: Swap cheddar for mozzarella, gouda, or pepper jack for a unique flavor profile.
- Go Gluten-Free: Use gluten-free breadcrumbs or almond flour as a binder.
- Spice It Up: Add a pinch of cayenne pepper, red chili flakes, or diced jalapeños for a spicy kick.
- Boost the Veggies: Mix in finely chopped spinach, grated zucchini, or even cooked quinoa for added texture and nutrients.
Make-Ahead and Storage Tips
Want to prep these cheese balls ahead of time? No problem! Here’s how:
- Refrigerate Before Baking: Once rolled, place the cheese balls on a tray, cover them with plastic wrap, and refrigerate for up to 24 hours. Bake them fresh when needed.
- Freeze for Later: Arrange the uncooked cheese balls on a tray and freeze until solid. Transfer them to a freezer bag or container and store for up to 3 months. Bake directly from frozen—just add a few extra minutes to the cooking time.
- Reheat Leftovers: Pop leftover cheese balls in a 350°F (175°C) oven for 5–7 minutes to revive their crispiness. Avoid microwaving, as they can turn soggy.
Creative Serving Suggestions
These Baked Broccoli Cheese Balls are versatile and can be served in a variety of ways:
- As a Party Appetizer: Arrange them on a platter with an assortment of dipping sauces. They’ll disappear in minutes!
- As a Side Dish: Serve alongside grilled chicken, steak, or fish for a complete meal.
- In a Wrap or Sandwich: Stuff a few cheese balls into a pita or sandwich for a fun, cheesy twist.
- For Kids’ Lunchboxes: They’re a fantastic snack that stays tasty even when cooled.
Baked Broccoli Cheese Balls: FAQs and Final Thoughts
As you savor your crispy, cheesy creations, you might have a few lingering questions about how to perfect, store, or customize these Baked Broccoli Cheese Balls. In this final part, we’ll tackle your most frequently asked questions and wrap up with some encouraging thoughts to inspire your next baking adventure.
Frequently Asked Questions
1. Can I use frozen broccoli instead of fresh?
Absolutely! Frozen broccoli works just as well as fresh in this recipe. Just make sure to thaw it completely and squeeze out any excess moisture before chopping it finely.
2. What can I substitute for breadcrumbs?
If you’re out of breadcrumbs, you can use crushed crackers, panko, or even rolled oats for a different texture. For a gluten-free option, almond flour or gluten-free breadcrumbs work perfectly.
3. How do I make these cheese balls dairy-free?
To make them dairy-free, substitute the cheddar and Parmesan cheeses with plant-based alternatives. You can also use an egg replacer or flaxseed meal mixed with water as a binding agent.
4. Can I fry these instead of baking them?
Yes, you can fry them for an extra-crispy finish! Heat oil in a skillet and fry the cheese balls over medium heat until golden brown on all sides. Just be mindful that frying will add extra calories compared to baking.
5. How do I prevent the cheese balls from falling apart?
The key to preventing them from falling apart is ensuring the mixture isn’t too wet. Add more breadcrumbs if needed, and make sure to press the mixture firmly when rolling into balls.
6. Can I prepare these ahead of time?
Definitely! You can prepare the mixture up to 24 hours in advance and store it in the refrigerator. Alternatively, roll and freeze the balls for a quick snack whenever you’re ready to bake.
7. What’s the best way to store leftovers?
Store leftover cheese balls in an airtight container in the refrigerator for up to 3 days. To reheat, bake them in the oven at 350°F (175°C) for 5–7 minutes to restore their crispiness.
Conclusion: Why You’ll Keep Coming Back to This Recipe
Baked Broccoli Cheese Balls are one of those rare recipes that check every box: they’re easy to make, packed with flavor, and loved by kids and adults alike. Whether you’re whipping them up for a party, sneaking in extra veggies for your little ones, or treating yourself to a cheesy snack, these balls never fail to impress.
Print
Baked Broccoli Cheese Balls
- Author: David
- Total Time: 40 minutes
Description
These baked broccoli cheese balls are a perfect snack or appetizer—crispy on the outside, cheesy and tender on the inside. They’re easy to make, packed with flavor, and kid-friendly! Serve them with your favorite dip for a guaranteed crowd-pleaser.
Ingredients
- 2 cups broccoli florets, finely chopped
- 1 cup breadcrumbs (for binding)
- 1 ½ cups shredded cheddar cheese
- ⅓ cup grated Parmesan cheese
- 2 eggs (for binding)
- 2 tbsp all-purpose flour (for binding)
- ½ tsp garlic powder (for seasoning)
- ½ tsp onion powder (for seasoning)
- Salt and pepper, to taste
- Cooking spray (for greasing the baking sheet)
Instructions
1️⃣ Steam the broccoli:
Preheat your oven to 400°F (200°C). Steam broccoli florets until tender-crisp (about 3–5 minutes). Let them cool, then finely chop into small pieces.
2️⃣ Mix the ingredients:
In a large mixing bowl, combine the finely chopped broccoli, breadcrumbs, cheddar cheese, Parmesan cheese, eggs, and flour. Add garlic powder, onion powder, salt, and pepper to taste. Stir well until all ingredients are fully incorporated.
3️⃣ Shape into balls:
Using your hands or a small cookie scoop, roll small portions of the mixture into 1-inch balls. Arrange them on a baking sheet lined with parchment paper or lightly greased with cooking spray.
4️⃣ Bake to perfection:
Bake in the preheated oven for 20–25 minutes, or until the balls are golden brown. For extra crispiness, broil for an additional 1–2 minutes, keeping a close eye to prevent burning.
5️⃣ Cool and serve:
Remove from the oven and allow to cool slightly. Serve warm with marinara sauce, ranch dip, or your favorite condiment.
Notes
- Make it gluten-free: Swap breadcrumbs and flour with gluten-free alternatives.
- Cheese options: You can replace cheddar with mozzarella for a gooier texture or use a mix of cheeses for extra flavor.
- Storage: Store leftovers in an airtight container in the fridge for up to 3 days. Reheat in the oven or air fryer for crispiness.
- Prep Time: 15 minutes
- Cook Time: 25 minutes
Nutrition
- Serving Size: 4

