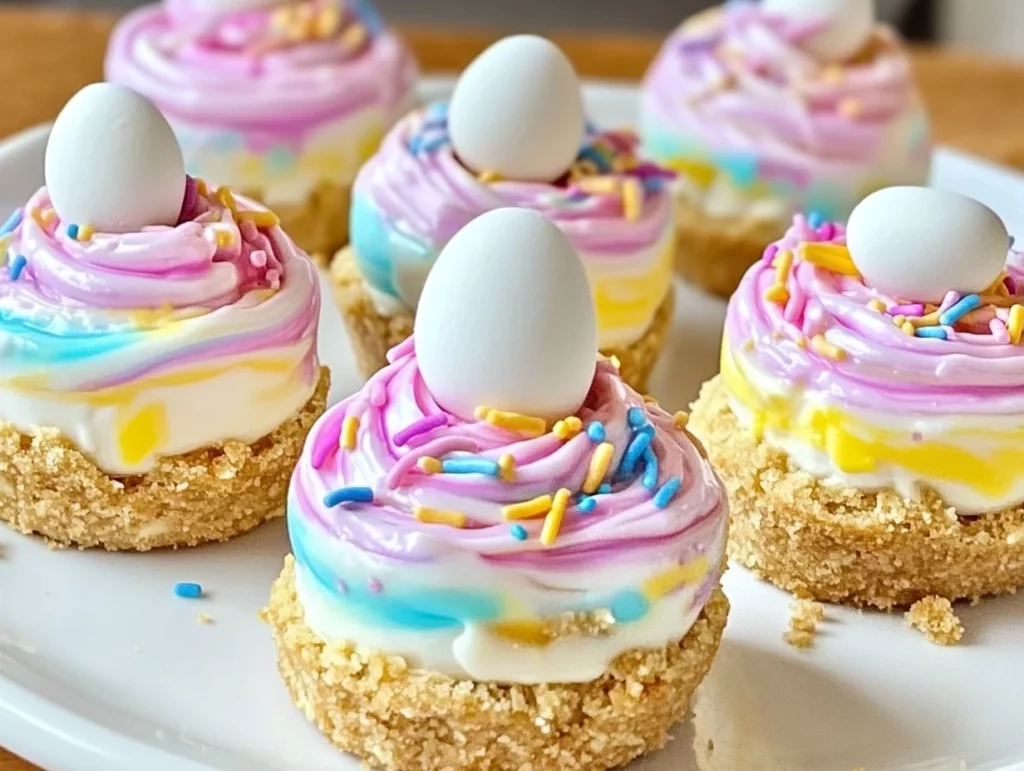
When spring rolls around and Easter is just a hop away, I always find myself craving light, colorful desserts that feel just as fresh as the season itself. And let me tell you, these Easter No-Bake Mini Swirl Cheesecakes check every single box! They’re bright, cheerful, and best of all — they don’t even require you to turn on the oven.
Whether you’re hosting a big family brunch, looking for something sweet to bring to a potluck, or just want a fun weekend project with the kids, these little cheesecakes are the perfect pick. I personally love how easy they are to whip up — and swirling all those pretty pastel colors together is honestly half the fun!
Today, I’m sharing every little tip and trick to help you create the most adorable, mouth-watering mini cheesecakes you’ve ever seen. Trust me, you’re going to want to make a double batch because these disappear fast.
Let’s dive right in and get started!
Ingredients You’ll Need
This recipe makes about 12 mini cheesecakes, and the ingredients are pretty simple — you might even have most of them on hand already!
For the Crust:
1 1/2 cups graham cracker crumbs (about 10–12 graham crackers, crushed)
3 tablespoons granulated sugar
6 tablespoons unsalted butter, melted
For the Cheesecake Filling:
16 oz cream cheese, softened
1/2 cup granulated sugar
1 teaspoon vanilla extract
1/2 cup heavy cream, whipped to soft peaks
Gel food coloring (pastel colors like pink, yellow, and blue)
Optional Toppings:
Whipped cream
Sprinkles
Fresh fruit (like strawberries, blueberries, or kiwi slices)
Chocolate shavings
Step-by-Step Instructions
Step 1: Make the Crust
First things first, let’s get that buttery graham cracker crust ready. In a medium bowl, mix together the graham cracker crumbs, sugar, and melted butter until everything is well combined and looks like wet sand.
Next, line a 12-cup muffin tin with paper liners. Scoop the crust mixture evenly into each liner, pressing it down firmly with the back of a spoon to make a solid, even base. You want the crust nice and packed so it holds together once chilled.
Pop the crusts into the fridge to firm up while we move on to the dreamy, creamy filling.

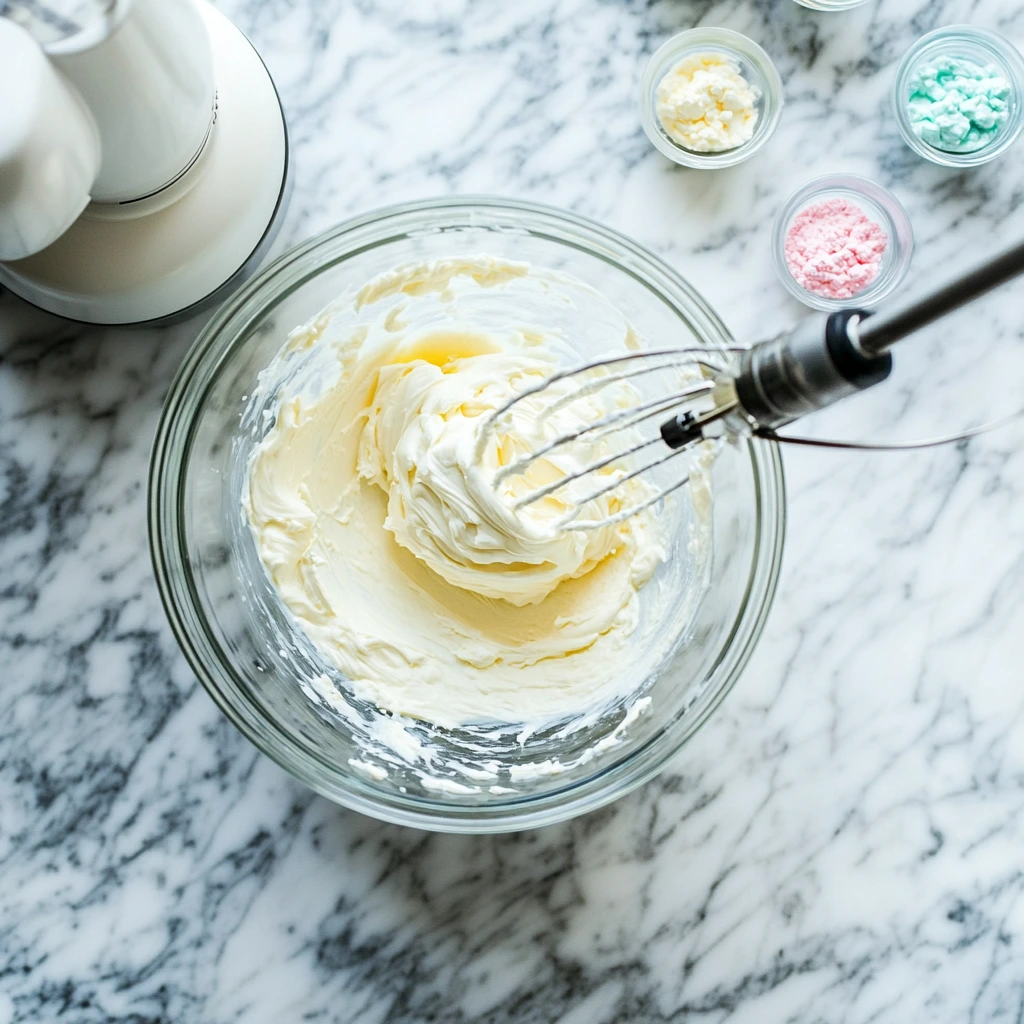
Step 2: Prepare the Cheesecake Filling
Now comes the best part — the cheesecake filling! In a large mixing bowl, beat the softened cream cheese, granulated sugar, and vanilla extract together until super smooth and creamy. No lumps allowed, so make sure that cream cheese is really soft before you start.
Once everything’s nice and silky, gently fold in the whipped cream. This step keeps the filling light and fluffy, almost like a cloud. It’s important to fold and not stir too vigorously, so you don’t deflate all that lovely air you just whipped in.
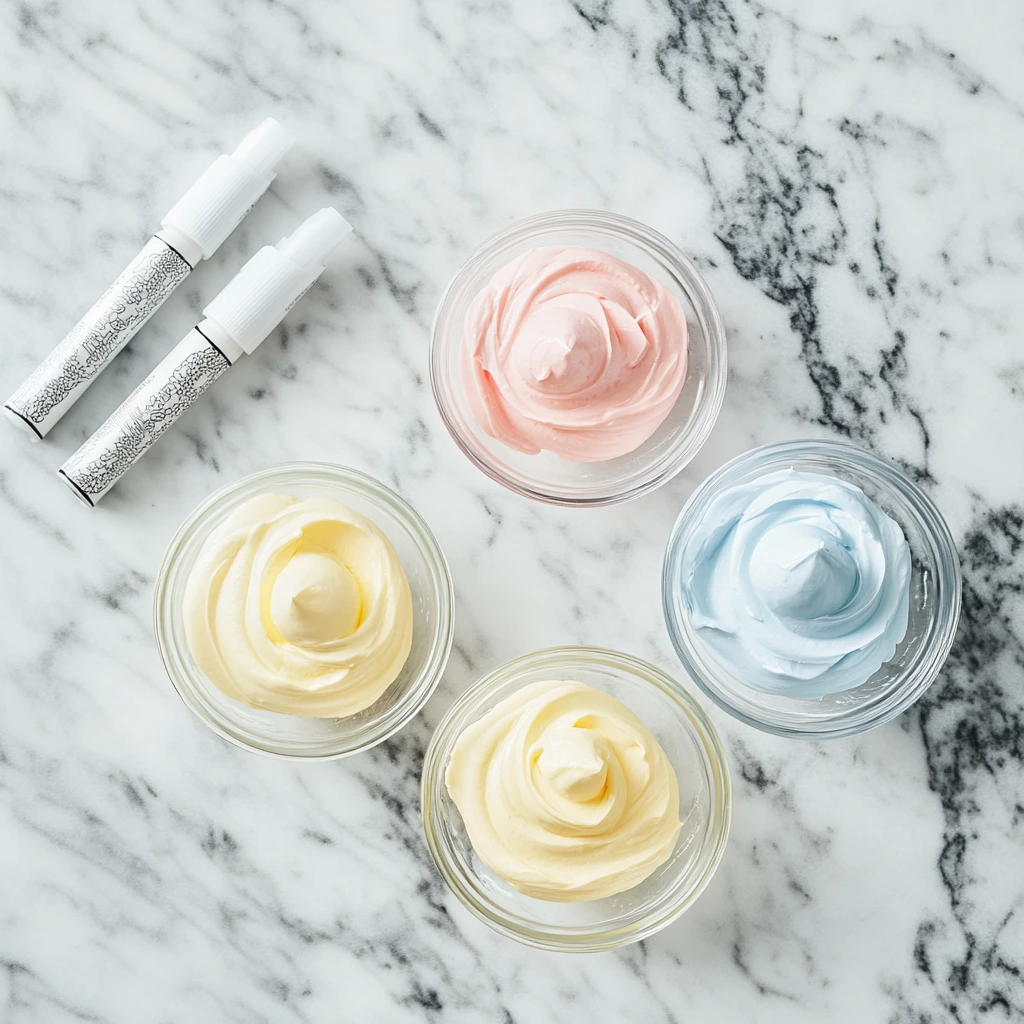
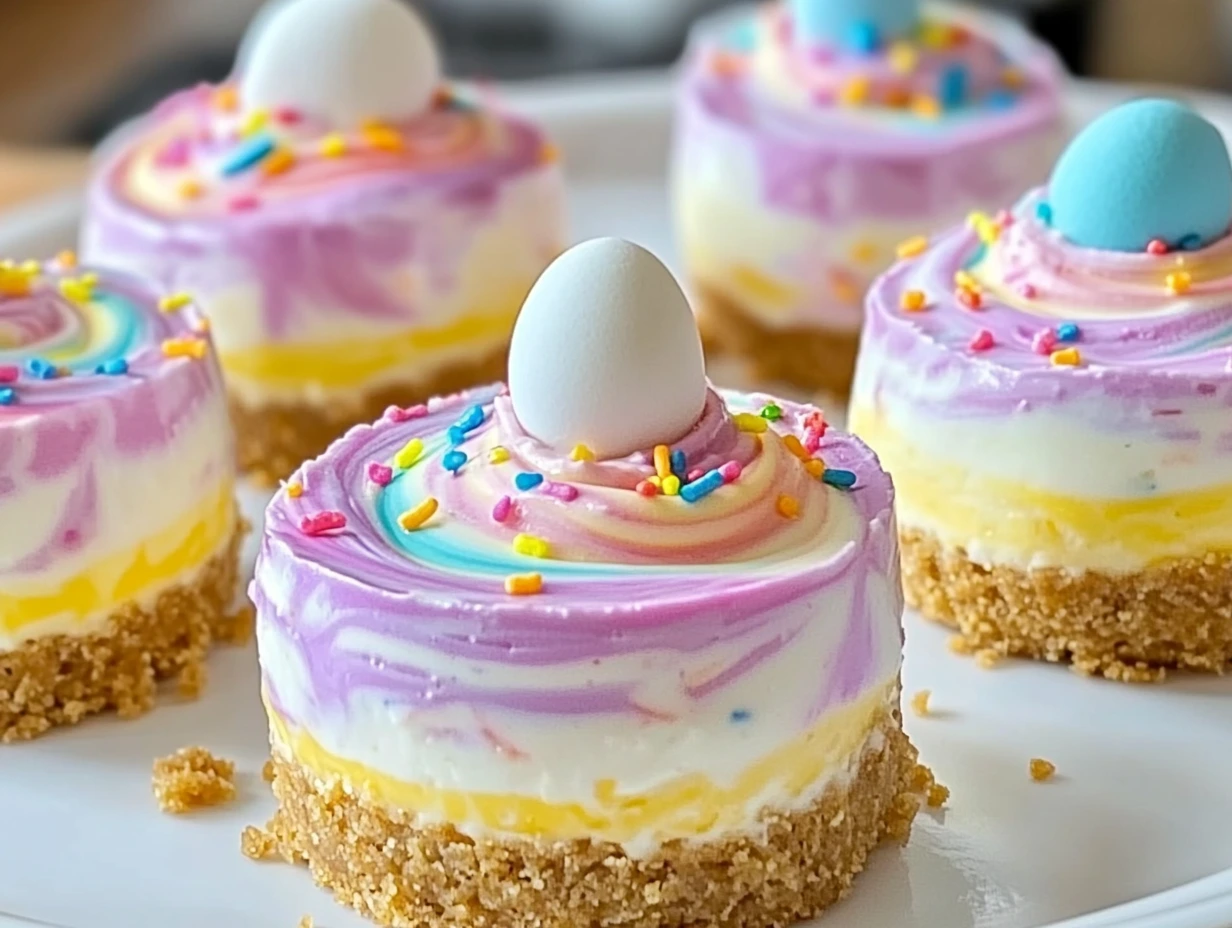
Divide the cheesecake mixture evenly into three bowls (or more if you want extra colors). Add a few drops of gel food coloring into each bowl — I went with soft pink, sunny yellow, and a pretty robin’s egg blue. Mix each bowl gently until you get that perfect pastel shade.
How to Assemble and Perfect Your Easter No-Bake Mini Swirl Cheesecakes
Now that we’ve got our colorful cheesecake fillings ready, it’s time for the fun part — swirling all those pretty pastels together! This step is where you can get creative and really make each mini cheesecake a little work of art.
I promise, this part is super simple and so satisfying. And don’t worry if you feel like you’re not a “decorator” — the swirl effect is meant to be a little messy and whimsical. Every little swirl just adds to the charm!
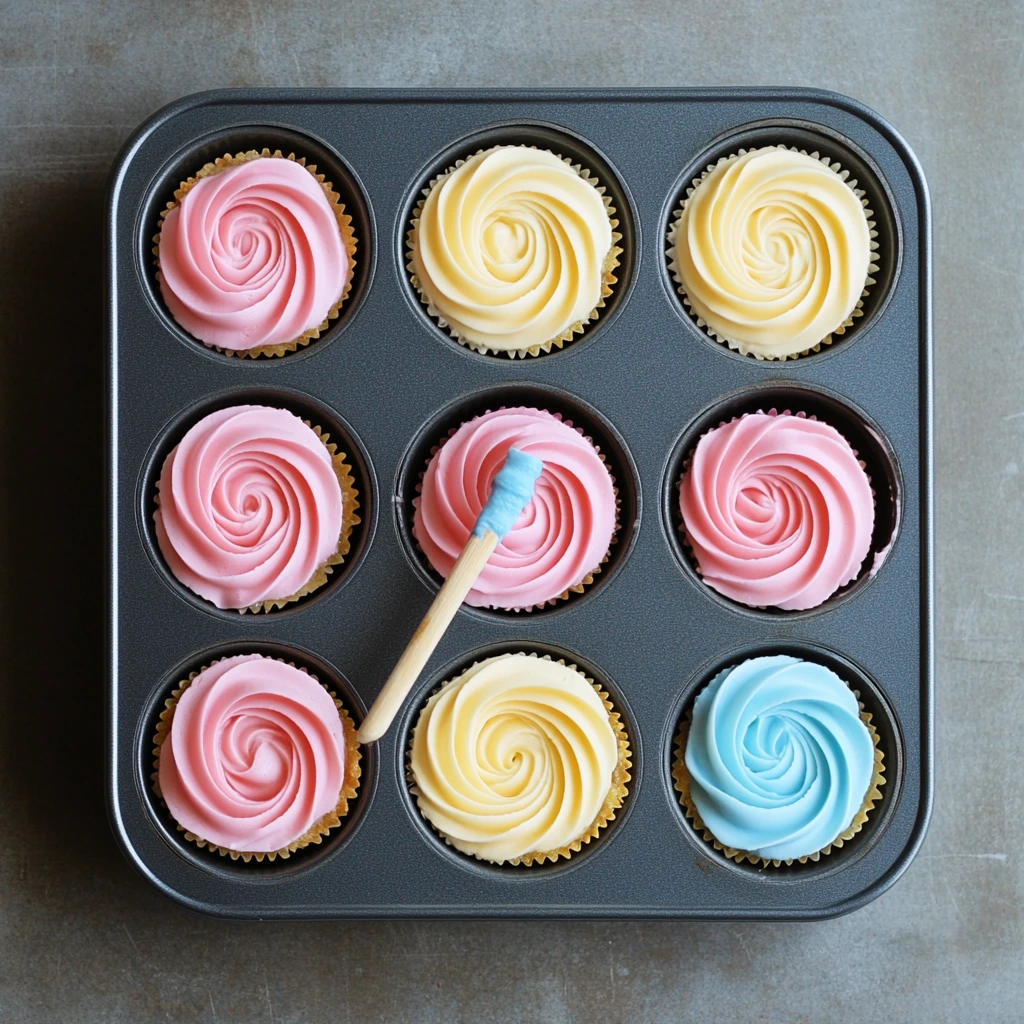
Step 3: Assemble the Mini Cheesecakes
Grab the muffin tin with the chilled graham cracker crusts. Now, using a small spoon (or even a piping bag if you want to be fancy), drop small dollops of each colored cheesecake mixture into each muffin cup. Alternate the colors as you go to make sure every mini cheesecake gets a mix of shades.
Once all the filling is divided among the cups, take a toothpick or a wooden skewer and gently swirl the colors together. Don’t overmix — just a few gentle swirls will give you that gorgeous marble look without blending the colors too much.
It’s one of those steps where less is definitely more!
Step 4: Chill
After you’ve created your beautiful swirls, it’s time to let the cheesecakes set up properly. Place the muffin tin in the refrigerator and chill for at least 4 to 6 hours. If you’re short on time, you can pop them into the freezer for about 1 to 2 hours to speed things up.
Just make sure they’re firm before you take them out — they should feel solid when gently pressed.
I usually make these the night before a big event so they have plenty of time to chill overnight. Plus, it’s one less thing to stress about on party day!
Step 5: Decorate and Serve
Once the mini cheesecakes are set and firm, it’s time to dress them up! You can keep it simple or go all out, depending on your mood.
Here are a few of my favorite topping ideas:
A swirl of whipped cream right on top
Pastel sprinkles for extra Easter flair
Fresh berries like strawberries or blueberries
Chocolate shavings for a little extra indulgence
Honestly, they’re so pretty on their own, you could even serve them as-is and still impress a crowd.
When you’re ready to serve, gently peel away the paper liners and place the cheesecakes on a serving platter. They’ll hold their shape beautifully and look absolutely adorable on your dessert table.
Helpful Tips for the Best No-Bake Cheesecakes
Use gel food coloring. Liquid food coloring can thin out your cheesecake filling and make it harder to set properly. Gel colors keep everything thick and vibrant.
Don’t over-swirl. A few gentle swirls are all you need. Overmixing can muddy the colors and make them less distinct.
Softened cream cheese is key. If your cream cheese is too cold, your filling will be lumpy no matter how much you beat it. Let it sit at room temperature for at least 30 minutes before starting.
Plan ahead. These cheesecakes need several hours to chill, so make sure you build in enough time before you need to serve them.
Use a sturdy muffin tin. A heavier muffin tin helps hold the shape better while chilling and makes removing the liners much easier.
FAQ About Easter No-Bake Mini Swirl Cheesecakes
Before we wrap up this fun recipe, I thought I’d answer a few of the most common questions I get about these mini cheesecakes. Whether it’s about substitutions, storing leftovers, or how to make them even more festive, I’ve got you covered!
1. Can I use something other than graham crackers for the crust?
Definitely! If you’re not a fan of graham crackers, you can easily swap them for crushed Oreos, vanilla wafers, or even a mixture of other cookies. Just keep the ratio of crumbs to butter about the same, and you’ll have a delicious alternative.
2. How far in advance can I make these mini cheesecakes?
You can make these up to 1-2 days ahead of time. Just be sure to store them in an airtight container in the fridge. They’ll stay fresh and perfect for several days. Making them ahead actually works out great because you don’t have to worry about any last-minute prep!
3. Can I freeze these mini cheesecakes?
Yes! These cheesecakes freeze wonderfully. After they’ve set and chilled in the fridge, you can wrap them individually in plastic wrap and store them in an airtight container in the freezer. They’ll keep for up to 2 months. When you’re ready to serve, just let them thaw in the fridge for a few hours before eating.
4. Is there a dairy-free version of this recipe?
You can absolutely make these cheesecakes dairy-free! Swap out the cream cheese for a dairy-free alternative (such as a cashew-based cream cheese), and use a dairy-free whipped cream substitute. For the crust, make sure to choose a dairy-free butter. You’ll still get that same creamy, dreamy texture without the dairy!
5. Can I make these in a different pan size?
You can! If you don’t have a muffin tin, you can make these in a regular pie or tart pan. Just be sure to adjust the crust and filling amounts accordingly. A tart pan will create a more traditional cheesecake shape, but mini cheesecakes in muffin tins are definitely the way to go if you want cute, individual servings.
6. How do I get the swirls to look perfect?
The key is to not overdo it with the swirling! You want just a few gentle swirls with a toothpick or skewer to create that marbled effect. If you swirl too much, the colors will blend into each other, and you won’t get the beautiful pastel swirls you’re after. A light hand is all you need!
7. What other toppings can I use to decorate?
The possibilities are endless! I love topping them with whipped cream and sprinkles for a festive look, but you could also use fresh berries, mini chocolate chips, coconut flakes, or even edible flowers for a more elegant touch. Get creative with what you have on hand!
Final Thoughts: Your New Favorite Spring Dessert
If you’re looking for a show-stopping dessert that’s easy to make, absolutely delicious, and perfect for Easter, these No-Bake Mini Swirl Cheesecakes are the way to go. The colorful swirls and light, creamy filling make them the ultimate springtime treat. Plus, the fact that you don’t even have to turn on the oven? That’s a huge win in my book.
So go ahead, grab your ingredients, and get ready for some serious cheesecake joy! Whether you’re making these for a holiday gathering, a birthday party, or just because — I know they’ll be a hit. And, hey, if you try any fun variations or find a new topping combo you love, I’d love to hear all about it in the comments!
Happy baking (or no-baking, I guess!) and enjoy these mini cheesecakes!
Print
Easter No-Bake Mini Swirl Cheesecakes
- Author: Andrew Recipes
Description
Celebrate Easter with these delightful No-Bake Mini Swirl Cheesecakes. Creamy, colorful, and absolutely festive, these little treats are perfect for spring gatherings or any time you want a cheerful dessert. No oven required, and you can have fun swirling beautiful pastel shades into every bite. They’re as fun to make as they are to eat!
Ingredients
For the Crust
1 1/2 cups graham cracker crumbs (about 10–12 graham crackers, crushed)
3 tbsp granulated sugar
6 tbsp unsalted butter, melted
For the Cheesecake Filling
16 oz cream cheese, softened
1/2 cup granulated sugar
1 tsp vanilla extract
1/2 cup heavy cream, whipped to soft peaks
Gel food coloring (pastel colors like pink, yellow, and blue)
Optional Toppings
Whipped cream
Sprinkles
Fresh fruit (like strawberries, blueberries, or kiwi slices)
Chocolate shavings
Instructions
Step 1: Make the Crust
In a medium bowl, mix the graham cracker crumbs, sugar, and melted butter until the mixture resembles wet sand. Divide the mixture evenly among a 12-cup muffin tin lined with paper liners. Press the mixture firmly into the bottom of each liner to form an even crust. Chill the crusts in the fridge while you prepare the filling.
Step 2: Prepare the Cheesecake Filling
In a large mixing bowl, beat the softened cream cheese, sugar, and vanilla extract until smooth and creamy. Gently fold in the whipped cream until the mixture is light and fluffy. Divide the cheesecake filling into 3 bowls (or more, depending on how many colors you want). Add a few drops of gel food coloring to each bowl and mix until you achieve your desired pastel shades.
Step 3: Assemble the Mini Cheesecakes
Spoon small dollops of each colored filling into the muffin cups, alternating colors to create a marbled effect. Use a toothpick or skewer to gently swirl the colors together for a decorative touch. Be careful not to overmix—you want to maintain the swirl pattern.
Step 4: Chill
Refrigerate the mini cheesecakes for at least 4–6 hours, or until set. For faster setting, you can freeze them for 1–2 hours.
Step 5: Decorate and Serve
Once set, top the mini cheesecakes with whipped cream, sprinkles, fresh fruit, or chocolate shavings for an extra festive touch. Serve chilled and enjoy the creamy, colorful goodness.
Notes
For the best results, make sure the cream cheese is fully softened before mixing to avoid lumps. Use gel food coloring rather than liquid for more vibrant pastel hues without thinning the filling. These mini cheesecakes can be made a day ahead and stored covered in the refrigerator until ready to serve, making them a convenient choice for parties and gatherings.

