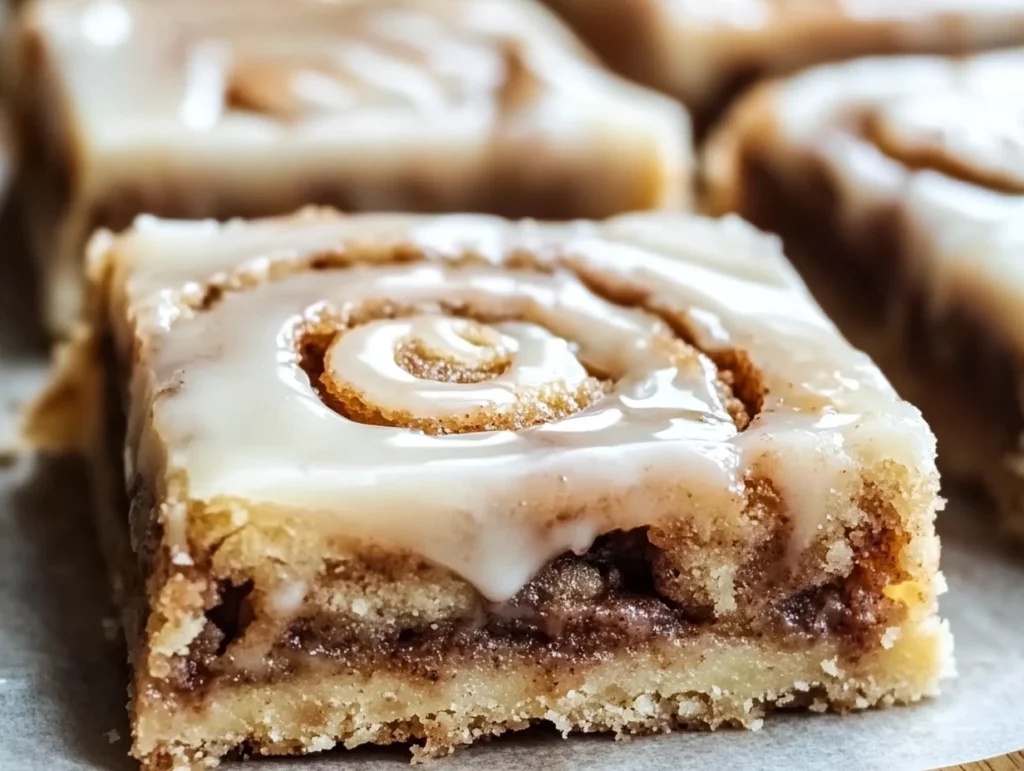
There’s something about cinnamon rolls that feels like a big, cozy hug, right? But let’s be real—sometimes you just don’t have the time (or patience) for all that rising, rolling, and waiting. That’s exactly why I am head-over-heels in love with these Cinnamon Roll Bliss Bars!
They capture all that sweet, buttery, cinnamon-sugar goodness you crave but in an easy-to-make bar form that’s ready in a fraction of the time. No yeast, no kneading—just pure, simple bliss. Whether you’re planning a special brunch, hosting a potluck, or just need a comforting treat with your coffee, these bars are seriously perfect. Trust me, after you try them once, you’ll be whipping them up whenever the craving hits.
Let’s dive right into how you can make these amazing bars right at home!
Ingredients You’ll Need
Here’s what you’ll need to create these dreamy Cinnamon Roll Bliss Bars:
For the Base:
1 cup unsalted butter, melted
1 cup granulated sugar
1/2 cup brown sugar
1 large egg, lightly beaten
1 teaspoon vanilla extract
1 3/4 cups all-purpose flour
1/2 teaspoon baking powder
1/4 teaspoon salt
For the Cinnamon Filling:
1/3 cup unsalted butter, softened
1/2 cup brown sugar
2 teaspoons ground cinnamon
For the Glaze:
1 cup powdered sugar
2–3 tablespoons milk (or heavy cream for extra richness)
1/2 teaspoon vanilla extract
Step-by-Step Instructions
Step 1: Preheat the Oven
First things first, go ahead and preheat your oven to 350°F (175°C). Line an 8×8-inch baking pan with parchment paper, making sure you leave a little overhang on the sides. (This little trick makes it super easy to lift your bars out later without any mess!)
Step 2: Make the Base
In a big mixing bowl, stir together the melted butter, granulated sugar, and brown sugar until everything looks smooth and glossy. Then, beat in the egg and vanilla extract until fully mixed.
Next, sprinkle in the flour, baking powder, and salt. Stir just until the dough comes together. It’s going to be thick and a little sticky—that’s exactly how it should be!
This rich, buttery dough is the heart of the bars, so don’t worry if it feels a little heavier than your usual cookie dough.

Step 3: Assemble the Layers
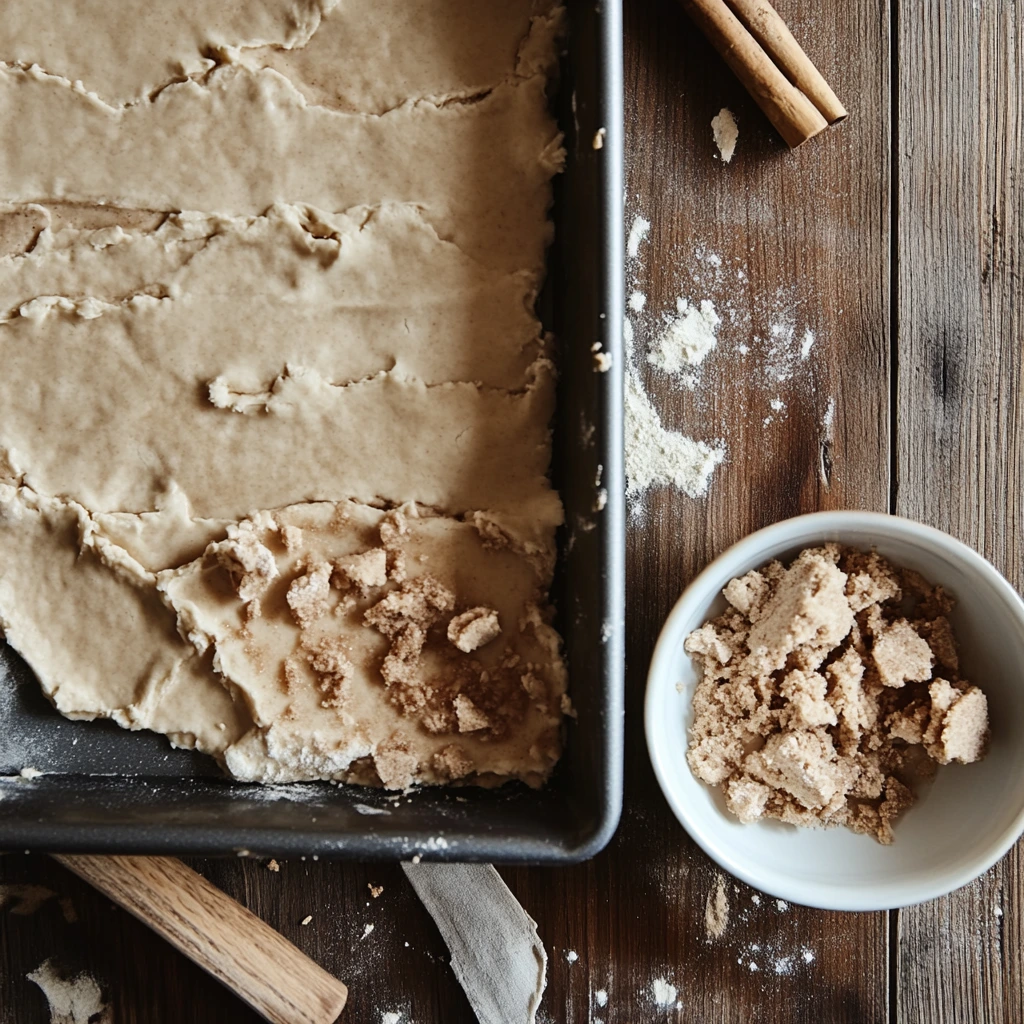
Now it’s time to build those luscious layers! Press about two-thirds of the dough evenly into the bottom of your prepared baking pan to create the base.
In a small bowl, whip together the softened butter, brown sugar, and cinnamon until it forms a thick, spreadable filling. Spread this cinnamon-sugar mixture all over the dough base.
Finally, crumble the remaining dough over the top. It’s totally fine (and even encouraged) if there are some gaps. As the bars bake, the dough will spread and create a gorgeous, rustic top layer that’s packed with flavor.
How to Bake and Finish Your Cinnamon Roll Bliss Bars
Alright, you’ve already done the hard part—building those delicious layers! Now let’s move on to the baking, glazing, and of course, a few little tips to make sure your Cinnamon Roll Bliss Bars come out perfectly every single time.
Grab your pan because it’s time to fill your kitchen with the most mouthwatering cinnamon-sugar scent you can imagine!

Step 4: Bake
Pop your pan into the preheated oven and bake for 25 to 30 minutes. Keep an eye on them around the 25-minute mark—you’re looking for the edges to turn a light golden brown and the center to look set.
Tip: The center might still have a slight softness, but that’s totally fine! It will firm up as it cools. Overbaking can make them dry, and we’re aiming for soft and chewy, not crumbly.
Once they’re done, let the bars cool completely in the pan. This is the hardest part (because they smell so good), but it’s really important. If you drizzle the glaze too soon, it’ll just melt right off into a sticky mess.
Step 5: Make the Glaze
While your bars are cooling, whip up the glaze. In a small bowl, whisk together:
1 cup powdered sugar
2–3 tablespoons milk or heavy cream
1/2 teaspoon vanilla extract
Start with 2 tablespoons of milk and see how you like the texture. If you want a thinner glaze for a more dramatic drizzle, add a tiny bit more milk. If you love a thick, creamy glaze (almost like frosting), keep it on the thicker side by adding a little more powdered sugar.
Whisk it up until smooth and silky, with no lumps in sight.
Step 6: Finish and Serve
Once your Cinnamon Roll Bliss Bars are completely cooled, it’s time for the best part—drizzling on that gorgeous glaze!
Use a spoon or a piping bag to drizzle the glaze all over the top of the bars. Be generous—you deserve it!
Let the glaze set for about 10–15 minutes (if you can wait that long), then use the parchment paper overhang to lift the whole slab out of the pan. Slice into squares, serve, and watch them disappear!
Tips and Variations for the Best Cinnamon Roll Bliss Bars
Add some crunch:
Want a little extra texture? Sprinkle some chopped pecans or walnuts over the cinnamon filling before you crumble the dough on top. The buttery nuts pair perfectly with the cinnamon flavor.
Less sweet option:
If you’re someone who likes your desserts a little less sweet, you can slightly reduce the sugar in the base (cut back about 2–3 tablespoons) or make a thinner glaze.
Make ahead magic:
These bars are actually even better the next day once the flavors have had time to settle. You can make them a day ahead, store them tightly covered at room temperature, and enjoy them all weekend long!
Serving suggestion:
For an extra-indulgent dessert, warm up a square for about 10 seconds in the microwave and add a scoop of vanilla ice cream. Pure heaven.
Storage tips:
Store any leftovers in an airtight container at room temperature for up to three days. If you prefer a firmer texture, you can refrigerate them. Just let them sit out for a few minutes before eating to bring back that soft, chewy bliss.

Cinnamon Roll Bliss Bars: Your Questions Answered
Before you rush off to bake a batch (and you definitely should!), let’s take a second to go over a few common questions about these Cinnamon Roll Bliss Bars. Whether it’s your first time making them or you’re already planning your second batch, these tips will help you get the best results every time.
Frequently Asked Questions
1. Can I double the recipe to make a bigger batch?
Absolutely! If you want a bigger batch for a party or a holiday gathering, just double all the ingredients and use a 9×13-inch baking pan. Keep an eye on the baking time—you may need to add a few extra minutes, but just watch for those golden edges and a set center.
2. Can I freeze Cinnamon Roll Bliss Bars?
Yes, you can! Once the bars are baked and glazed, let them cool completely. Slice them into squares, wrap each piece tightly in plastic wrap, and then place them in a freezer-safe bag. They’ll stay fresh for up to 2 months. To enjoy, thaw at room temperature or microwave for a few seconds.
3. What if I don’t have parchment paper?
No worries! You can lightly grease your baking pan with butter or non-stick spray instead. Just be extra careful when removing the bars after baking. Parchment makes it a lot easier to lift them out without breaking.
4. Can I use margarine instead of butter?
While margarine can technically be used, I highly recommend sticking with real unsalted butter for this recipe. Butter gives that rich, classic flavor and texture that margarine just can’t fully replicate.
5. How do I know when the bars are done baking?
The edges should look lightly golden, and the center should no longer look glossy or wet. A little softness in the middle is fine because the bars will continue to firm up as they cool.
6. Can I make these gluten-free?
You can! Just substitute a 1:1 gluten-free all-purpose flour blend for the regular flour. Make sure your blend includes xanthan gum for the best texture.
7. What can I add for even more flavor?
Try adding a pinch of nutmeg to the cinnamon filling, or a handful of white chocolate chips to the dough for an extra indulgent twist.
Final Thoughts: Why You’ll Love These Cinnamon Roll Bliss Bars
If you’re anything like me, you’re always looking for a go-to recipe that’s simple, satisfying, and guaranteed to impress. These Cinnamon Roll Bliss Bars check all the boxes. They bring all the cozy vibes of a homemade cinnamon roll but without any of the fuss.
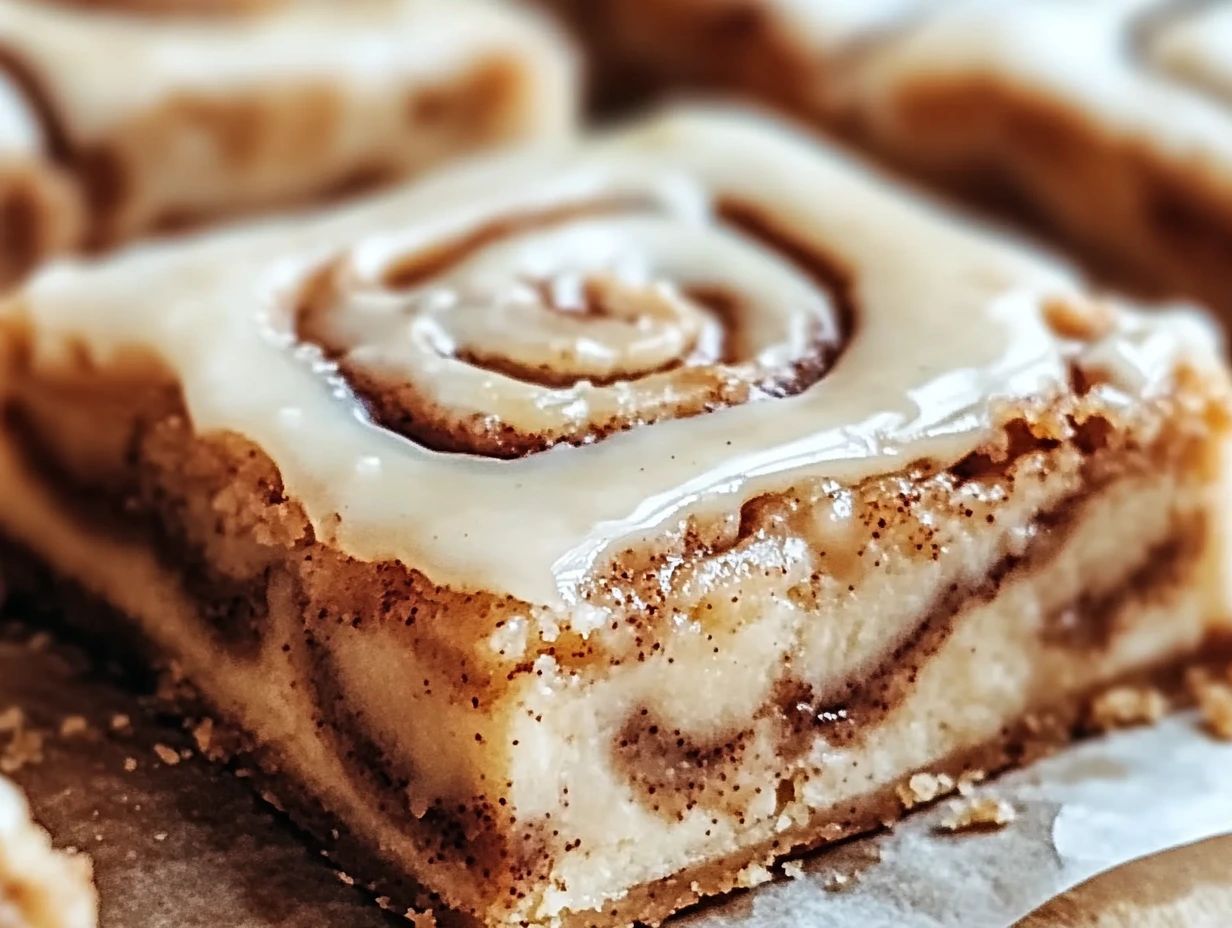
The buttery base is rich and soft, the cinnamon filling is just the right amount of sweet and spiced, and the vanilla glaze ties it all together in the most perfect way. Plus, they’re super versatile—you can serve them for breakfast, dessert, or even as an afternoon snack with a cup of coffee.
I can’t wait for you to try them! If you do, be sure to come back and let me know how they turned out. Feel free to get creative and add your own twists, too—I love hearing how you make these recipes your own!
Happy baking!
Print
Cinnamon Roll Bliss Bars
- Author: Andrew Recipes
Description
These Cinnamon Roll Bliss Bars are everything you love about a classic cinnamon roll, transformed into an easy, indulgent dessert bar. With a buttery cookie base, a rich cinnamon-sugar filling, and a sweet vanilla glaze drizzled over the top, every bite melts in your mouth. Perfect for brunches, potlucks, or anytime you’re craving something cozy and comforting without the effort of rolling out dough.
Ingredients
For the Base:
1 cup unsalted butter, melted
1 cup granulated sugar
1/2 cup brown sugar
1 large egg, lightly beaten
1 teaspoon vanilla extract
1 3/4 cups all-purpose flour
1/2 teaspoon baking powder
1/4 teaspoon salt
For the Cinnamon Filling:
1/3 cup unsalted butter, softened
1/2 cup brown sugar
2 teaspoons ground cinnamon
For the Glaze:
1 cup powdered sugar
2–3 tablespoons milk (or heavy cream for extra richness)
1/2 teaspoon vanilla extract
Instructions
Step 1: Preheat the Oven
Preheat your oven to 350°F (175°C). Line an 8×8-inch baking pan with parchment paper, leaving some overhang for easy removal.
Step 2: Make the Base
In a large mixing bowl, combine the melted butter, granulated sugar, and brown sugar. Stir until smooth and glossy. Beat in the egg and vanilla extract until fully incorporated. Add the flour, baking powder, and salt. Mix just until the dough comes together. The dough will be thick and sticky, which is exactly what you want.
Step 3: Assemble the Layers
Press two-thirds of the dough evenly into the bottom of the prepared pan to form the base. In a small bowl, mix the softened butter, brown sugar, and cinnamon together until it forms a spreadable filling. Evenly spread the cinnamon mixture over the base layer. Crumble the remaining dough over the cinnamon layer; it’s okay if there are gaps as the dough will spread while baking.
Step 4: Bake
Bake for 25 to 30 minutes, or until the edges turn a light golden brown and the center looks set. Allow the bars to cool completely in the pan before adding the glaze to avoid melting.
Step 5: Make the Glaze
In a small bowl, whisk together the powdered sugar, milk, and vanilla extract until smooth. Adjust the consistency by adding more milk if you prefer a thinner drizzle or more sugar if you like a thicker glaze.
Step 6: Finish and Serve
Drizzle the glaze generously over the cooled bars. Once the glaze sets slightly, slice into squares and serve.
Notes
For an extra decadent touch, sprinkle a few chopped pecans or walnuts over the cinnamon filling before adding the crumbled dough. If you prefer a less sweet version, you can slightly reduce the amount of sugar in the base or the glaze. Store leftovers in an airtight container at room temperature for up to three days or refrigerate for a slightly firmer texture. These bars are also delicious slightly warmed with a scoop of vanilla ice cream.

