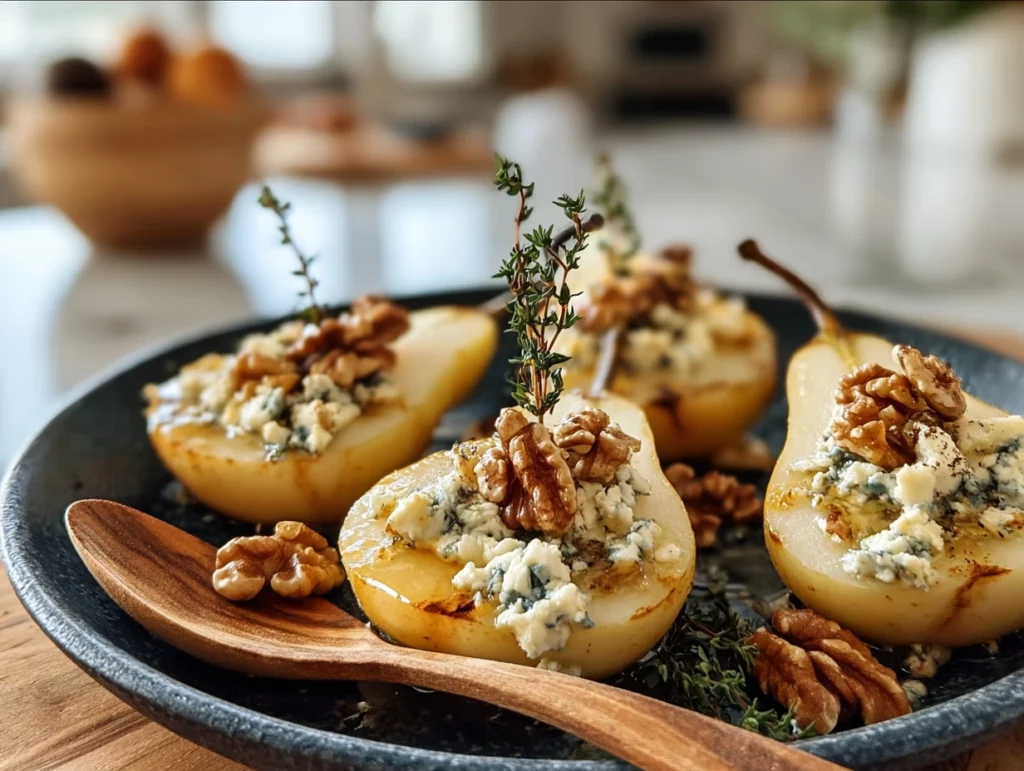
If you’re anything like me, you probably have a go-to recipe (or two) you pull out whenever you’re hosting, attending a potluck, or just want to impress someone with minimal effort. And let me tell you—these Elegant Blue Cheese Stuffed Pears are exactly that kind of recipe. They look like they belong on the menu of a five-star restaurant, but they’re surprisingly easy to make right in your own kitchen.
I remember the first time I served these at a small dinner party. Everyone paused mid-bite and gave me that “you seriously made this?” look. It’s that perfect combination of sweet, savory, creamy, and crunchy that makes this dish such a standout. The blue cheese brings a bold richness, the pears add a juicy sweetness, and the toasted nuts give it the crunch it needs to feel complete. And then there’s that final drizzle of honey—just enough to tie it all together.
This recipe works beautifully as a fancy starter, a wine night snack, or even a light side dish for a fall or winter meal. Bonus points? You only need a handful of ingredients and about 15 minutes of oven time. It’s classy without being complicated—my favorite kind of cooking.
Let’s dive in and get these beauties in the oven.

Ingredients You’ll Need
2 ripe but firm pears (Bosc or Anjou work best)
4 ounces blue cheese, crumbled
¼ cup chopped walnuts or pecans, toasted
2 teaspoons honey
Fresh thyme leaves (optional, for garnish)
Lemon juice (for brushing the pears)
STEP-BY-STEP INSTRUCTIONS
Step 1: Preheat and Prep
First things first—preheat your oven to 375°F (190°C). While that’s heating, go ahead and prep your pears. You’ll want them ripe but still firm enough to hold their shape while baking. Slice each pear in half lengthwise, and use a spoon or melon baller to gently scoop out the core.
Here’s a little tip: if the cavities seem a bit shallow, scoop just a little extra flesh out of the center. This will give you more room for the filling.
Now, to keep the pears from browning, lightly brush the cut sides with a bit of lemon juice. It doesn’t affect the flavor and keeps them looking beautiful and fresh.
Step 2: Assemble in the Baking Dish
Next, place your pear halves cut side up in a baking dish. If they wobble a bit, you can slice a tiny sliver off the bottom of each one to help them sit flat. Now it’s time for the fun part—filling those centers with crumbled blue cheese.
Don’t be shy with the cheese! You want each bite to have a bold, creamy flavor. Use about 1 ounce of blue cheese per pear half, pressing it in gently so it doesn’t spill over too much.

Step 3: Add the Toasted Nuts
Once the cheese is nestled in, sprinkle each pear with your toasted nuts. You can use either walnuts or pecans here—whatever you prefer or have on hand. If you haven’t toasted them yet, just toss them in a dry skillet over medium heat for a few minutes until they’re fragrant and slightly golden. It makes a big difference in flavor.
At this point, your kitchen is going to smell amazing, and you haven’t even put anything in the oven yet.
Finishing the Elegant Blue Cheese Stuffed Pears and Tips for Serving
Now that our pear halves are filled and topped with those golden, toasted nuts, it’s time to bring everything together with a quick bake and a few simple finishing touches. This is the moment where all the flavors soften, melt, and mingle—and trust me, your kitchen will smell incredible.
What I love most about this recipe is how effortless it feels once it’s in the oven. You’ve already done the prep, and the rest just happens while you clean up or set the table. Whether you’re serving these pears at a dinner party or enjoying them as a cozy evening snack, this next part will make them truly shine.
Let’s get to it.

Step 4: Bake the Pears
With the pears assembled in the baking dish, go ahead and slide them into your preheated oven at 375°F (190°C). Bake for 10 to 12 minutes, just until the cheese begins to melt and the pears are warmed through.
You’re not looking for the pears to get overly soft here—you still want them to hold their shape. The goal is a gentle bake that enhances their natural sweetness and gives the cheese just enough time to become creamy and slightly gooey.
Step 5: Drizzle with Honey and Garnish
Once they’re done baking, carefully remove the pears from the oven and let them sit for a minute or two. Then comes one of the most satisfying parts: drizzling each pear half with honey.
The honey adds a beautiful layer of sweetness that balances the boldness of the blue cheese. Use about ½ teaspoon per pear half, and feel free to adjust based on how sweet or tangy you want the final result to be.
For a finishing touch, sprinkle a few fresh thyme leaves over the top. It’s optional, but I find the thyme brings a nice earthiness that complements the other flavors without overpowering anything.
Tips for Success and Easy Variations
This dish is all about balance—sweet, savory, creamy, crunchy—and once you get the hang of it, there’s a lot of room to experiment and customize based on your preferences or what you have in the pantry.
Here are a few tips and variations that I’ve found helpful over the years:
Choosing the Right Pears: Bosc and Anjou pears are your best bet for baking because they hold their shape well. Just make sure they’re ripe but still firm to the touch.
Go Nuts (or Not): If you’re not a fan of walnuts or pecans, try using slivered almonds or even pistachios. Toasting the nuts is key—it deepens their flavor and makes the texture more satisfying.
Try a Savory Twist: For a more savory take, add a pinch of cracked black pepper before baking. Or, once they’re out of the oven, drizzle a little balsamic glaze over the top instead of honey.
Play with the Cheese: Blue cheese brings a bold flavor, but if it’s a bit too strong for your taste, try using gorgonzola dolce (a creamier, milder version) or a mix of blue cheese and goat cheese.
Serving Suggestions: These pears make an elegant starter, but they also pair beautifully with a glass of chilled white wine or as part of a charcuterie board. You can even slice them and toss them into a salad with arugula and a light vinaigrette for a next-level lunch.
FAQ and Final Thoughts on Elegant Blue Cheese Stuffed Pears
Before we wrap up, I wanted to cover a few common questions I’ve gotten over the years when making or serving these Elegant Blue Cheese Stuffed Pears. Whether you’re trying this for the first time or are already planning your second batch, these quick answers should help make the process smooth and stress-free.

FREQUENTLY ASKED QUESTIONS
1. Can I make these stuffed pears ahead of time?
Yes, you can assemble the pears a few hours ahead—just hold off on baking them until you’re ready to serve. Keep them in the fridge, covered, and let them come to room temperature before baking.
2. What type of blue cheese works best for this recipe?
I recommend a creamy, crumbly blue cheese like Danish Blue or Gorgonzola. If you want something a bit milder, Gorgonzola Dolce is a great option. Stilton also works well for a stronger flavor.
3. Do I have to toast the nuts?
Technically no, but it’s highly recommended. Toasting the nuts brings out their flavor and gives them a better crunch. It only takes a few minutes in a dry skillet—totally worth the extra step.
4. Can I use pears that are overripe?
It’s best to stick with firm-ripe pears like Bosc or Anjou. Overripe pears tend to get mushy when baked and won’t hold their shape as well.
5. What can I use instead of honey for a different flavor?
Balsamic glaze is a great alternative for a more savory, tangy finish. Maple syrup also works if you prefer a deeper sweetness.
6. Are there any dairy-free options for this recipe?
You can try a plant-based blue cheese alternative or even a cashew-based creamy cheese. The texture and flavor will be different, but still delicious.
7. How should I serve these at a party?
Serve the pears warm or at room temperature on a platter. You can also slice them into wedges for bite-sized appetizers. Add a few sprigs of thyme and some extra toasted nuts on the platter for a polished look.
Final Thoughts
Elegant, easy, and endlessly adaptable—these Blue Cheese Stuffed Pears are the kind of dish that makes you look like a kitchen pro without actually requiring a ton of effort. That’s honestly my favorite kind of recipe. It’s all about smart pairings: the natural sweetness of the pear, the richness of the cheese, the earthy crunch from toasted nuts, and a touch of honey to finish.
Whether you’re hosting a fall dinner, looking to bring something impressive to a potluck, or just treating yourself to something a little special on a weeknight, this recipe fits the bill. And once you try it, you’ll see why it’s one of those go-to recipes that people remember long after the plates are cleared.
Print
Elegant Blue Cheese Stuffed Pears
- Author: Andrew Recipes
Description
Elegant Blue Cheese Stuffed Pears are a sophisticated appetizer or light side dish that combines sweet, juicy pears with the bold tang of blue cheese, balanced by the crunch of nuts and a drizzle of honey. This dish is perfect for entertaining or adding a touch of refinement to a meal. The contrast of flavors and textures makes each bite memorable and satisfying.
Ingredients
2 ripe but firm pears, halved and cored
4 ounces blue cheese, crumbled
¼ cup chopped walnuts or pecans, toasted
2 teaspoons honey
Fresh thyme leaves (optional, for garnish)
Lemon juice (for brushing)
Instructions
Preheat the oven to 375°F (190°C). Lightly brush the cut sides of the pear halves with lemon juice to prevent browning.
Place the pear halves, cut side up, in a baking dish. Use a small spoon or melon baller to deepen the cavity slightly if needed.
Fill each pear center with crumbled blue cheese, pressing it in gently. Sprinkle toasted nuts on top of the cheese.
Bake for 10-12 minutes, or until the pears are warmed through and the cheese is slightly melted.
Remove from the oven and transfer to serving plates. Drizzle each pear half with honey and garnish with fresh thyme leaves if desired.
Notes
For a more savory variation, add a pinch of cracked black pepper or a few drops of balsamic glaze. These pears pair wonderfully with a glass of white wine or as an accompaniment to a charcuterie board. Use Bosc or Anjou pears for the best texture when baked.

