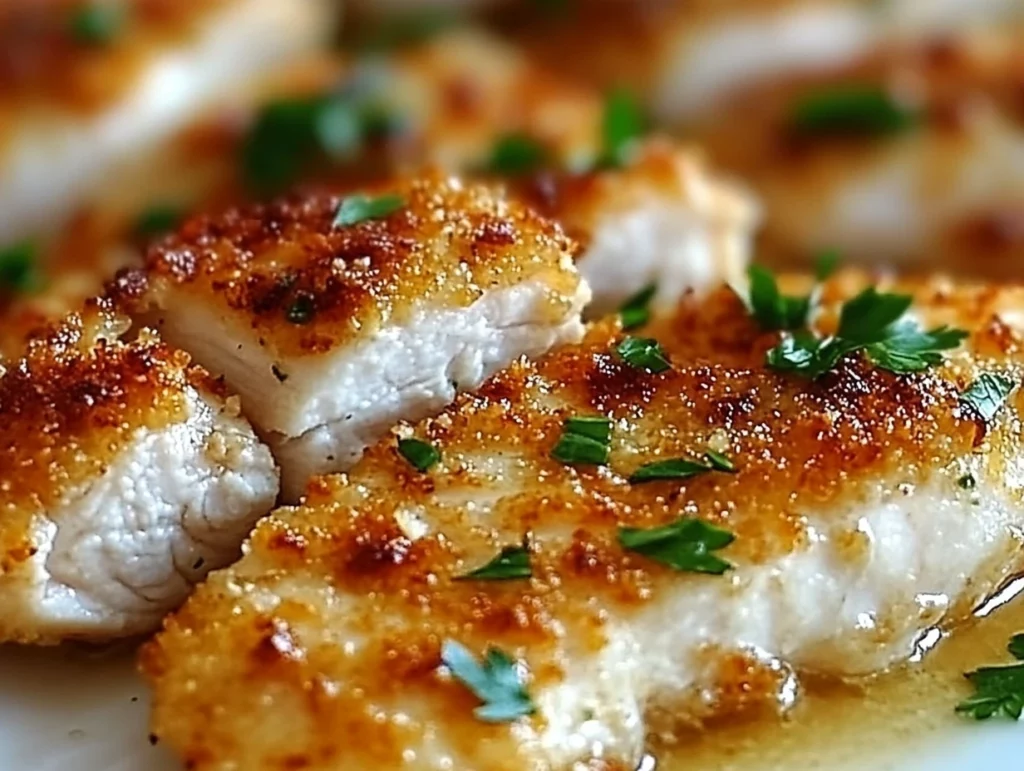
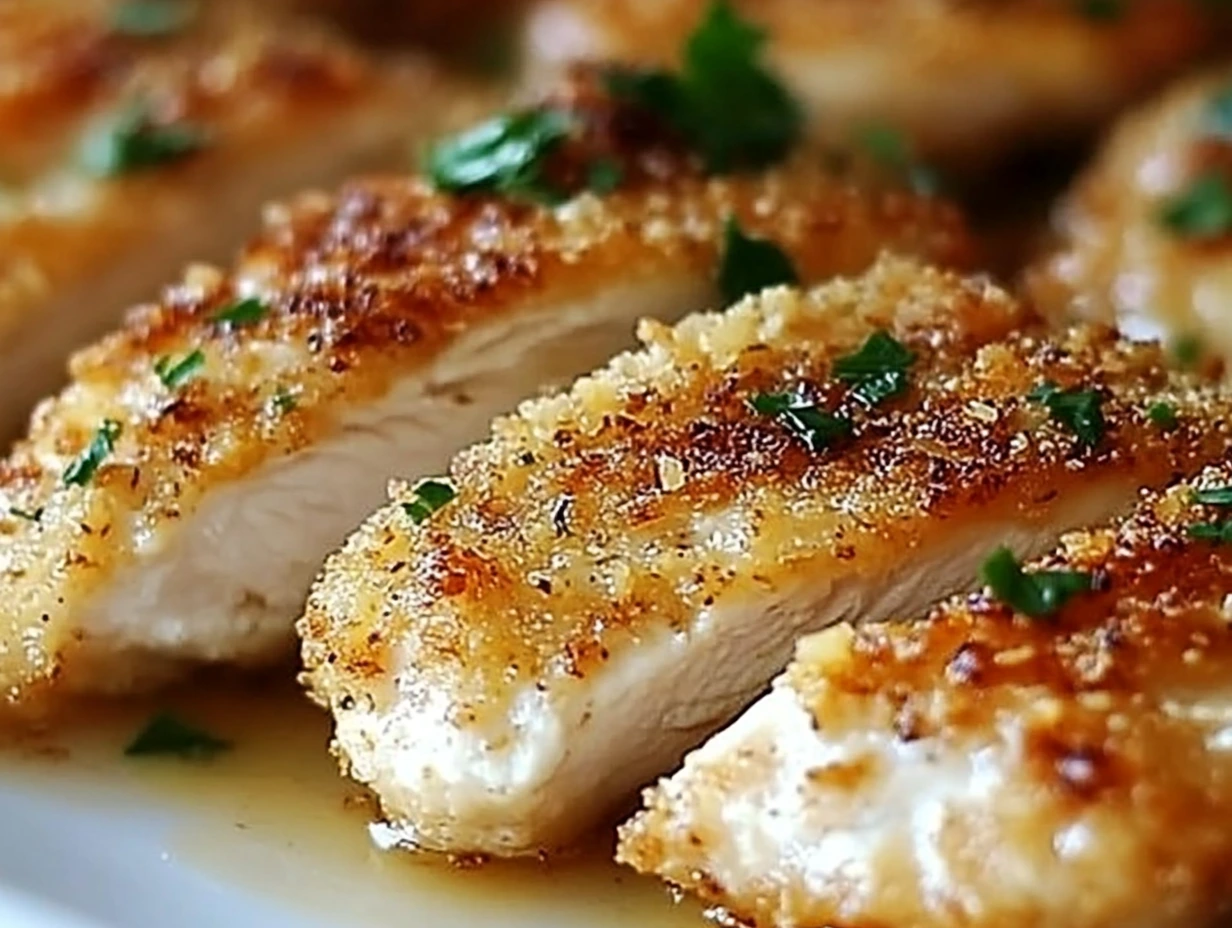
There’s something about crispy, golden-brown chicken that just makes everything feel right. It’s the kind of comfort food that’s perfect for a busy weeknight dinner or when you’re looking to impress your guests without spending hours in the kitchen. This Garlic Parmesan Crusted Chicken does just that—it’s easy to make, packed with flavor, and has the perfect balance of crunchy crust and juicy chicken. Whether you’re serving it with a side of pasta, a fresh salad, or roasted vegetables, this dish is sure to become a family favorite.
I first made this recipe on a busy Thursday evening when I wanted something quick but also a little special. I had chicken breasts in the fridge, and I was craving something crispy but with rich, savory flavors. I had a few simple ingredients like Parmesan cheese and breadcrumbs on hand, and I decided to experiment. Let me tell you—this recipe has since become a regular in our meal rotation. It’s that good!
So, if you’re in the mood for crispy, cheesy chicken with an irresistible garlic kick, you’ve come to the right place. Let’s dive into the recipe and get started!
Ingredients You’ll Need
Before you get your hands dirty, here’s a quick rundown of the ingredients. I love that this recipe uses simple pantry staples, but together they create something truly special.
4 boneless, skinless chicken breasts (make sure they’re pounded to an even thickness)
1/2 cup grated Parmesan cheese (the key to that delicious, savory crust)
1/2 cup breadcrumbs (Panko works great if you’re craving extra crunch!)
1 teaspoon garlic powder (for that irresistible garlic flavor)
1 teaspoon Italian seasoning (a must for a little herby goodness)
1/2 teaspoon smoked paprika (optional, but highly recommended for a smoky depth)
1/2 teaspoon salt (to bring it all together)
1/4 teaspoon black pepper (to taste)
1/4 cup all-purpose flour (for dredging)
2 large eggs, beaten (to help everything stick)
2 tablespoons olive oil (for frying and crisping)
Chopped parsley, for garnish (just a little something fresh to finish it off)
Step-by-Step Instructions:
Now that we have everything ready, let’s jump into the steps. Don’t worry—it’s easier than you think!
1. Preheat Your Oven
Start by preheating your oven to 375°F (190°C). Line a baking sheet with parchment paper or lightly grease it. This will ensure that your chicken doesn’t stick while baking and that it crisps up nicely in the oven.
2. Set Up Your Breading Station
A breading station is your secret weapon for making sure the crust sticks to the chicken and comes out golden and crispy. Here’s how to set it up:
In one shallow bowl, place the flour.
In another shallow bowl, beat the eggs.
In a third bowl, combine the Parmesan cheese, breadcrumbs, garlic powder, Italian seasoning, smoked paprika, salt, and black pepper. This will be your flavorful coating.
I like to set everything up in advance, so it’s easy to just dip and coat the chicken without any hassle. Trust me, it makes the process so much smoother!

3. Prep the Chicken
Use paper towels to pat the chicken breasts dry. This helps the breading adhere better and prevents the chicken from steaming when it cooks. Once dry, dredge each chicken breast through the flour, shaking off any excess. Then, dip it into the beaten eggs, making sure the chicken is fully coated, but not dripping wet. Finally, press the chicken into the Parmesan-breadcrumb mixture, ensuring that it’s evenly coated on all sides. This is where all the flavor lives, so make sure to get a nice, thick coating.
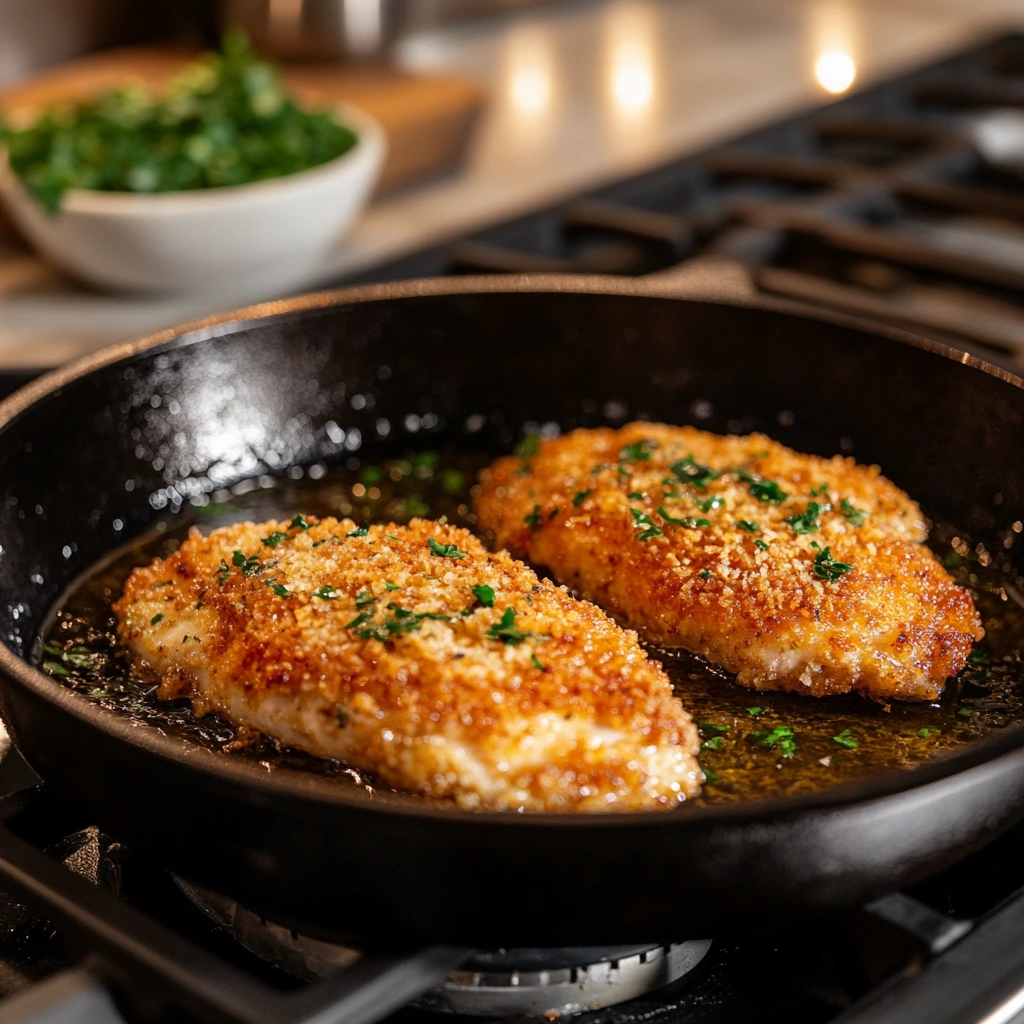
4. Fry the Chicken
In a large skillet, heat the olive oil over medium heat. Once hot, add the breaded chicken to the skillet and cook for 2-3 minutes per side or until the chicken is golden brown and crispy. If you have a large skillet, you can cook all the pieces at once. If not, it’s totally okay to work in batches to avoid overcrowding the pan.
The key here is to let the chicken get that nice, golden exterior, which will give it that satisfying crunch once it’s baked. Don’t rush this step—it’s all about getting that crispy crust!
5. Bake the Chicken
After frying the chicken, transfer it to the prepared baking sheet. Pop it in the oven and bake for 15-20 minutes, or until the internal temperature reaches 165°F (74°C). This step ensures the chicken is cooked all the way through while keeping it juicy on the inside.
Let the chicken rest for 5 minutes before serving. This helps the juices redistribute inside the chicken, making it even juicier.
6. Garnish and Serve
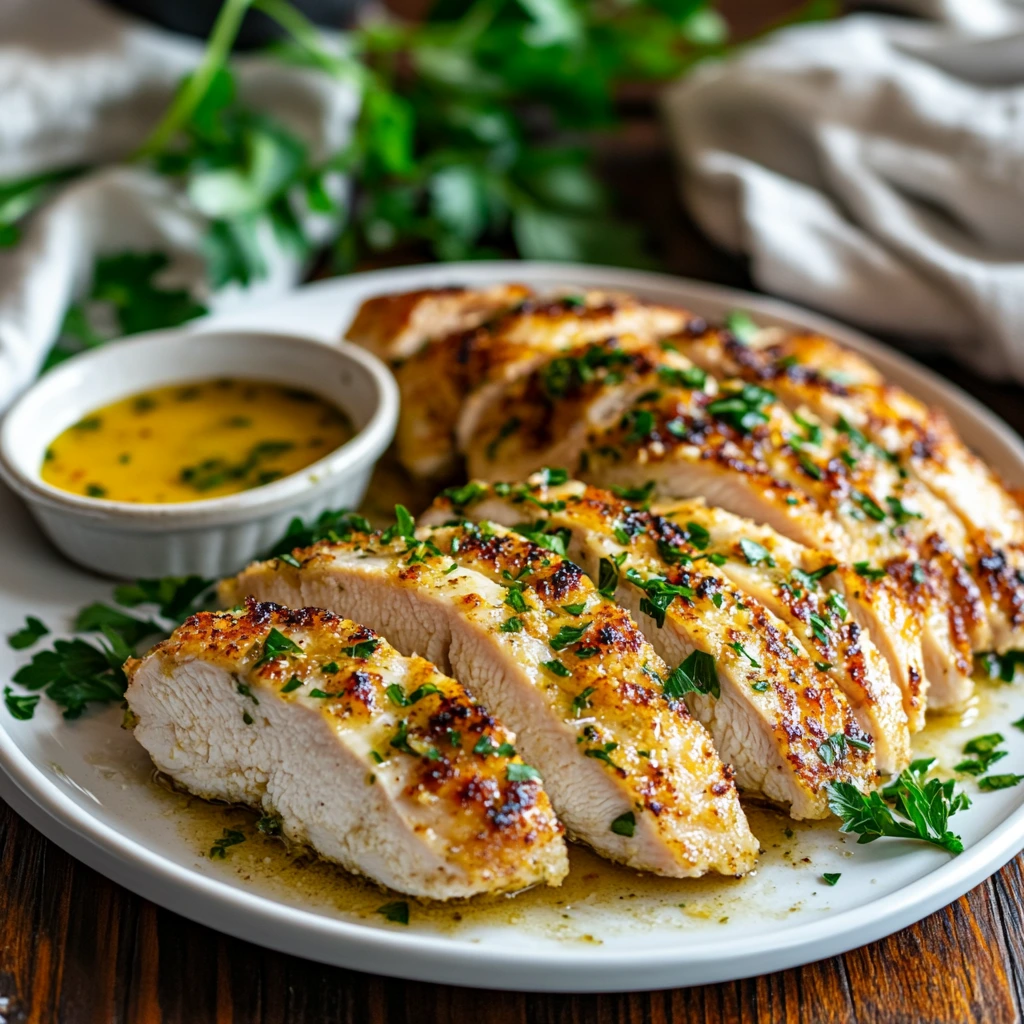
Finish off the chicken with a sprinkle of chopped parsley for a fresh pop of color and flavor. Then, it’s time to serve! You can pair it with whatever sides you like—pasta, roasted vegetables, or a crisp salad all make great accompaniments.
And that’s it! You’ve got yourself a beautiful plate of Garlic Parmesan Crusted Chicken that’s crispy, juicy, and absolutely packed with flavor. I promise, once you try this recipe, it’ll be a go-to for any night you need something tasty, but not too time-consuming.
Extra Tips and Tricks for the Best Garlic Parmesan Crusted Chicken
Here are some little hacks to ensure that your chicken turns out even better than expected:
Even Thickness: If your chicken breasts are uneven in thickness, you may end up with some pieces overcooked and others undercooked. Use a meat mallet or rolling pin to pound the chicken to an even thickness. This will ensure everything cooks evenly and stays juicy.
Use Panko for Extra Crispiness: I love using Panko breadcrumbs in this recipe because they give the chicken that extra crunch. If you’re using regular breadcrumbs, you’ll still get a great result, but Panko will definitely make it extra crispy, which adds to the overall texture and appeal.
Try Adding a Little Cheese to the Coating: If you’re a fan of cheese (who isn’t?), try adding a little extra grated Parmesan directly into the breadcrumb mixture. This will make the crust even more flavorful and cheesy, which is never a bad thing!
Preheat the Skillet: It’s important to heat the skillet before adding the chicken. If the pan isn’t hot enough, the breading will stick to the pan instead of crisping up. Aim for medium heat and give the oil time to heat up before adding the chicken.
Don’t Skip the Resting Time: After you take the chicken out of the oven, let it rest for 5 minutes. This allows the juices to redistribute inside the chicken, making it more tender and flavorful when you cut into it.
Step-by-Step Instructions:
Now, let’s continue with the remaining steps of the recipe!
7. Serve and Pair It With Delicious Sides
Once your chicken is all golden and crispy, it’s time to serve it! This dish is so versatile, and there are plenty of ways to pair it with sides that complement the savory flavors.
Here are a few of my favorite sides to serve with Garlic Parmesan Crusted Chicken:
Pasta: A simple pasta with a light garlic butter sauce or marinara goes perfectly with the crispy chicken. The sauce can help balance the crunch of the chicken, and the flavors of garlic and Parmesan work so well together.
Roasted Vegetables: Think roasted broccoli, carrots, or Brussels sprouts. The roasted vegetables provide a nice contrast to the richness of the chicken and add a healthy touch to the meal.
Fresh Salad: A crisp salad with mixed greens, cherry tomatoes, and a tangy vinaigrette makes for a fresh and light side to pair with this flavorful chicken.
Mashed Potatoes: Creamy mashed potatoes are always a hit and are a fantastic comfort food pairing with the crispy, cheesy chicken.
8. Make it Your Own
While this recipe is absolutely delicious as is, it’s also super versatile. Feel free to experiment and make it your own! Here are a few variations to consider:
Spicy Garlic Parmesan: Add some red pepper flakes to the breading mix for a spicy kick. It’ll give the dish a nice heat that balances the richness of the Parmesan and garlic.
Lemon Garlic Parmesan: Add the zest of one lemon to the breadcrumb mixture for a bright, citrusy flavor that pairs perfectly with the garlic and Parmesan. A squeeze of fresh lemon juice over the chicken before serving adds an extra burst of freshness.
Cheesy Herb Crust: For even more cheesy goodness, try adding a mix of mozzarella and Parmesan to the breadcrumb mixture. This will create an extra cheesy crust that’ll have everyone asking for seconds.
Important Tips for Success
Before we wrap up the cooking instructions, here are a few final things to keep in mind:
Monitor the Temperature: Make sure your oven is preheated to the right temperature, and always check the internal temperature of the chicken with a meat thermometer to ensure it’s fully cooked. 165°F (74°C) is the sweet spot for juicy, tender chicken that’s perfectly cooked through.
Avoid Overcrowding the Skillet: When frying the chicken, don’t overcrowd the pan. You want each piece to have enough space to get crispy on all sides. If needed, cook the chicken in batches.
Resting Time Is Key: Don’t skip the 5-minute resting period after baking. This helps lock in all the juices and gives you a nice, tender result.
FAQ Section and Conclusion
We’ve covered the basics, and I’m sure you’re eager to dive in and make this delicious Garlic Parmesan Crusted Chicken! Before you do, though, let’s tackle some common questions that may come up during the cooking process. This FAQ section should help clear up any uncertainties and give you even more confidence in the kitchen. After that, I’ll wrap things up with some final thoughts and encourage you to give this dish a try!
Frequently Asked Questions
1. Can I use chicken thighs instead of chicken breasts?
Yes, you can absolutely use boneless, skinless chicken thighs for this recipe. They’re slightly juicier and more forgiving than chicken breasts, so you might find they stay even more tender. Just adjust the cooking time slightly, as thighs can take a little longer to cook through. You’ll want to make sure the internal temperature reaches 165°F (74°C) to ensure they’re fully cooked.
2. Can I prepare the chicken ahead of time?
Absolutely! You can bread the chicken and store it in the fridge for up to 24 hours before cooking. This can actually help the breading adhere better and gives the chicken more time to absorb the flavors. Just be sure to cover the breaded chicken with plastic wrap or store it in an airtight container to keep it fresh.
3. What can I use if I don’t have breadcrumbs?
If you don’t have breadcrumbs on hand, crushed crackers (like saltines or Ritz) work great as a substitute. You can also use crushed cornflakes or even oats if you’re looking for a more rustic texture. If you’re trying to keep it gluten-free, there are plenty of gluten-free breadcrumbs available, or you can use ground almonds or rice flour.
4. Can I make this recipe without frying the chicken?
Yes, if you’d prefer to skip frying, you can bake the chicken entirely in the oven! After breading the chicken, place it on the prepared baking sheet and bake it at 375°F (190°C) for 25-30 minutes or until the chicken reaches an internal temperature of 165°F (74°C). You won’t get quite the same crispy fried texture, but it will still be delicious and a bit lighter.
5. How do I know when the chicken is cooked through?
The best way to check if your chicken is cooked through is by using a meat thermometer. Insert the thermometer into the thickest part of the chicken breast, and if it reads 165°F (74°C), your chicken is done! If you don’t have a thermometer, you can cut into the thickest part of the chicken, and the juices should run clear, not pink.
6. Can I freeze the breaded chicken?
Yes, you can freeze the breaded chicken before frying. To do this, place the breaded chicken breasts on a baking sheet and freeze them for 1-2 hours until solid. Then, transfer them to a freezer-safe bag or container. When you’re ready to cook, you can fry or bake them directly from frozen—just add a few extra minutes to the cooking time.
7. How can I make this dish spicier?
If you like a bit of heat, try adding red pepper flakes or a little cayenne pepper to the breadcrumb mixture. You could also serve the chicken with a spicy dipping sauce, like a sriracha mayo or buffalo sauce, to add an extra kick. Spice up the garlic flavor with a touch of chili powder if you prefer a smoky heat.
Conclusion: A Dish to Impress and Enjoy
There you have it! Now you know all the ins and outs of making the perfect Garlic Parmesan Crusted Chicken—from the crispy, flavorful coating to the juicy chicken inside. It’s the kind of dish that can be whipped up in no time but still feels special enough for any occasion. Whether you’re feeding your family on a busy weeknight or looking to impress guests with minimal effort, this recipe has you covered.
One of the best things about this dish is its versatility. It pairs wonderfully with so many different sides, so you can tailor it to your family’s tastes or whatever you have on hand. Plus, the chicken stays juicy and flavorful while having that irresistible crunchy crust. Seriously, who can resist that combo?
I highly recommend you give this recipe a try. It’s quick, easy, and sure to become one of your go-to weeknight meals. Don’t forget to share your own twist on it in the comments below—I’d love to hear how it turns out for you!
Now, go ahead, get cooking, and enjoy that crispy, cheesy goodness! Happy cooking!
Print
Garlic Parmesan Crusted Chicken
- Author: Andrew Recipes
Description
This Garlic Parmesan Crusted Chicken is crispy on the outside, juicy on the inside, and packed with bold flavors from garlic, Parmesan, and Italian herbs. The perfect balance of crunch and tenderness makes it a great option for an easy weeknight dinner or a special meal. Serve it with a side of pasta, salad, or roasted vegetables for a complete dish.
Ingredients
4 boneless, skinless chicken breasts (pounded to an even thickness)
1/2 cup grated Parmesan cheese
1/2 cup breadcrumbs (Panko for extra crispiness)
1 teaspoon garlic powder
1 teaspoon Italian seasoning
1/2 teaspoon smoked paprika (optional)
1/2 teaspoon salt
1/4 teaspoon black pepper
1/4 cup all-purpose flour
2 large eggs, beaten
2 tablespoons olive oil (for frying)
Chopped parsley, for garnish
Instructions
Preheat the oven to 375°F (190°C) and line a baking sheet with parchment paper or lightly grease it.
Set up a breading station by placing the flour in one shallow bowl, beaten eggs in another, and a mixture of Parmesan cheese, breadcrumbs, garlic powder, Italian seasoning, smoked paprika, salt, and black pepper in a third.
Pat the chicken breasts dry with paper towels. Dredge each piece in the flour, shaking off any excess, then dip into the beaten eggs, letting any extra drip off. Finally, press the chicken into the Parmesan-breadcrumb mixture, ensuring an even coating on all sides.
Heat olive oil in a large skillet over medium heat. Add the breaded chicken and cook for 2–3 minutes per side, or until golden brown. Work in batches if necessary to avoid overcrowding the pan.
Transfer the browned chicken to the prepared baking sheet and bake for 15–20 minutes, or until the internal temperature reaches 165°F (74°C).
Notes
Let the chicken rest for 5 minutes before serving. Garnish with chopped parsley and enjoy hot with your favorite sides.

