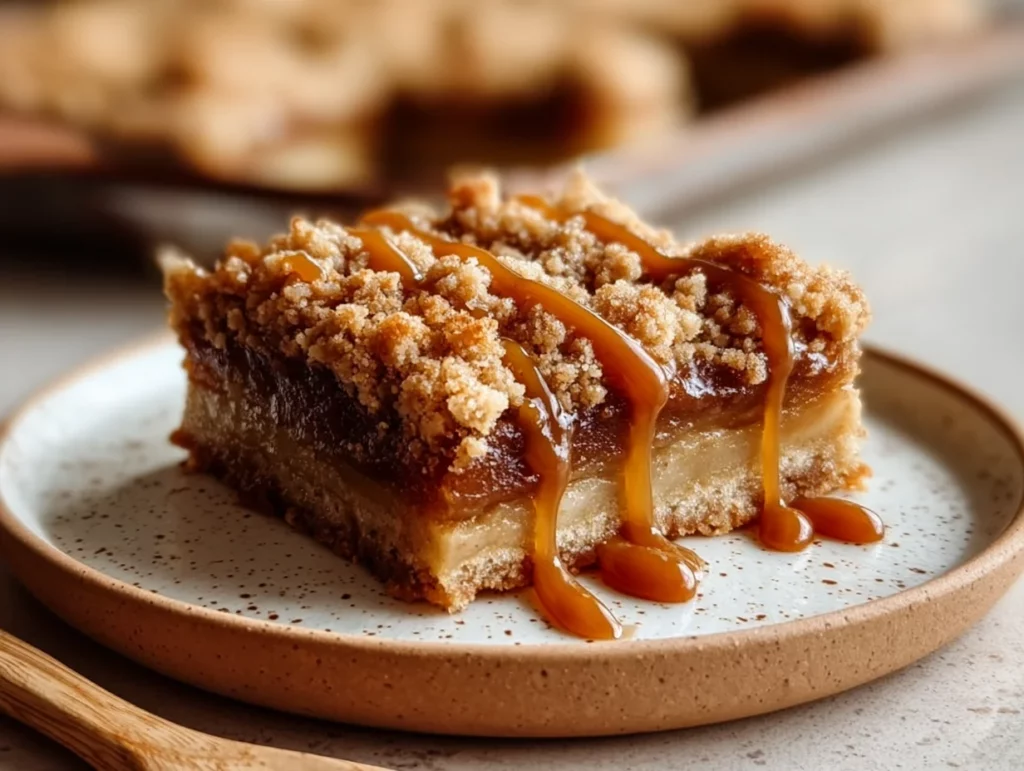
There’s something undeniably magical about the combination of buttery shortbread, warm spiced apples, and rich salted caramel. When the leaves start to turn and there’s that unmistakable chill in the air, I always find myself craving cozy, comforting desserts—and these Salted Caramel Apple Bars hit every single note.
They’re like a warm hug wrapped in pastry. The kind of dessert that makes you pause mid-bite, close your eyes, and savor every single layer. And let me tell you—these bars are so much easier to make than they look.
I first made a version of these for a small family get-together, and within minutes, the plate was empty. Ever since, they’ve become my go-to fall treat for potlucks, Thanksgiving spreads, or even just a weekend baking session when I want the house to smell amazing.
With a buttery shortbread crust that holds everything together, a gooey apple center spiced with cinnamon, and a homemade salted caramel that brings just the right touch of indulgence—this dessert truly feels special.
Let’s get baking!
Ingredients You’ll Need
For the crust and topping:
1 cup unsalted butter, softened
½ cup granulated sugar
2 cups all-purpose flour
¼ teaspoon salt
For the apple filling:
3 medium apples, peeled, cored, and finely diced
2 tablespoons granulated sugar
1 teaspoon cinnamon
1 tablespoon all-purpose flour
For the salted caramel:
½ cup granulated sugar
3 tablespoons unsalted butter
¼ cup heavy cream
½ teaspoon sea salt
STEP 1: Prep the Baking Pan and Make the Crust
Start by preheating your oven to 350°F (175°C). Line a 9×9-inch baking pan with parchment paper, making sure there’s a bit of overhang on the sides—this makes removing the bars so much easier once they’re cooled.
In a large mixing bowl, cream together the softened butter and sugar until the mixture is light and fluffy. This will take about 2-3 minutes with an electric mixer. You want to make sure it’s nicely whipped before moving on.
Next, add in the flour and salt and mix until a crumbly dough starts to form. It might look a bit dry at first, but keep mixing—it’ll come together.
Take about two-thirds of the dough and press it firmly into the bottom of your prepared pan. You want an even, compact layer here since it forms the base of the bars. Set aside the remaining dough for the topping—we’ll use that later.
Pop the crust into the oven and bake for 12 to 14 minutes, just until the edges start turning golden. Don’t overbake at this stage—we’re going to put it back in the oven later, so this is just the pre-bake to give it a head start.
Once it’s done, take it out and let it cool slightly while you move on to the apple filling.

STEP 2: Make the Apple Filling
While the crust is baking, go ahead and get your apples ready. You’ll want to use firm, tart apples like Granny Smith or Honeycrisp—they hold their shape and give a great balance to the sweetness of the caramel.
After peeling, coring, and dicing the apples, toss them in a bowl with the granulated sugar, cinnamon, and flour. The flour helps absorb any excess juice from the apples while they bake, keeping the crust from getting soggy.
Give everything a good stir until the apples are nicely coated and set the mixture aside while you whip up the caramel.
STEP 3: Make the Salted Caramel
Now comes the showstopper: the homemade salted caramel. Don’t let this part intimidate you—it’s actually pretty simple as long as you keep an eye on it and move quickly.
In a medium saucepan over medium heat, add the granulated sugar and stir constantly. The sugar will start to clump, then melt into a smooth liquid. Keep stirring until it reaches a deep amber color—this is when the flavor really develops.
Once the sugar is fully melted and amber-colored, whisk in the butter. Be careful here—it’ll bubble up quite a bit. Then slowly pour in the heavy cream while whisking, and keep stirring until the mixture is completely smooth and glossy.
Take it off the heat and stir in the sea salt. And just like that—you’ve got rich, silky, salted caramel that you’ll be tempted to eat straight from the spoon.

Irresistible Salted Caramel Apple Bars: The Perfect Fall Dessert
Welcome back! By now, your kitchen probably smells incredible—between the buttery shortbread crust and that rich salted caramel, it’s already starting to feel like fall in the best possible way. In this part of the recipe, we’re going to pull everything together: layering the apple filling, adding that gooey caramel, and baking the bars to golden perfection. I’ll also share a few tips to help you get the texture just right and make sure your bars hold together beautifully.
Let’s get into it!
STEP 4: Assemble the Bars
With your crust slightly cooled and the apple mixture ready to go, it’s time to build these bars.
Spread the apple mixture evenly over the crust, making sure you get the apples all the way to the edges. Press them down lightly to create an even layer. The natural juices from the apples will soak just a bit into the crust, keeping everything moist but still crisp on the bottom.
Next, drizzle about two-thirds of the salted caramel sauce over the apples. You don’t have to be exact here, but try to cover most of the surface. The remaining caramel will be used later for a final drizzle, so be sure to set that aside.
Now for the finishing touch before baking—take the reserved one-third of the shortbread dough and crumble it over the top of the apple and caramel layers. You can do this by hand, just pinching off pieces and sprinkling them evenly across the surface. This creates that beautiful crumbly topping with just the right amount of golden crunch.
STEP 5: Bake to Perfection
Place the assembled bars back into your preheated oven and bake for 30 to 35 minutes, or until the top is lightly golden and the apple filling is bubbling around the edges.
Keep an eye on them around the 30-minute mark. You’re looking for the top to be set and golden brown, but not overly dark. The bubbling edges are your sign that the caramel and apples have married beautifully underneath.
Once baked, remove the pan from the oven and let the bars cool completely—this is super important if you want clean slices. I know it’s tempting to cut into them right away, but letting them cool allows the layers to set and makes it easier to lift them out of the pan without everything falling apart.
STEP 6: Drizzle and Serve
Once cooled, use the parchment paper to lift the bars out of the pan, and place them on a cutting board. From here, cut them into squares—any size you like. I usually go with 16 smaller squares or 9 bigger ones if I’m serving them as more of a plated dessert.
Before serving, drizzle the remaining salted caramel sauce over the top of the bars. You can rewarm the caramel slightly if it’s thickened too much—just 10 to 15 seconds in the microwave will do the trick.
And just like that, you’ve got rich, gooey, buttery bars packed with all the cozy flavors of fall.
Tips for Best Results
Choose the right apples: Firm varieties like Granny Smith, Honeycrisp, or Pink Lady work best. They hold their shape and bring a nice tartness to balance the sweetness of the caramel.
Don’t rush the caramel: It’s tempting to crank up the heat to make the sugar melt faster, but slow and steady wins here. Stir constantly and watch closely so it doesn’t burn.
Cool completely before slicing: I know it bears repeating, but this step is essential. If the bars are even slightly warm, they’ll fall apart when you try to cut them.
Store them properly: These bars hold up great in the fridge for up to five days. Just keep them in an airtight container, and they’ll taste even better the next day as the flavors meld together.
Serve warm or cold: These bars are delicious straight from the fridge for a firmer texture, or gently warmed in the microwave for that soft, gooey finish.
Fun Variations to Try
Want to make these bars your own? Here are a few simple ways to switch things up:
Add chopped pecans or walnuts to the topping for a nutty crunch.
Mix in a pinch of nutmeg or cloves with the apple filling for even more fall spice.
Use brown sugar instead of white in the caramel for deeper molasses flavor.
Top with a scoop of vanilla ice cream for the ultimate dessert experience.
Irresistible Salted Caramel Apple Bars: The Perfect Fall Dessert
We’ve made it to the final stretch, and if you’ve followed along so far, your kitchen has probably never smelled better. The buttery shortbread, cinnamon-kissed apples, and gooey caramel come together into something truly special—and surprisingly easy to pull off.
Before we wrap things up, let’s go through some of the most common questions that come up when making these bars. Whether you’re planning to make a big batch for a fall party or just want a cozy treat to enjoy with your morning coffee, these tips and answers will help you make the most out of every single bite.

FAQ: Your Salted Caramel Apple Bars Questions Answered
1. Can I make these bars ahead of time?
Yes, absolutely! In fact, they taste even better the next day after the flavors have had time to meld. You can make them a day or two in advance and store them in the refrigerator until you’re ready to serve.
2. What’s the best way to store leftovers?
Store the bars in an airtight container in the fridge for up to five days. You can layer them with parchment paper if you’re stacking them to keep the caramel from sticking.
3. Can I freeze these bars?
Yes, these bars freeze really well. After cooling completely, slice them and place them in a single layer in a freezer-safe container (or wrap individually). When you’re ready to enjoy, thaw them in the fridge overnight and warm them up slightly for best texture.
4. What kind of apples work best?
Firm, tart apples like Granny Smith, Honeycrisp, or Pink Lady are ideal. They hold their shape well during baking and provide a nice balance to the sweetness of the caramel.
5. My caramel hardened—what did I do wrong?
If your caramel turned out too hard, it might have been cooked too long or at too high a temperature. Be sure to remove it from the heat as soon as it reaches that rich amber color, and don’t skip adding the cream and butter slowly to keep it smooth.
6. Can I use store-bought caramel sauce instead of homemade?
Yes, you can use store-bought caramel in a pinch. However, homemade really makes a difference in flavor and texture. If you do use pre-made caramel, try to choose a high-quality one and warm it slightly before drizzling.
7. Do I need to peel the apples?
Peeling is recommended for the best texture. Apple skins can get chewy during baking, which may take away from the smooth, gooey texture of the filling.
Final Thoughts: Time to Bake These Bars!
If you’re looking for a cozy, crowd-pleasing dessert to carry you through the fall season (and honestly, beyond), these Salted Caramel Apple Bars are it. They’re simple enough to make on a quiet weekend afternoon but special enough to serve at a holiday gathering.
What I love most is how flexible and forgiving this recipe is. You don’t need any fancy tools or complicated techniques—just a handful of ingredients and a little bit of patience while everything bakes and cools. And the payoff? A layered dessert that checks every box: buttery, gooey, crisp, and comforting.
Whether you serve them chilled, at room temperature, or gently warmed with a scoop of vanilla ice cream, I guarantee these bars will earn a permanent spot in your fall baking lineup.
Print
Irresistible Salted Caramel Apple Bars
- Author: Andrew Recipes
Description
These Salted Caramel Apple Bars combine the warmth of cinnamon-spiced apples with a buttery shortbread crust and a gooey layer of homemade salted caramel. Each bite offers the perfect balance of sweet and salty, soft and crisp. They’re a comforting fall dessert that feels indulgent and homemade, ideal for sharing at gatherings or enjoying with a warm drink.
Ingredients
For the crust and topping
1 cup unsalted butter, softened
½ cup granulated sugar
2 cups all-purpose flour
¼ teaspoon salt
For the apple filling
3 medium apples, peeled, cored, and finely diced
2 tablespoons granulated sugar
1 teaspoon cinnamon
1 tablespoon all-purpose flour
For the salted caramel
½ cup granulated sugar
3 tablespoons unsalted butter
¼ cup heavy cream
½ teaspoon sea salt
Instructions
Preheat the oven to 350°F (175°C). Line a 9×9-inch baking pan with parchment paper, leaving a slight overhang for easy removal.
In a mixing bowl, cream together the softened butter and sugar until light and fluffy. Add the flour and salt, mixing until a crumbly dough forms. Press about two-thirds of the dough into the bottom of the prepared pan to form an even crust. Reserve the remaining dough for the topping.
Bake the crust for 12 to 14 minutes, or until just starting to turn golden around the edges. Remove from the oven and let it cool slightly.
While the crust is baking, prepare the apple filling. In a bowl, combine the diced apples, sugar, cinnamon, and flour. Mix until the apples are evenly coated.
To make the salted caramel, add the sugar to a medium saucepan over medium heat. Stir continuously until the sugar melts and turns a deep amber color. Carefully whisk in the butter until fully melted, then slowly add the cream. Continue stirring until smooth. Remove from heat and stir in the sea salt.
Spread the apple mixture evenly over the partially baked crust. Drizzle with about two-thirds of the salted caramel sauce. Crumble the reserved dough over the top.
Return the pan to the oven and bake for 30 to 35 minutes, or until the top is lightly golden and the filling is bubbling.
Allow the bars to cool completely in the pan before lifting them out and cutting into squares. Drizzle the remaining salted caramel over the top before serving.
Notes
Use firm apples like Granny Smith or Honeycrisp for the best texture and tartness. Be cautious when making caramel as the mixture gets extremely hot. These bars can be stored in the refrigerator for up to five days and taste even better the next day once the flavors have melded. Serve chilled or gently warmed for a soft, gooey finish.

