There’s something truly magical about the combination of tangy lemon and rich cream cheese. The way they come together in these Lemon Cream Cheese Bars is nothing short of perfection. The creamy filling, balanced with just the right amount of tartness from the lemon, sits atop a buttery graham cracker crust, creating a treat that is as refreshing as it is indulgent. Whether you’re preparing for a family get-together, a special occasion, or just looking for a sweet treat to brighten your day, these bars are sure to impress.
I first made these bars for a backyard BBQ last summer, and I couldn’t believe how quickly they disappeared! The refreshing citrus flavor combined with the creamy texture just hits all the right notes, making them the perfect dessert for warmer weather. And let’s not forget how easy they are to make – just a few simple steps and you’ll have a dessert everyone will be talking about. So, let’s dive into the recipe and create these zesty, decadent bars together.
Ingredients for Lemon Cream Cheese Bars
For the Crust:
1 ½ cups graham cracker crumbs (about 10–12 sheets, crushed)
¼ cup granulated sugar
6 tablespoons unsalted butter, melted
For the Filling:
2 (8 oz) packages cream cheese, softened to room temperature
½ cup granulated sugar
2 large eggs, room temperature
Zest and juice of 2 lemons (about ¼ cup fresh juice)
1 teaspoon vanilla extract
For the Garnish (Optional):
Powdered sugar, for dusting
Fresh berries (such as raspberries, blueberries, or sliced strawberries)
How to Make Lemon Cream Cheese Bars
Step 1: Preheat Your Oven and Prepare the Pan
The first step to making these delicious Lemon Cream Cheese Bars is to preheat your oven to 350°F (175°C). While the oven heats up, prepare your 8×8-inch baking pan. Line the pan with parchment paper, making sure there’s an overhang on the sides. This little trick makes removing the bars later so much easier! Trust me, you’ll thank yourself when it’s time to cut them into neat squares.

Step 2: Make the Graham Cracker Crust
Now, let’s get started on that buttery graham cracker crust. In a mixing bowl, combine the graham cracker crumbs with the sugar and melted butter. Stir everything together until the mixture resembles wet sand. It should be slightly sticky and crumbly, but it will hold its shape when pressed into the pan.
Next, press this graham cracker mixture firmly into the bottom of the prepared pan, ensuring it forms an even layer. You can use the back of a spoon or your hands to smooth it out. Once you’ve got it nicely packed, pop the pan into the oven and bake the crust for 8-10 minutes or until it turns a light golden brown. This step not only gives the crust a lovely crunch but also helps it hold up when you add the creamy filling. After baking, take the crust out and let it cool slightly while you prepare the filling.
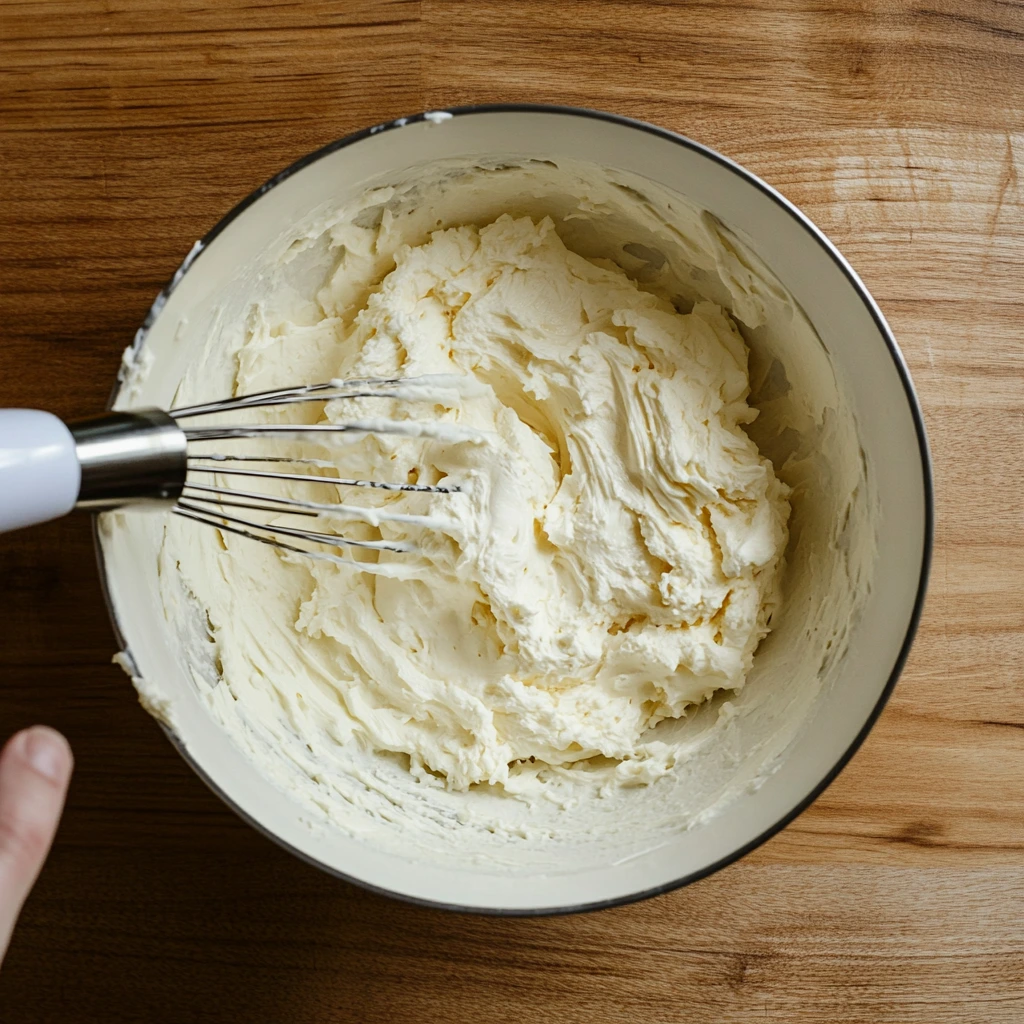
Step 3: Prepare the Cream Cheese Filling
Now for the star of the show – the creamy lemon filling! In a large mixing bowl, use a hand mixer or a stand mixer to beat together the softened cream cheese and granulated sugar. You want to beat it for about 2-3 minutes until it’s smooth and creamy.
Once your cream cheese mixture is nice and fluffy, it’s time to add the eggs. Add the eggs one at a time, beating well after each addition to ensure they’re fully incorporated. Then, add the fresh lemon zest and juice, along with the vanilla extract, and beat everything together until it’s smooth and well combined. The lemon zest and juice will give the filling that bright, citrusy flavor we’re all craving.
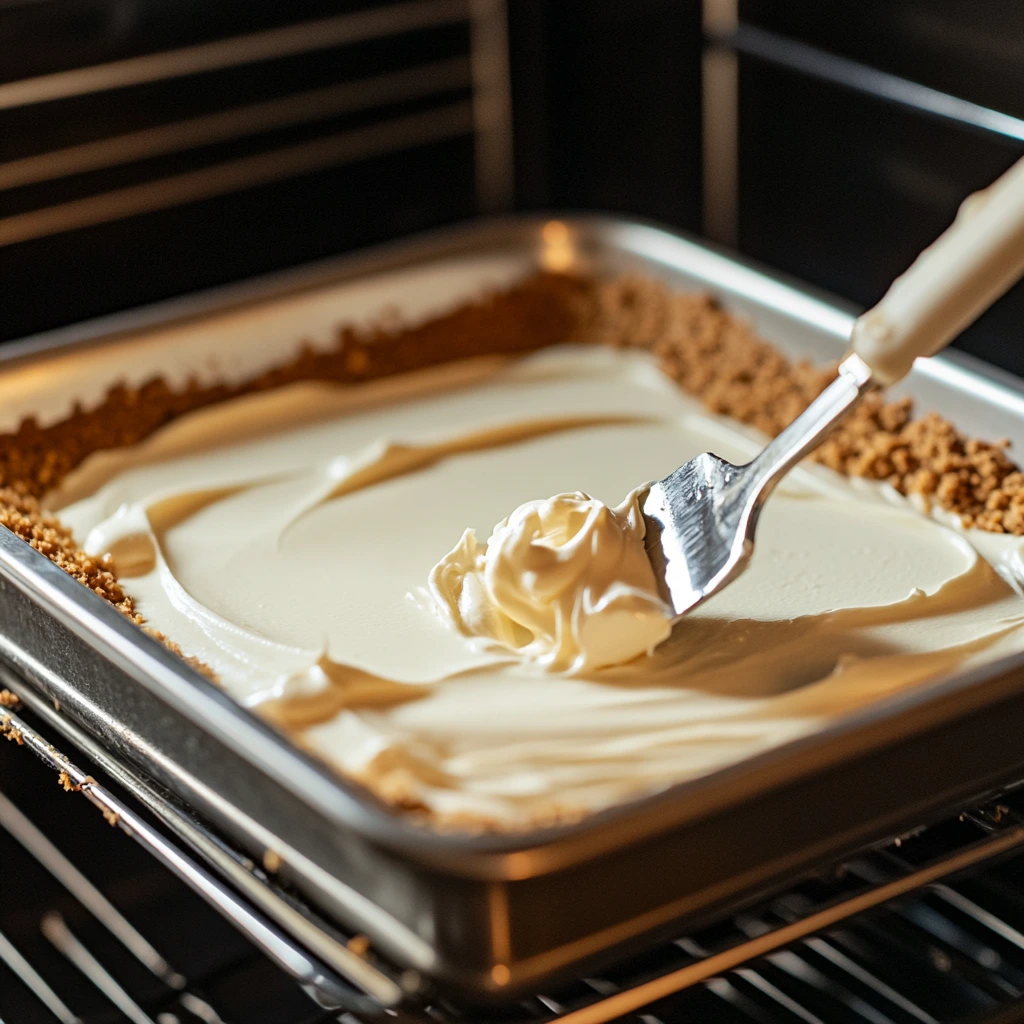
Step 4: Assemble and Bake the Bars
Pour the cream cheese filling over the cooled graham cracker crust, spreading it evenly with a spatula. Make sure the filling covers the entire surface of the crust. Place the pan back into the oven and bake for 25-30 minutes. You’ll know the bars are ready when the edges are set, and the center has a slight jiggle to it, but isn’t liquidy. This ensures that the filling is perfectly creamy and baked through.
Once the bars are done, remove them from the oven and allow them to cool completely on a wire rack. The cooling process is crucial because it helps the filling set and firms up the texture of the bars. Trust me, you don’t want to skip this step!
What Makes These Bars So Special?
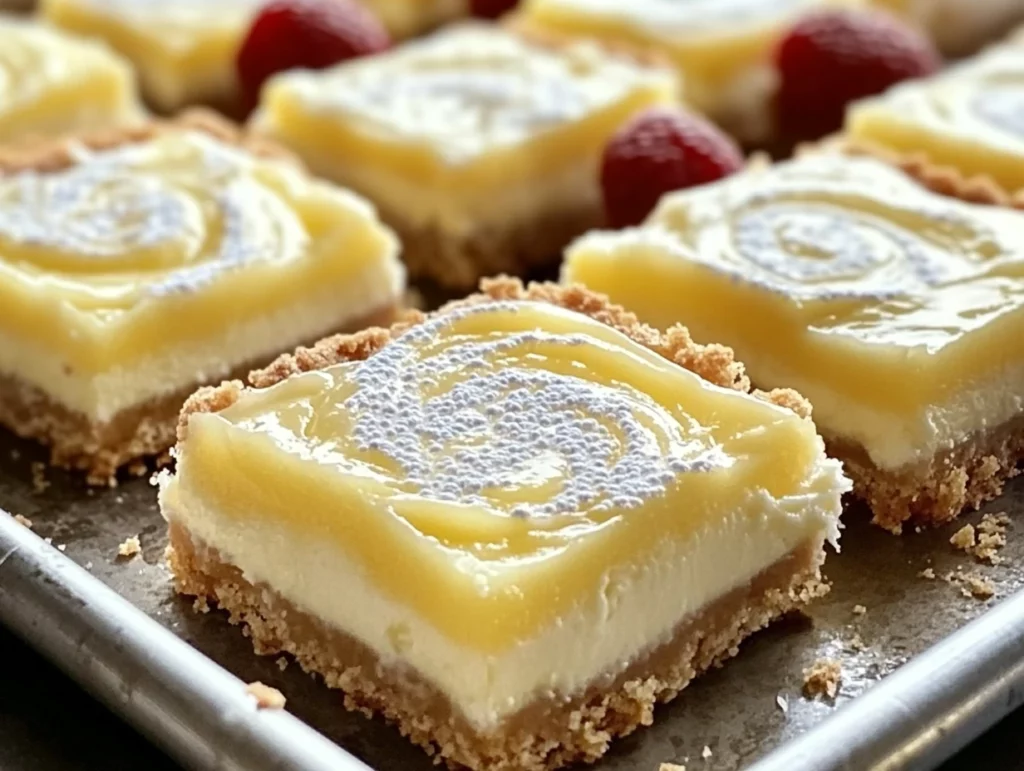
These Lemon Cream Cheese Bars aren’t just your average dessert – they are the perfect balance of sweet and tart, creamy and crunchy. The graham cracker crust adds a touch of sweetness and texture that contrasts wonderfully with the smooth, lemony filling. Plus, with the option to garnish with fresh berries and a dusting of powdered sugar, they look as impressive as they taste. Whether you’re hosting a summer barbecue or looking for a simple treat to enjoy with a cup of tea, these bars are always a hit. They’re light, refreshing, and just the right amount of indulgent – making them a go-to dessert for any occasion.
Continuing with Lemon Cream Cheese Bars: Tips, Tricks, and the Final Steps
Now that the base and filling are ready, we’re so close to tasting these delicious bars. But, before you dive into slicing them up, let’s talk about a few final steps and a couple of tips to ensure your bars turn out perfectly every time. It’s all about letting the flavors meld, setting them properly, and a few optional finishing touches that will take these bars from tasty to absolutely stunning.
Step 5: Chill and Set the Bars
Once your bars have cooled to room temperature, it’s time to give them a little chill time in the fridge. You’ll want to refrigerate them for at least 2-3 hours, or better yet, overnight. This ensures that the filling fully sets, allowing you to cut the bars into neat, clean squares. Patience is key here – I know it’s tempting to dig in right away, but letting them chill will give you the perfect texture and flavor.
Step 6: Remove the Bars from the Pan and Cut Into Squares
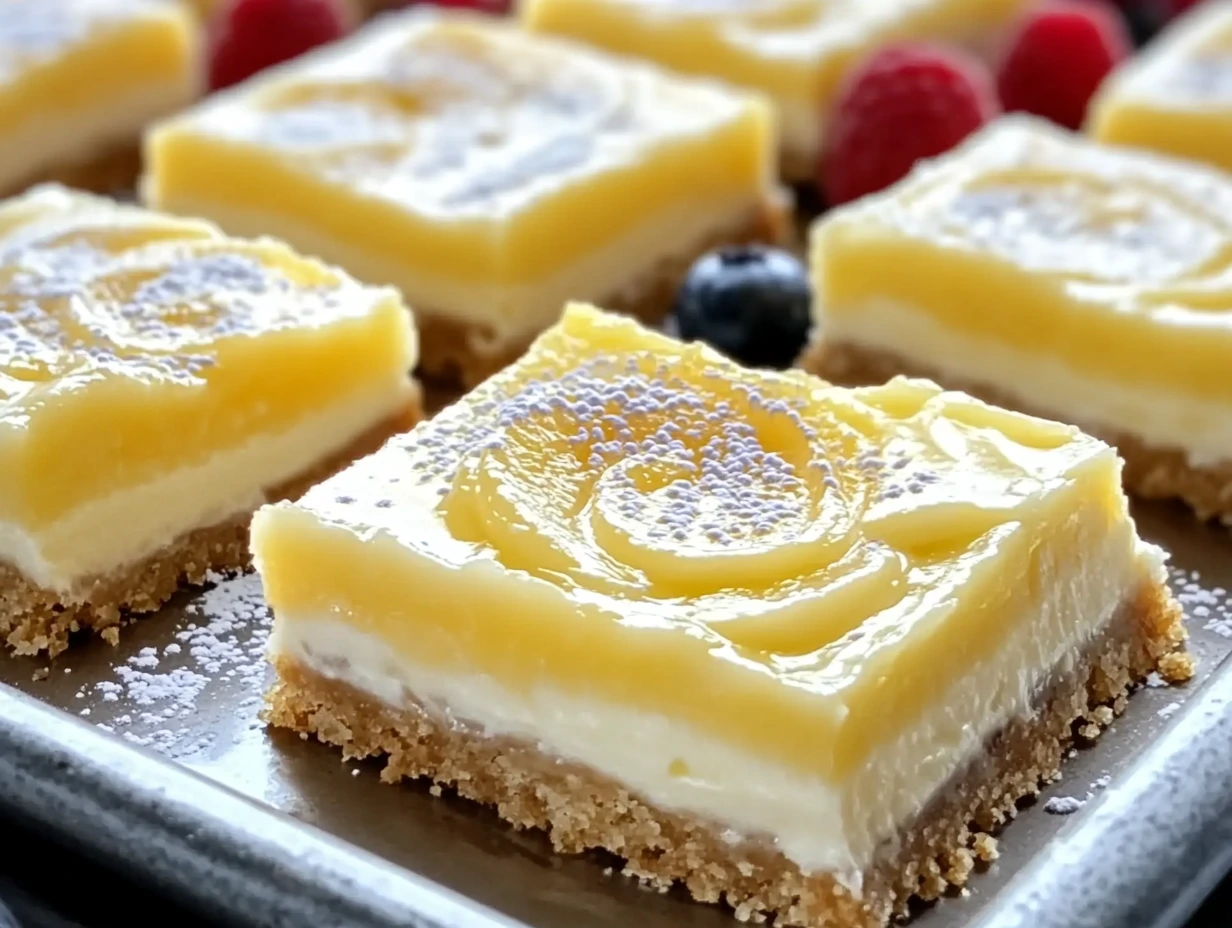
When your Lemon Cream Cheese Bars are fully chilled and ready to serve, use the parchment paper overhang to lift them out of the pan. This little trick makes it so much easier to remove the bars without making a mess. Place the block of bars on a cutting board and slice them into squares – you can make them as big or as small as you like, but I recommend a 3×3 grid for a nice bite-sized treat.
If you want your squares to look extra pretty, a sharp knife is your best friend here. Run your knife under warm water before cutting, wiping it clean between each slice, to keep your cuts neat and smooth. Trust me, your presentation will look like it came straight from a bakery.
Optional Garnish for an Extra Touch
Now that you have your perfectly set Lemon Cream Cheese Bars, you can take them to the next level with a simple garnish. A light dusting of powdered sugar gives the bars a pretty finish and adds just a hint of sweetness. Fresh berries like raspberries, blueberries, or sliced strawberries add a pop of color and a delightful contrast to the tart lemon flavor. It’s the little details that really elevate the overall experience and make these bars look as beautiful as they taste.
A Few Helpful Tips for Perfect Lemon Cream Cheese Bars
Lemon Zest and Juice: For a more intense lemon flavor, don’t be afraid to add a little extra zest and juice. I recommend starting with the amount listed in the recipe, but feel free to adjust based on your personal taste. More zest will give the bars a slightly more fragrant, citrusy punch.
Chill Time: Don’t rush the chilling process. It’s tempting, I know, but refrigerating the bars for a few hours (or overnight) is essential for getting the filling to firm up properly. Cutting them too soon might lead to a mess, so be patient!
Make-Ahead Tip: These bars are great for making ahead. In fact, they get even better after they’ve had time to rest in the fridge overnight. If you’re planning for a party or special occasion, consider making them a day in advance to save time and ensure they’re fully set.
Texture Variations: Want a slightly different texture? You can experiment with using digestive biscuits instead of graham crackers for the crust. Or, add a bit of finely chopped nuts (like almonds or pecans) to the crust for a crunchier, nuttier twist.
Pan Size: If you prefer thinner bars, you can use a 9×9-inch pan instead of an 8×8-inch pan. Just keep an eye on the baking time as the bars may cook slightly faster in a larger pan.
The Perfect Dessert for Any Occasion
What makes these Lemon Cream Cheese Bars so special is their versatility. They’re the ideal dessert for warm weather, but they’re also perfect for year-round gatherings. Whether you’re serving them at a spring picnic, a summer barbecue, or even a cozy fall dinner, they’ll never go out of style. The light lemon flavor pairs so beautifully with the creamy texture of the filling, while the graham cracker crust provides a comforting, sweet crunch. Together, they create a dessert that’s both refreshing and indulgent.
FAQ About Lemon Cream Cheese Bars: Everything You Need to Know
Before we wrap up, I know you might have a few lingering questions. No worries! I’ve gathered some of the most common questions people ask about these Lemon Cream Cheese Bars to help ensure your baking experience goes smoothly. Here’s everything you need to know to make these bars a success every time.
1. Can I make these bars ahead of time?
Absolutely! In fact, these bars are a great make-ahead dessert. You can prepare them a day in advance and store them in the refrigerator overnight. This will give them plenty of time to fully set, ensuring the best texture when you cut into them. Just be sure to keep them covered or wrapped to prevent them from absorbing any odors from the fridge.
2. Can I use a different type of crust?
Yes, you can definitely experiment with different crust options. While the graham cracker crust is traditional and offers a nice balance of sweetness and texture, you could also use crushed digestive biscuits, vanilla wafer cookies, or even shortbread cookies. Just make sure to adjust the amount of butter you add to the crumbs to ensure the crust sticks together.
3. How do I get the lemon flavor to stand out more?
If you want a more pronounced lemon flavor, there are a couple of ways to enhance it. You can add an extra tablespoon of lemon zest and juice, which will boost the citrusy taste. Another option is to use a bit of lemon extract, but be careful as a little goes a long way. Taste the filling before you bake it and adjust accordingly to get the flavor just right for your preference.
4. Can I use a different pan size?
Yes, you can! If you want slightly thinner bars, a 9×9-inch baking pan works well. Just remember that the baking time might be a little shorter in a larger pan, so keep an eye on them towards the end of the baking time. If you go with a smaller pan, the bars will be thicker, and you might need to adjust the baking time slightly longer.
5. How can I store the leftover bars?
After serving, store any leftovers in an airtight container in the refrigerator. They should stay fresh for about 3-4 days. If you want to keep them longer, you can freeze the bars. Simply cut them into squares, wrap them tightly in plastic wrap or foil, and place them in a freezer-safe container. They’ll stay good in the freezer for up to 2-3 months. When you’re ready to enjoy them, just let them thaw in the fridge or at room temperature for a few hours.
6. Can I add other fruits to the bars?
Absolutely! While fresh berries like raspberries, strawberries, and blueberries are the classic garnish for these bars, you can definitely get creative. You could add a layer of fruit puree, like raspberry or strawberry, to the filling for an extra fruity twist. Or, you could top them with thin slices of citrus fruits like oranges or even a little drizzle of honey for added sweetness.
7. What can I do if my bars are too soft after baking?
If your Lemon Cream Cheese Bars are too soft after baking, it could be due to not allowing enough chill time. Make sure you let them cool completely to room temperature before refrigerating them for at least 2-3 hours (or overnight). If they still seem too soft, you may want to bake them for a few extra minutes next time to ensure the filling is set before removing them from the oven.
Conclusion: Try These Lemon Cream Cheese Bars Today!
There you have it – the full breakdown on making the most delicious and refreshing Lemon Cream Cheese Bars. From the simple graham cracker crust to the creamy, lemony filling, these bars are a perfect balance of flavors and textures that are sure to impress. Plus, they’re so easy to make, you’ll wonder why you haven’t tried them sooner!
Whether you’re making them for a special occasion or just as a treat for yourself, these bars are a crowd-pleaser that never goes out of style. I hope you feel inspired to give them a try and experiment with your own personal touches. Maybe you’ll add more lemon zest, swap the crust, or try a new garnish – the possibilities are endless! And, of course, don’t forget to share them with friends and family, because these Lemon Cream Cheese Bars are just too good to keep to yourself.
If you’ve made these bars or plan to try them soon, I’d love to hear about your experience. Feel free to leave a comment below or share your thoughts on how you personalized the recipe. Happy baking, and enjoy every tangy, creamy bite!
Print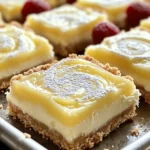
Lemon Cream Cheese Bars
- Author: Andrew Recipes
Description
These Lemon Cream Cheese Bars are the perfect balance of tangy lemon flavor and rich, creamy filling, all atop a buttery graham cracker crust. With their zesty lemon profile and smooth texture, they’re sure to be a crowd-pleaser at any gathering. Whether you serve them at a family dinner or as a sweet treat for a special occasion, they are a refreshing dessert that’s both easy to make and deliciously indulgent.
Ingredients
For the Crust:
1 ½ cups graham cracker crumbs (about 10–12 sheets, crushed)
¼ cup granulated sugar
6 tablespoons unsalted butter, melted
For the Filling:
2 (8 oz) packages cream cheese, softened to room temperature
½ cup granulated sugar
2 large eggs, room temperature
Zest and juice of 2 lemons (about ¼ cup fresh juice)
1 teaspoon vanilla extract
For Garnish (Optional):
Powdered sugar, for dusting Fresh berries (such as raspberries, blueberries, or sliced strawberries)
Instructions
Preheat Your Oven: Begin by preheating your oven to 350°F (175°C). Line an 8×8-inch baking pan with parchment paper, leaving an overhang on the sides for easy removal once the bars are set.
Make the Crust: In a mixing bowl, combine the graham cracker crumbs, sugar, and melted butter until the mixture resembles wet sand. Press this mixture firmly into the bottom of the prepared pan to form an even layer. Use the back of a spoon or your hands to smooth it out. Bake the crust in the preheated oven for 8–10 minutes or until it’s lightly golden. Once baked, remove the crust from the oven and let it cool slightly.
Prepare the Filling: In a large mixing bowl, beat the softened cream cheese and granulated sugar together until smooth and creamy, which should take about 2–3 minutes. Add the eggs one at a time, beating well after each addition. Then, mix in the lemon zest, lemon juice, and vanilla extract until everything is fully combined, resulting in a smooth, lemony filling.
Assemble and Bake: Pour the cream cheese filling over the cooled crust, spreading it evenly with a spatula. Bake in the preheated oven for 25–30 minutes, or until the edges are set and the center is slightly jiggly but not liquidy. This will ensure that the filling is perfectly baked. Remove the pan from the oven and allow the bars to cool completely on a wire rack.
Chill and Serve: Once the bars have cooled to room temperature, refrigerate them for at least 2–3 hours or until they’re fully set. Once chilled, use the parchment paper overhang to lift the bars out of the pan and place them on a cutting board. Cut into squares and garnish with a dusting of powdered sugar or fresh berries for an extra touch of color and flavor.
Notes
For a more pronounced lemon flavor, you can increase the lemon zest and juice by a tablespoon or two.
If you’re in a hurry, these bars can be made the day before and refrigerated overnight to ensure they’re fully set before serving.
The addition of fresh berries like raspberries or blueberries adds a nice contrast to the tart lemon flavor and enhances the overall presentation.
You can also use a 9×9-inch pan if you prefer slightly thinner bars, but be mindful to adjust the baking time accordingly.

