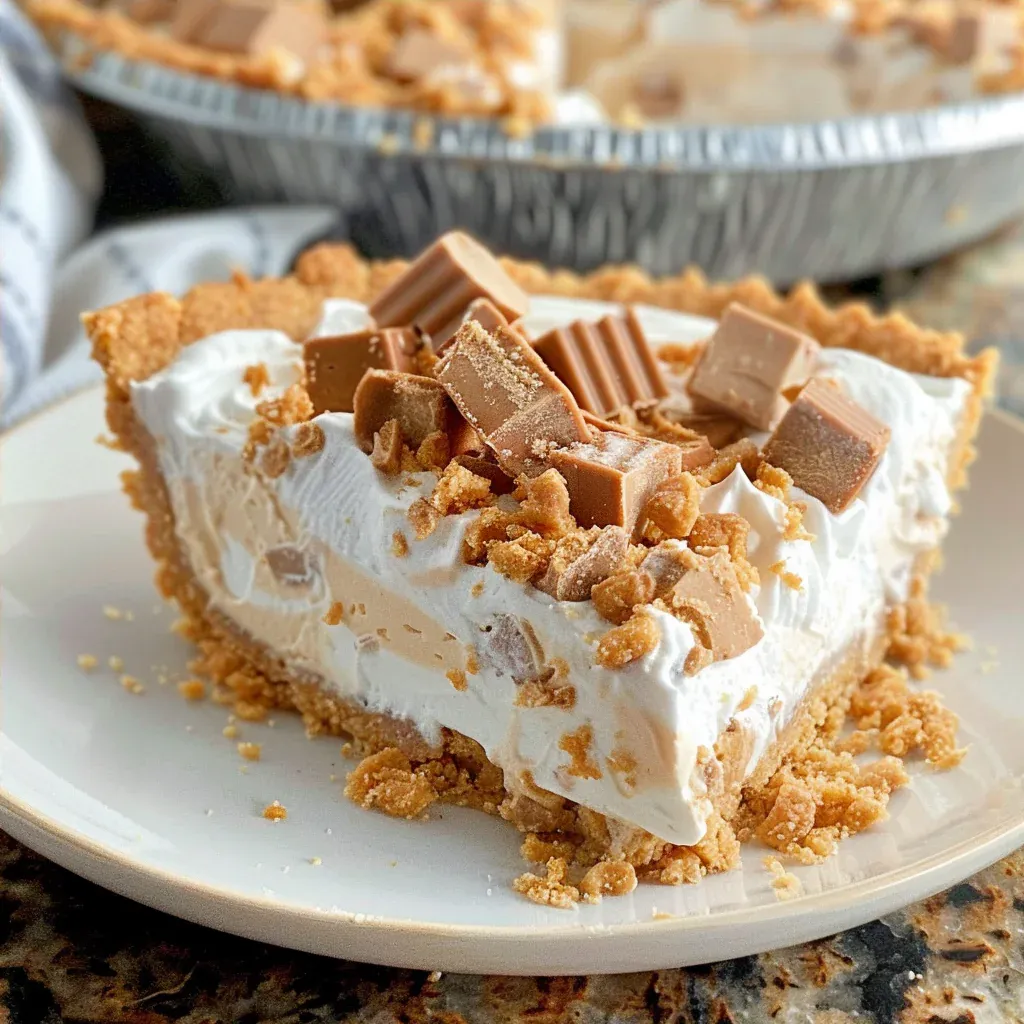
No-Bake Butterfinger Pie is a delightful dessert that captures the essence of creamy, rich flavors combined with the irresistible crunch of Butterfinger candy. Imagine a pie that requires no baking, allowing you to focus on the joy of blending flavors and textures. This pie is the perfect centerpiece for your next family gathering or holiday celebration. As you whip together the creamy peanut butter filling and fold in crushed Butterfingers, the aroma of sweet nostalgia fills your kitchen. With every spoonful, you’ll experience the smoothness of cream cheese, the richness of peanut butter, and the delightful crunch of candy that will have everyone coming back for seconds.
- Why This No-Bake Butterfinger Pie Is Worth Your Time
- Main Ingredients
- Tools Needed
- Step-by-Step Instructions
- Pro Tips for Perfect No-Bake Butterfinger Pie
- Serving Ideas and Pairings
- Variations and Swaps for No-Bake Butterfinger Pie
- Leftovers and Storage Tips
- Nutrition Notes
- Frequently Asked Questions About No-Bake Butterfinger Pie
Why This No-Bake Butterfinger Pie Is Worth Your Time
This No-Bake Butterfinger Pie is not just another dessert; it is a celebration of flavor balance and artisan craftsmanship. The creamy peanut butter filling, combined with the tang of cream cheese, creates a luscious base that is both indulgent and light. This dish stands out because it captures the essence of a classic dessert while offering the convenience of a no-bake recipe. The addition of crushed Butterfingers adds an unexpected crunch, contributing layers of texture that will delight every palate. The process itself is straightforward, making it accessible for both novice and seasoned cooks. Plus, who can resist a dessert that can be prepared in minutes and chilled to perfection? The joy of making this pie lies in the ability to create something that feels special without the need for complicated techniques or lengthy preparations.
Main Ingredients for No-Bake Butterfinger Pie
Every ingredient in this No-Bake Butterfinger Pie plays a crucial role in building the flavor profile and texture. Here’s a closer look at what you’ll need:
- 8 ounces package cream cheese: Provides a rich and creamy base for the pie. Make sure it’s softened for easy mixing.
- ¾ cup creamy peanut butter: Adds a nutty flavor and smooth texture, making the filling rich and satisfying.
- 10.2 ounces bag of fun size Butterfingers: These bring a delightful crunch and sweetness, perfectly complementing the creamy filling.
- 12 ounces whipped topping: Lightens the filling and gives it an airy texture, balancing the richness of the cream cheese and peanut butter.
- 1 pre-made graham cracker pie crust: Serves as the convenient base for the pie, providing a sweet crunch that pairs beautifully with the filling.
Tools Needed for No-Bake Butterfinger Pie
| Tool | Purpose / what it helps with |
| Mixing Bowl | For combining the cream cheese, peanut butter, and whipped topping. |
| Electric or Hand Mixer | To achieve a smooth and creamy filling by beating the ingredients together. |
| Spatula or Frosting Knife | To smooth the pie filling in the crust and spread the whipped topping evenly. |
| Measuring Cups | For accurately measuring peanut butter and whipped topping. |
| Chopping Knife | To chop the Butterfingers into smaller pieces for mixing and garnishing. |
Step-by-Step Instructions for No-Bake Butterfinger Pie
Creating this No-Bake Butterfinger Pie is a delightful journey that requires just a few simple steps. Follow along as we transform these ingredients into a creamy masterpiece.
- In a large bowl, use an electric or hand mixer to beat the cream cheese and peanut butter together until the mixture is smooth. This will create a creamy base that should be free of lumps, so take your time to mix thoroughly.
- Carefully fold in half of the whipped topping until it is just combined with the peanut butter mixture. Be gentle to preserve the light, airy texture of the whipped topping.
- Mix in half of the chopped Butterfingers into the peanut butter and cream cheese blend. This will add both texture and flavor to the filling.
- Transfer the mixture into the prepared graham cracker pie crust and smooth out the top using a spatula or frosting knife. Make sure to spread it evenly for a beautiful finish.
- Spread the remaining whipped topping over the surface of the pie filling. This will create a lovely, fluffy layer that enhances both the look and taste.
- Garnish the top of the pie with the leftover chopped Butterfingers. This not only adds flavor but also makes for an enticing presentation.
- Refrigerate the pie for 2-4 hours, or overnight, to allow it to firm up before slicing and serving. Enjoy! The longer it chills, the more the flavors meld together, creating a truly delicious dessert.
Pro Tips for Perfect No-Bake Butterfinger Pie
- Ensure your cream cheese is at room temperature for easier mixing and a smoother filling.
- Be gentle when folding in the whipped topping to maintain its light texture.
- Chop the Butterfingers into even pieces to ensure they distribute uniformly throughout the filling.
- For added flavor, consider drizzling some melted chocolate over the top before serving.
- If you prefer a richer taste, use a combination of creamy and crunchy peanut butter.
- Make sure to refrigerate the pie for at least 2 hours to allow it to set properly.
- For a fun twist, add a sprinkle of sea salt on top of the pie just before serving to enhance the flavors.
Serving Ideas and Pairings
- Serve the pie with a dollop of extra whipped topping for added creaminess.
- Pair with fresh fruit, such as strawberries or bananas, to add a refreshing contrast.
- Drizzle chocolate sauce over individual slices for a decadent touch.
- Garnish with crushed nuts, like peanuts or almonds, for added texture.
- Enjoy with a glass of cold milk or a rich cup of coffee to balance the sweetness.
Variations and Swaps for No-Bake Butterfinger Pie
Restaurant-Style Version
Elevate this pie to restaurant quality by using a homemade graham cracker crust and incorporating a layer of chocolate ganache beneath the filling for extra indulgence.
Rustic Home-Cook Version
For a more rustic feel, use crushed cookies instead of a pre-made pie crust, and simply layer the filling in individual mason jars for a fun presentation.
Make-Ahead Version
This pie can be made a day in advance, allowing the flavors to develop even more. Just be sure to cover it well to prevent any absorption of odors from the refrigerator.
Seasonal Ingredient Version
Incorporate seasonal flavors by adding a layer of pumpkin puree to the filling in the fall or fresh berries in the summer for a refreshing twist.
Leftovers and Storage Tips
- Store any leftover pie in an airtight container in the refrigerator for up to 3 days.
- To maintain the best texture, avoid freezing the pie as it may alter the creamy consistency.
- When ready to serve leftovers, allow them to sit at room temperature for about 10 minutes for easier slicing.
- For longer storage, you can freeze the filling separately and assemble it into the crust when you’re ready to serve.
Nutrition Notes
This No-Bake Butterfinger Pie is a treat that balances indulgence with enjoyment. While the exact nutritional values will depend on serving sizes, it is important to note that this dessert is rich and can be enjoyed in moderation. You can adjust the macronutrient content by using reduced-fat cream cheese and a lighter whipped topping without sacrificing flavor. Additionally, consider serving smaller portions alongside a fresh fruit salad for a more balanced dessert option.
Frequently Asked Questions About No-Bake Butterfinger Pie
Can I use different candy in this No-Bake Butterfinger Pie?
Absolutely! You can substitute Butterfingers with any crushed candy bar of your choice, such as Snickers or Reese’s, to give it your own twist.
How long does the No-Bake Butterfinger Pie need to chill?
For the best results, refrigerate the pie for at least 2-4 hours, or even overnight, to allow it to firm up properly.
Can I make this No-Bake Butterfinger Pie ahead of time?
Yes, this pie is perfect for making ahead of time, just be sure to store it in the refrigerator until you are ready to serve.
What can I serve with No-Bake Butterfinger Pie?
This pie pairs wonderfully with coffee, cold milk, or fresh fruit. You can also add extra toppings like chocolate sauce or nuts.
Is No-Bake Butterfinger Pie suitable for parties?
Absolutely! This pie is a crowd-pleaser and is perfect for gatherings, as it’s easy to make and doesn’t require baking.
Now that you’ve discovered the art of creating No-Bake Butterfinger Pie, it’s time to roll up your sleeves and bring this creamy delight to life in your kitchen. Embrace the joy of artisan cooking as you blend flavors and textures, making memories with every slice. Enjoy the process, and savor the delicious results of your efforts!

No-Bake Butterfinger Pie Delight
- Total Time: 45 minutes
- Yield: 4 servings 1x
Description
This irresistible no-bake butterfinger pie delight is the perfect way to end any meal. Made with package cream cheese, ¾ cup creamy peanut butter, and bag of fun size butterfingers, it’s a sweet treat that will satisfy any dessert craving.
Ingredients
- 8 ounces package cream cheese
- ¾ cup creamy peanut butter
- 10.2 ounces bag of fun size Butterfingers
- 12 ounces whipped topping
- 1 pre-made graham cracker pie crust
Instructions
- In a large bowl, use an electric or hand mixer to beat the cream cheese and peanut butter together until the mixture is smooth.
- Carefully fold in half of the whipped topping until it is just combined with the peanut butter mixture.
- Mix in half of the chopped Butterfingers into the peanut butter and cream cheese blend.
- Transfer the mixture into the prepared graham cracker pie crust and smooth out the top using a spatula or frosting knife.
- Spread the remaining whipped topping over the surface of the pie filling.
- Garnish the top of the pie with the leftover chopped Butterfingers.
- Refrigerate the pie for 2-4 hours, or overnight, to allow it to firm up before slicing and serving. Enjoy!
- Prep Time: 15 minutes
- Cook Time: 30 minutes

