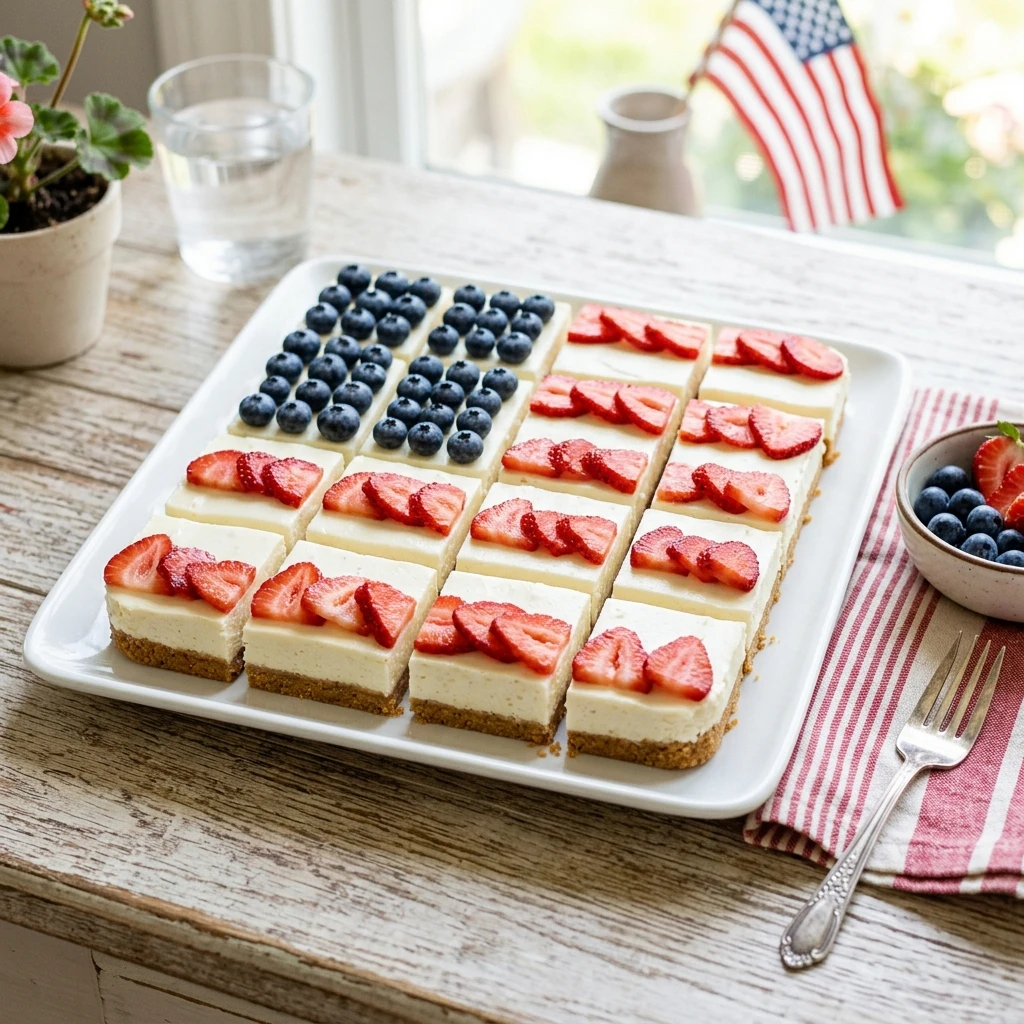
No-Bake Flag Cheesecake Bars are a delightful treat that perfectly capture the spirit of summer celebrations. Imagine a creamy cheesecake filling sitting atop a buttery crust, adorned with vibrant blueberries and strawberries arranged like an American flag. The look is stunning, the aroma is inviting, and the taste is a symphony of flavors that dance in your mouth. These bars are not only eye-catching but also simple to make without ever turning on the oven. They’re ideal for a Sunday family gathering, a picnic, or any festive occasion, making them a must-try recipe for anyone who loves artisan desserts.
- Why This No-Bake Flag Cheesecake Bars Is Worth Your Time
- Main Ingredients for No-Bake Flag Cheesecake Bars
- Tools Needed for No-Bake Flag Cheesecake Bars
- Step-by-Step Instructions for No-Bake Flag Cheesecake Bars
- Pro Tips for Perfect No-Bake Flag Cheesecake Bars
- Serving Ideas and Pairings
- Variations and Swaps for No-Bake Flag Cheesecake Bars
- Leftovers and Storage Tips
- Nutrition Notes
- Frequently Asked Questions About No-Bake Flag Cheesecake Bars
Why This No-Bake Flag Cheesecake Bars Is Worth Your Time
Creating No-Bake Flag Cheesecake Bars is not just about assembling ingredients; it’s an art form that celebrates flavor and presentation. The creamy cheesecake filling provides a rich, velvety texture that contrasts beautifully with the crispness of the buttery graham cracker crust. Each bite is a balance of sweetness from the strawberries and a hint of tartness from the blueberries. This dessert stands out because it embodies craftsmanship through the careful arrangement of fresh fruit, transforming a classic cheesecake into a patriotic masterpiece. Plus, the no-bake aspect allows you to enjoy this treat without the heat of the oven, making it perfect for warm summer days.
Main Ingredients for No-Bake Flag Cheesecake Bars
To craft the perfect No-Bake Flag Cheesecake Bars, you’ll want to ensure that you have the right ingredients. Each component plays a vital role in achieving the desired flavor and texture.
- 2 cups graham cracker crumbs: These provide the base for the crust, offering a sweet and crunchy texture.
- 1/2 cup unsalted butter, melted: This binds the crumbs together and gives the crust its rich flavor.
- 1/4 cup granulated sugar: A touch of sweetness that balances the flavors in the crust.
- 16 oz cream cheese, softened: The star of the cheesecake filling, it creates a creamy, luscious texture.
- 1 cup powdered sugar: Sweetens the filling while ensuring a smooth consistency.
- 1 tsp vanilla extract: Enhances the overall flavor with a hint of warmth.
- 1 cup heavy whipping cream: Adds lightness and airiness to the cheesecake filling.
- 1 cup blueberries: Used for the blue field of the flag, they add a burst of flavor and color.
- 1 cup strawberries, sliced: These create the red stripes, providing freshness and sweetness.
Tools Needed for No-Bake Flag Cheesecake Bars
| Tool | Purpose / what it helps with |
| 9×13 inch pan | Holds the cheesecake bars during assembly and refrigeration. |
| Mixing bowls | Used for combining the crust and filling ingredients. |
| Electric mixer | Aids in beating the cream cheese and whipping the heavy cream to the right consistency. |
| Spatula | Helps in folding the whipped cream into the cream cheese mixture and spreading the filling evenly. |
| Measuring cups and spoons | Ensures accurate measurements of all ingredients for consistent results. |
| Knife | Used to slice the strawberries and cut the bars for serving. |
Step-by-Step Instructions for No-Bake Flag Cheesecake Bars
Making No-Bake Flag Cheesecake Bars is a straightforward process that involves preparing the crust, making the filling, and assembling the dessert. Here’s how to do it:
- In a bowl, combine the graham cracker crumbs, melted butter, and granulated sugar. Press the mixture firmly into the bottom of a 9×13 inch pan to create the crust. Make sure it’s evenly distributed to form a solid base.
- In a large mixing bowl, beat the softened cream cheese, powdered sugar, and vanilla extract until the mixture is smooth and creamy. This step is crucial for achieving a lump-free filling.
- In a separate bowl, whip the heavy cream until stiff peaks form. This indicates that the cream is aerated enough. Then, gently fold the whipped cream into the cream cheese mixture until well combined. Be careful not to deflate the whipped cream.
- Spread the cheesecake mixture evenly over the crust in the pan. Use a spatula to ensure an even layer, which will help with presentation.
- Arrange the blueberries in the top left corner to represent the blue field of the flag. The blueberries should be placed closely together for a cohesive look.
- Place the sliced strawberries in rows to create the red stripes of the flag. Alternate the rows to achieve a striking visual effect.
- Refrigerate for at least 4 hours or until the cheesecake is set. This step is essential to allow the flavors to meld and the texture to firm up.
- Cut into bars and serve chilled. Enjoy the refreshing taste of your labor as you share these bars with family and friends.
Pro Tips for Perfect No-Bake Flag Cheesecake Bars
- Ensure the cream cheese is at room temperature for easier blending and to avoid lumps in your filling.
- When whipping the cream, stop as soon as stiff peaks form to prevent it from turning into butter.
- Use a spatula to spread the filling evenly over the crust, which helps in achieving a polished look.
- For a cleaner cut, run your knife under hot water before slicing the bars.
- Chill the bars overnight if possible; this allows the flavors to develop more fully.
- Experiment with other fruits, such as raspberries or kiwi, for different flavor combinations.
Serving Ideas and Pairings
- Pair with a refreshing glass of lemonade or iced tea to complement the dessert.
- Serve alongside a scoop of vanilla ice cream for an extra indulgent treat.
- Garnish with a sprig of mint for a pop of color and added freshness.
- Offer additional berries on the side for those who want a little extra fruit.
- Consider drizzling a raspberry sauce for a tangy contrast to the sweetness of the cheesecake.
Variations and Swaps for No-Bake Flag Cheesecake Bars
Restaurant-Style Version
For a more sophisticated touch, add a layer of chocolate ganache on top of the cheesecake filling before adding the fruit. This adds richness and a luxurious texture.
Rustic Home-Cook Version
Incorporate crushed nuts into the graham cracker crust for added flavor and texture. Almonds or pecans work particularly well.
Make-Ahead Version
Prepare the bars a day in advance and store them in the refrigerator. This allows the flavors to meld and makes for an easy, stress-free serving on the day of your event.
Seasonal Ingredient Version
Change the fruit toppings based on the season. For fall, consider using apples and pears, while in winter, pomegranates can add a festive touch.
Leftovers and Storage Tips
- Store leftovers in an airtight container in the refrigerator for up to 3 days.
- To maintain quality, avoid freezing the cheesecake bars, as the texture may change once thawed.
- For best results, consume within a few days for optimal freshness.
- If you have leftover fruit, consider serving it over yogurt or oatmeal for a delicious breakfast.
Nutrition Notes
Each serving of No-Bake Flag Cheesecake Bars contains approximately 300 calories, with a balance of carbohydrates, fats, and proteins. If you’re looking to adjust for dietary preferences, consider using reduced-fat cream cheese or a gluten-free graham cracker alternative. Remember that while these adjustments may affect the flavor and texture slightly, the artisan quality of the dessert can still shine through.
Frequently Asked Questions About No-Bake Flag Cheesecake Bars
How do I make No-Bake Flag Cheesecake Bars more flavorful?
Add a bit of lemon zest or a splash of lemon juice to the cream cheese mixture for a refreshing tang that enhances the overall flavor.
Can I use different fruits for the flag design?
Absolutely! Feel free to swap in other berries or even tropical fruits like mango for a unique twist on the traditional flag design.
What is the best way to cut No-Bake Flag Cheesecake Bars?
Run a knife under hot water before cutting, cleaning it between cuts to maintain clean edges and a beautiful presentation.
How long do No-Bake Flag Cheesecake Bars last?
These bars can be stored in the refrigerator for up to 3 days, but they are best enjoyed fresh.
Can I make No-Bake Flag Cheesecake Bars ahead of time?
Yes! These bars are perfect for making ahead, allowing you to prepare them a day in advance for a hassle-free serving option.
Now that you have all the secrets to creating stunning No-Bake Flag Cheesecake Bars, I encourage you to gather your ingredients and start crafting this beautiful dessert. Each bar is a celebration of craftsmanship and quality ingredients, bringing joy to every gathering. Enjoy the process and delight in the artisan joy of cooking.
No-Bake Flag Cheesecake Bars
Ingredients
Method
- In a bowl, combine the graham cracker crumbs, melted butter, and granulated sugar. Press the mixture firmly into the bottom of a 9×13 inch pan to create the crust.
- In a large mixing bowl, beat the softened cream cheese, powdered sugar, and vanilla extract until the mixture is smooth and creamy.
- In a separate bowl, whip the heavy cream until stiff peaks form, then gently fold the whipped cream into the cream cheese mixture until well combined.
- Spread the cheesecake mixture evenly over the crust in the pan.
- Arrange the blueberries in the top left corner to represent the blue field of the flag.
- Place the sliced strawberries in rows to create the red stripes of the flag.
- Refrigerate for at least 4 hours or until the cheesecake is set.
- Cut into bars and serve chilled.

