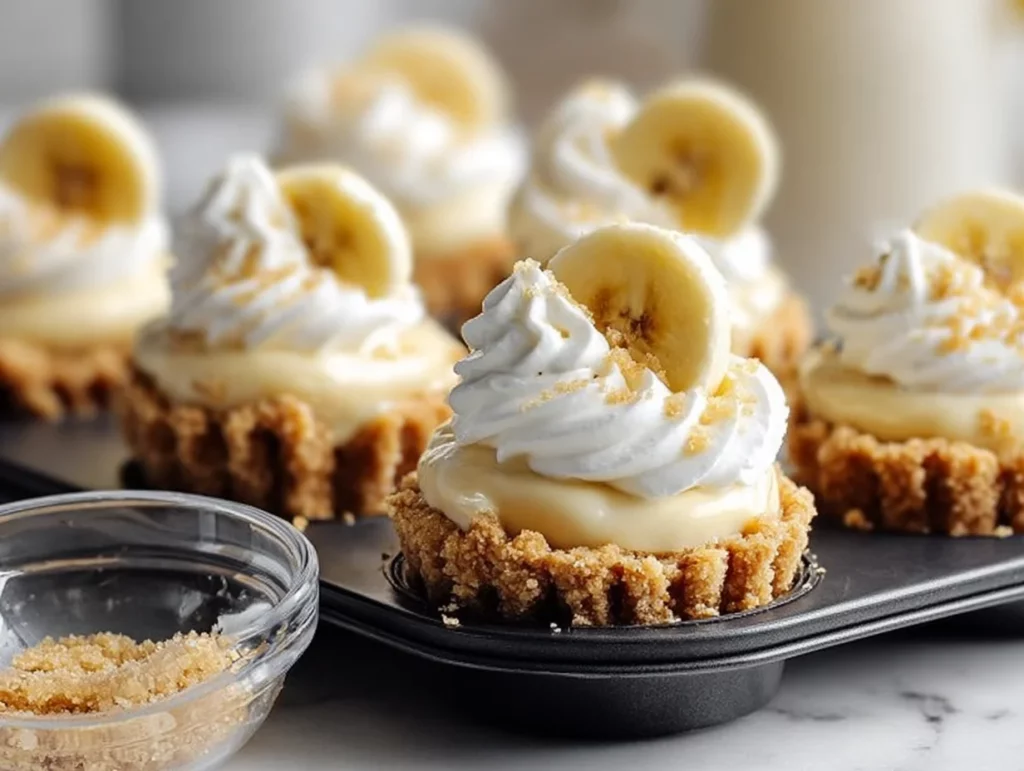
If there’s one dessert that always brings back nostalgic memories and instantly earns a place on any party table, it’s banana cream pie. But what if I told you there’s an easier, cuter, and totally oven-free version of that beloved classic? These No-Bake Mini Banana Cream Pies are everything you love about the traditional dessert — creamy filling, fresh banana slices, fluffy whipped topping — but in a bite-sized, no-fuss form.
Perfect for parties, showers, potlucks, or even a quick weeknight treat, these mini pies come together in minutes and chill beautifully. They’re light, sweet, and full of that homemade flavor without the need for baking or complicated steps.
Growing up, banana cream pie was always one of those “special occasion” desserts in our house. My mom would bake the crust, make the pudding from scratch, and layer everything with such care. As much as I loved the end result, it felt like a full-day project. So, when I discovered a no-bake version that still delivered all the flavor with a fraction of the work — I knew it was a winner. And the fact that they’re mini? Even better! Who doesn’t love their own personal pie?
Let’s dive into how to make these adorable no-bake banana cream pies. Trust me — once you try them, they’ll be on repeat in your kitchen.
Ingredients You’ll Need
For the crust:
1 cup graham cracker crumbs
3 tablespoons melted butter
2 tablespoons granulated sugar
For the filling:
1 box (3.4 oz) instant vanilla pudding mix
1 1/4 cups cold milk
1/2 cup whipped topping or whipped cream
1 to 2 ripe bananas, sliced
For topping:
Whipped cream or whipped topping
Extra banana slices for garnish (optional)
Tip: Be sure to use ripe bananas with a few freckles — they’ll be sweet and tender without being mushy.
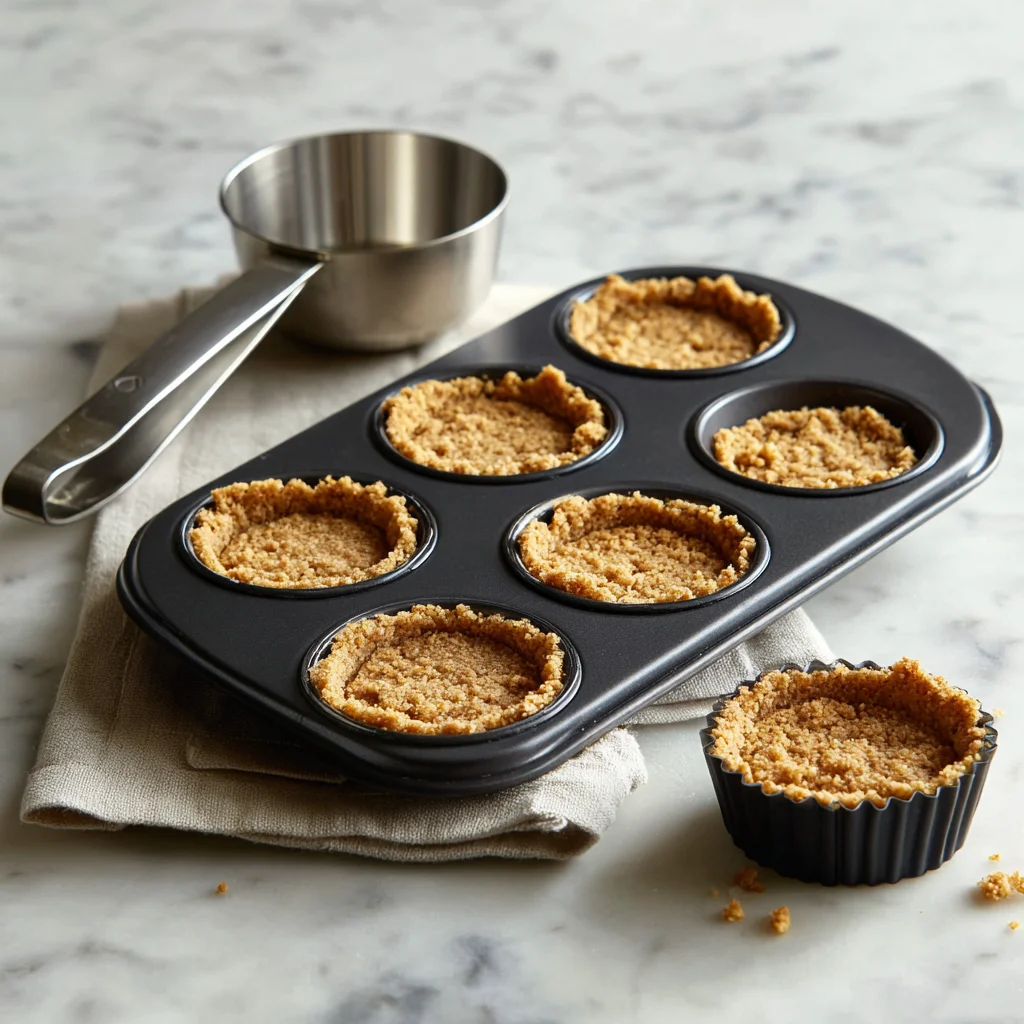
STEP 1: Make the Graham Cracker Crust
Let’s start with the base. In a medium mixing bowl, combine the graham cracker crumbs, melted butter, and granulated sugar. Use a spoon or fork to mix everything together until the texture resembles wet sand. You want the crumbs to be evenly moistened so they pack down well.
Now, take a mini muffin pan or small clear dessert cups (I love using those when I want the layers to show), and press about a tablespoon of the crumb mixture into the bottom of each cavity. Press firmly using your fingers or the back of a spoon so the crust holds together.
Pop the crusts into the fridge to chill while you move on to the next step. Just 10-15 minutes in the fridge will help them firm up enough to hold the filling.

STEP 2: Prepare the Creamy Vanilla Filling
While the crusts are chilling, let’s whip up the easiest banana cream pie filling ever. In a clean mixing bowl, whisk together the instant vanilla pudding mix and cold milk. It’s important that the milk is cold so the pudding sets up properly. Whisk for about 2 minutes, or until the mixture thickens.
Once the pudding has thickened, gently fold in the whipped topping or whipped cream. Use a rubber spatula and take your time folding — you want the mixture to be light and airy, not overmixed. This gives the filling that dreamy, mousse-like texture.
And just like that, your filling is done! No stovetop, no fuss.
STEP 3: Layer with Fresh Bananas and Filling
Now it’s time to assemble your mini pies. Take the crusts out of the fridge and place a few banana slices over each crust. I like to use about 2-3 thin slices per mini pie. If you’re prepping these a little ahead of time, you can brush the banana slices with a touch of lemon juice to keep them from browning — totally optional, but helpful if you’re making them for a party.
Next, spoon or pipe the pudding mixture on top of the bananas, filling each mini pie to the top. If you’re feeling a little fancy, piping the filling with a large star tip gives them a pretty, bakery-style finish — but a spoon works just as well.
Topping, Chilling & Helpful Tips
We’ve already layered the graham cracker crust, added fresh banana slices, and filled each mini pie with that creamy vanilla pudding mixture. Can you believe how quick and easy it is? Now it’s time to top things off and get these little treats ready to wow your guests—or just yourself if you’re keeping them all at home (no judgment here!).
What I love most about these no-bake mini banana cream pies is that they look fancy, but they’re incredibly easy to pull together. Even better, they can be made ahead of time, which takes a lot of the stress out of entertaining. Let’s finish assembling and talk about some simple ways to customize or store your pies.
![]()
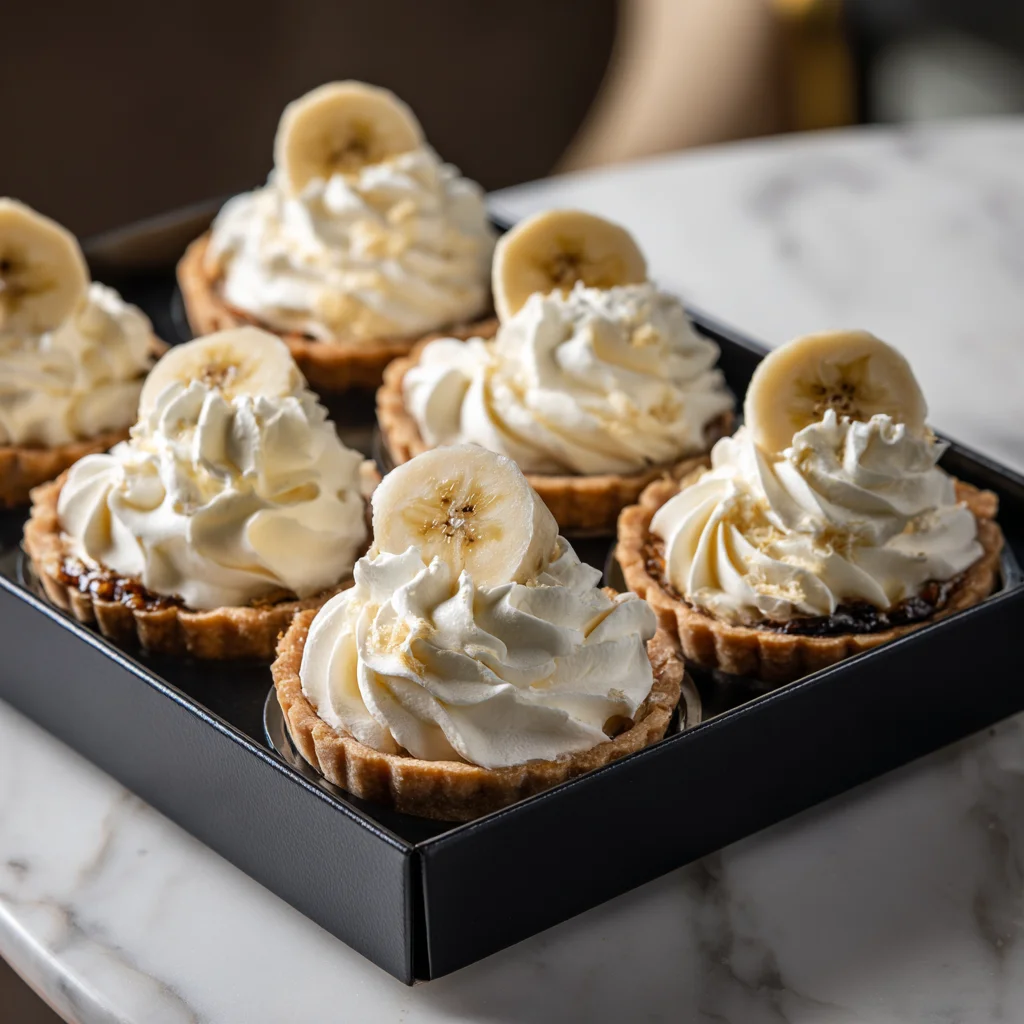
STEP 4: Top with Whipped Cream and Garnish
Once your mini pies are filled, it’s time for the finishing touch: whipped cream. A generous dollop on top makes them look polished and adds that light, creamy texture that balances the sweetness of the filling and bananas.
You can either spoon the whipped cream on top or pipe it using a pastry bag and tip for a more decorative touch. I like to use a star tip to create a swirl on top of each mini pie—it’s a small detail that really makes them pop on a serving tray.
If you’re feeling extra fancy (or just want to impress your guests), add a thin banana slice on top of the whipped cream. This is totally optional, but it gives a nice hint at what’s inside and adds a fresh look.
Optional Tip: If you’re making these for a party and want them to stay pretty, you can lightly dip the banana slices for garnish in lemon juice to keep them from browning. Just don’t use too much or the tartness might come through.
STEP 5: Chill Until Set
Now that your mini banana cream pies are fully assembled and looking gorgeous, all that’s left is a little chill time. Place the pies in the refrigerator for at least one hour before serving. This allows the pudding to firm up and the flavors to meld together.
They’re great served cold and even better when they’ve had a chance to set. I recommend storing them in the fridge until just before serving so they stay nice and fresh.
Storage Tip: These mini pies are best enjoyed the same day, especially for peak freshness with the banana slices. However, if you’re prepping ahead, they’ll keep well in the fridge for up to 2 days. Just keep them covered to prevent the whipped topping from drying out.
TIPS FOR SUCCESS
Even though this recipe is super simple, a few quick tips will make your mini banana cream pies look and taste their best every time:
Use ripe but firm bananas. You want them sweet and flavorful without being mushy. Look for bananas that are yellow with a few brown specks.
Stick with instant pudding mix. This recipe was written for instant pudding, not cook-and-serve. It sets up quickly and keeps the recipe no-bake and fuss-free.
Chill the crust before adding filling. This helps the crust firm up and makes it easier to layer with bananas and pudding.
Use clear dessert cups if serving for events. If you want to show off the pretty layers—especially for parties—clear plastic mini cups are a great choice.
Don’t skip the chill time. Even though the pudding thickens quickly, that extra hour in the fridge really helps everything set up nicely and gives the best texture.
VARIATIONS TO TRY
This basic recipe is super versatile, and you can totally make it your own! Here are a few fun ideas if you want to mix it up:
Chocolate Banana Cream: Swap vanilla pudding for instant chocolate pudding for a rich twist.
Banana Coconut Cream: Add a little coconut extract to the pudding and top with toasted coconut for a tropical flair.
Crust Swap: Use crushed vanilla wafers or chocolate cookie crumbs instead of graham crackers for a different base flavor.
Mini Tart Shells: Don’t feel like making your own crust? Use pre-made mini tart shells or phyllo cups for an easy shortcut.
Banana Split Style: Drizzle a little chocolate sauce or caramel over the whipped cream for extra indulgence.
FAQs & Final Thoughts
By now, your No-Bake Mini Banana Cream Pies should be chilling in the fridge, looking absolutely irresistible. Whether you’re serving them at a party, taking them to a potluck, or keeping them all to yourself (we’ve all been there), these little bites of banana cream bliss are sure to be a hit.
Before we wrap things up, let’s go over some of the most frequently asked questions about making these mini pies—because when it comes to dessert, a little troubleshooting and extra info can go a long way.

FREQUENTLY ASKED QUESTIONS
1. Can I use homemade whipped cream instead of store-bought topping?
Absolutely! If you prefer homemade whipped cream, go for it. Just make sure it’s whipped to stiff peaks so it holds its shape when folded into the pudding and used as a topping.
2. What kind of milk should I use with the pudding mix?
Whole milk or 2% milk works best with instant pudding mix for a thicker, creamier texture. Skim milk can result in a thinner consistency, and plant-based milks may not set properly unless specifically formulated for use with instant puddings.
3. How can I keep the bananas from browning?
To prevent browning, lightly brush banana slices with lemon juice before layering them into the pies. Just a small amount does the trick without adding too much tartness.
4. Can I make these mini pies the night before?
Yes, you can! Just assemble them completely and cover tightly before refrigerating. They’ll hold up well overnight. For best presentation, add the banana garnish on top just before serving.
5. Do I have to use a mini muffin pan?
Not at all. These pies can be assembled in mini dessert cups, small ramekins, or even regular muffin pans (just increase the crust and filling amounts slightly). Using clear cups is great for presentation, especially for events.
6. Can I freeze these mini banana cream pies?
Freezing isn’t recommended. The pudding and bananas don’t thaw well and can become watery or mushy. These are best enjoyed fresh or within 1–2 days of making.
7. Can I use a different flavor of pudding?
Definitely! While vanilla is classic, feel free to use chocolate, banana cream, or even butterscotch pudding for a fun twist. Just keep in mind that the overall flavor will change depending on the pudding you choose.
FINAL THOUGHTS
There’s something so comforting about banana cream pie, and when you turn that into a no-bake, bite-sized dessert? It’s a total game changer. These No-Bake Mini Banana Cream Pies are perfect for when you want something easy, make-ahead friendly, and totally crowd-pleasing.
Whether you’re prepping them for a holiday dessert tray, a backyard barbecue, or just because you’re in the mood for something sweet without turning on the oven, these mini pies are always a good idea. I love how versatile they are too—you can customize the crust, the pudding, and even add toppings to match the season or event.
So next time you need a quick dessert that looks like it took a lot more effort than it did, give these a try. And if you do, I’d love to hear how they turned out! Leave a comment, share your own twists, or let me know what event you served them at.
Print
No-Bake Mini Banana Cream Pies
- Author: Andrew Recipes
Description
These No-Bake Mini Banana Cream Pies are the perfect bite-sized dessert for any occasion. With a buttery graham cracker crust, a smooth vanilla pudding filling, and fresh banana slices, each mini pie is topped with a dollop of whipped cream for a deliciously creamy finish. They’re easy to assemble, require no oven time, and are a great make-ahead treat for parties, picnics, or just a sweet craving at home.
Ingredients
For the crust:
1 cup graham cracker crumbs
3 tablespoons melted butter
2 tablespoons granulated sugar
For the filling:
1 box (3.4 oz) instant vanilla pudding mix
1 1/4 cups cold milk
1/2 cup whipped topping or whipped cream
1 to 2 ripe bananas, sliced
For topping:
Whipped cream or whipped topping
Extra banana slices for garnish (optional)
Instructions
In a bowl, combine graham cracker crumbs, melted butter, and sugar until the texture resembles wet sand. Press the mixture firmly into the bottoms of a mini muffin pan or small dessert cups to form the crust. Place in the refrigerator to chill while preparing the filling.
In a separate bowl, whisk the instant vanilla pudding mix with cold milk until it thickens, about 2 minutes. Gently fold in the whipped topping until smooth and combined.
Remove the crusts from the fridge. Place a few banana slices over each crust, then spoon or pipe the pudding mixture on top, filling each mini pie.
Top each mini pie with a dollop of whipped cream and garnish with a banana slice if desired.
Refrigerate the mini pies for at least 1 hour before serving to allow them to set properly.
Notes
Make sure the bananas are just ripe for best flavor and texture. To prevent browning, you can brush the banana slices with a little lemon juice before assembling. These mini pies are best enjoyed the same day but can be stored in the fridge for up to 2 days. Use clear mini cups if serving for parties to show off the pretty layers.

